First boat repairs - sea nymph v146

Page  12>
Post Options Post Options   Likes (0) Likes(0)   Quote Primer Quote  Post ReplyReply Direct Link To This Post Topic: First boat repairs - sea nymph v146
    Posted: 09 Aug 2024 at 6:57pm
Primer View Drop Down
Bronze
Bronze


Joined: 09 Aug 2024
Status: Offline
Points: 17
Hi all,

After reading on this forum for a bit I've brought my first boat. This is my first foray into boating and fishing. It was cheap and cheap for a reason. I've got the steering/controls and engine side of things coming together, the electrical appears to generally work but needs further investigation for anything that looks like it may fail. The hull is where I'm up to now and would appreciate some direction on what I would consider minor bumps and scrapes (lots of them) to the hull.

What I'm wanting to do get the boat on the water without causing further water damage to the hull. The purpose of this for evaluating the boat to see if it works for me and how much time and effort I want to put in to making it all tidy and nice again. Also the weather isn't great for proper repairs (temperature and rain) at this time of year. I will be doing the repairs outside when I have a few spare hours and its not raining.

From what I've read a quick fix would be "to seal the area grind out, find out if structural, fill with glass and resin..a little resin rich.. then roughly grind the high points off to general shape" (courtesy of steps 2016)

Could I get a away with a few thick layers of gel coat without the grinding out and filling with glass and resin? Perhaps using a small radiant heater to help with the curing? It would only need to last 3 - 6 months before being attacked properly.

I'm thinking 2 layers of gel coat with out wax and then one final with wax.

P.S trying to figure out how to load pics
Back to Top
Post Options Post Options   Likes (0) Likes(0)   Quote Primer Quote  Post ReplyReply Direct Link To This Post Posted: 09 Aug 2024 at 7:19pm
Primer View Drop Down
Bronze
Bronze


Joined: 09 Aug 2024
Status: Offline
Points: 17
Back to Top
Post Options Post Options   Likes (0) Likes(0)   Quote Primer Quote  Post ReplyReply Direct Link To This Post Posted: 09 Aug 2024 at 7:20pm
Primer View Drop Down
Bronze
Bronze


Joined: 09 Aug 2024
Status: Offline
Points: 17
Back to Top
Post Options Post Options   Likes (0) Likes(0)   Quote Primer Quote  Post ReplyReply Direct Link To This Post Posted: 09 Aug 2024 at 7:20pm
Primer View Drop Down
Bronze
Bronze


Joined: 09 Aug 2024
Status: Offline
Points: 17
Back to Top
Post Options Post Options   Likes (0) Likes(0)   Quote Primer Quote  Post ReplyReply Direct Link To This Post Posted: 09 Aug 2024 at 7:21pm
Primer View Drop Down
Bronze
Bronze


Joined: 09 Aug 2024
Status: Offline
Points: 17
Back to Top
Post Options Post Options   Likes (0) Likes(0)   Quote Primer Quote  Post ReplyReply Direct Link To This Post Posted: 09 Aug 2024 at 7:22pm
Primer View Drop Down
Bronze
Bronze


Joined: 09 Aug 2024
Status: Offline
Points: 17
Back to Top
Post Options Post Options   Likes (0) Likes(0)   Quote Pcj Quote  Post ReplyReply Direct Link To This Post Posted: 09 Aug 2024 at 8:15pm
Pcj View Drop Down
Titanium
Titanium
Avatar

Joined: 27 Nov 2019
Location: papakura
Status: Offline
Points: 4106
Gel coat will do nil.really need to get 2 pack resin/hardner with some micro balloons..Easy to mix and sand.First will be to sand/ grind until you get clean looking glass.Over fill then sand .Mixing gel coat colour can be tricky. Depending on your location.there is a fibreglass supply shop in panmure AK who have the gear and advice.did this exercise last yr
"Times up"
Back to Top
Post Options Post Options   Likes (0) Likes(0)   Quote Pcj Quote  Post ReplyReply Direct Link To This Post Posted: 09 Aug 2024 at 8:21pm
Pcj View Drop Down
Titanium
Titanium
Avatar

Joined: 27 Nov 2019
Location: papakura
Status: Offline
Points: 4106
If you have f/b look up sea nymph page.couple of old builders there who will give you all the advice on glassing etc
"Times up"
Back to Top
Post Options Post Options   Likes (0) Likes(0)   Quote Bertiesdad Quote  Post ReplyReply Direct Link To This Post Posted: 09 Aug 2024 at 11:11pm
Bertiesdad View Drop Down
Bronze
Bronze


Joined: 10 Jun 2022
Status: Offline
Points: 87
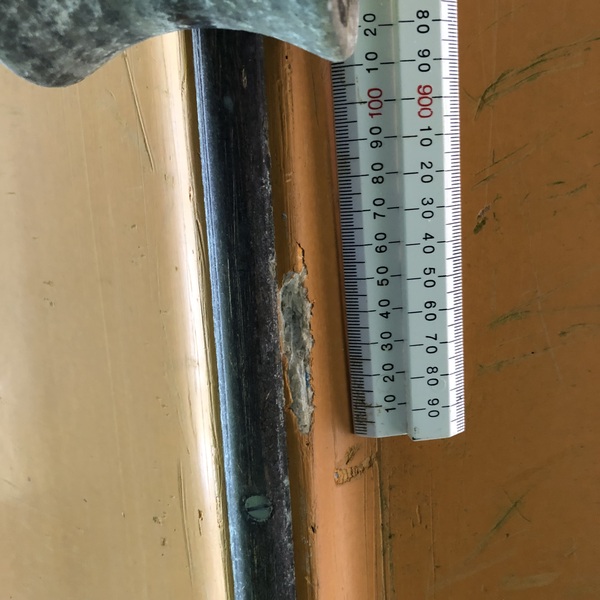
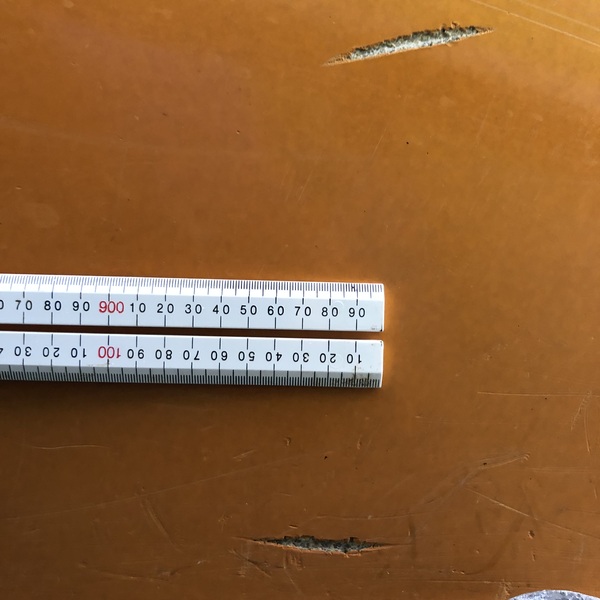
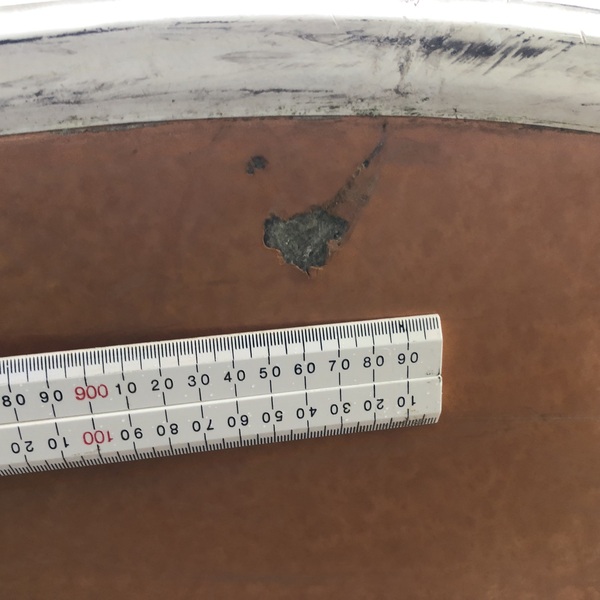
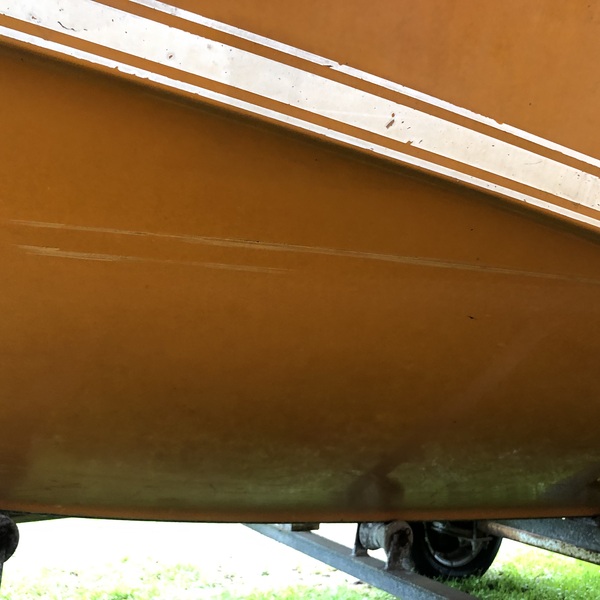
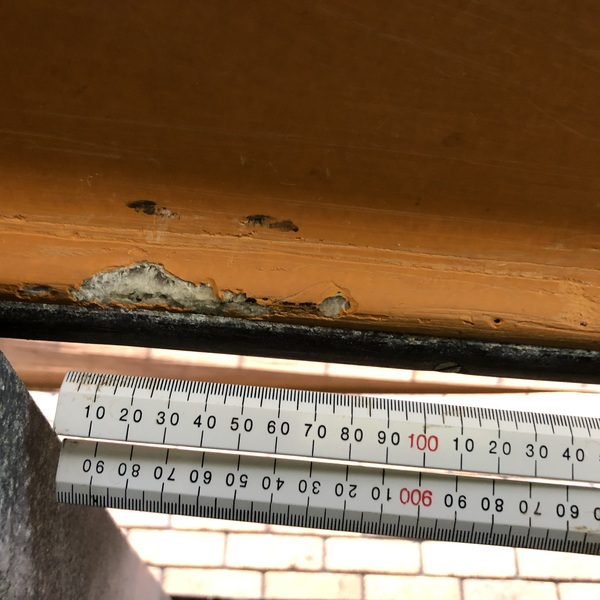
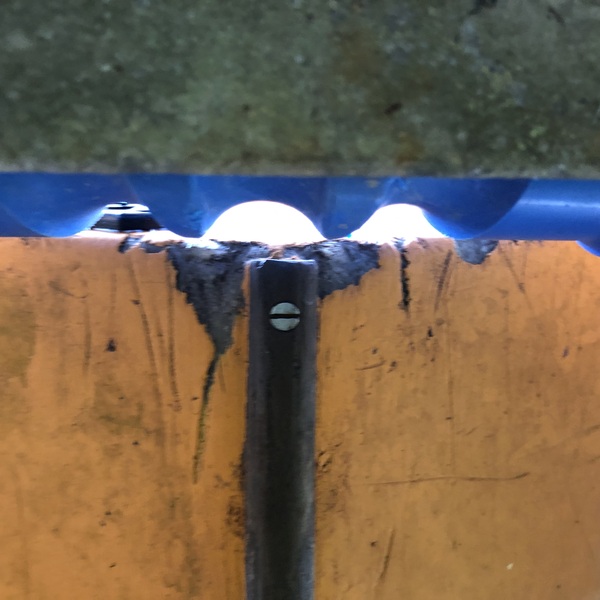
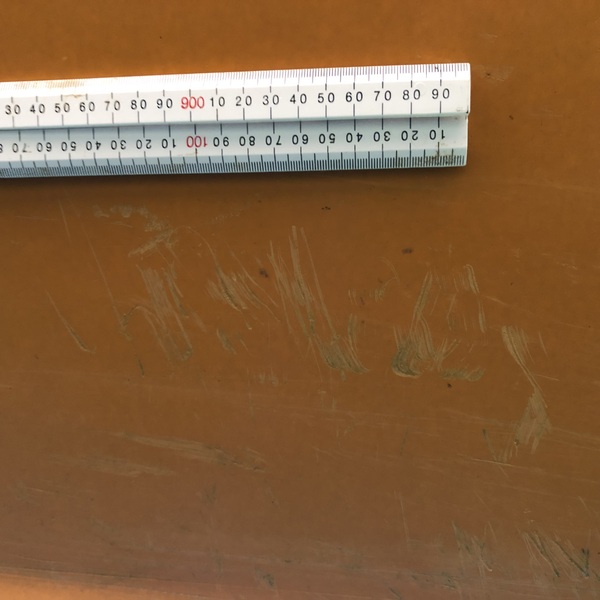
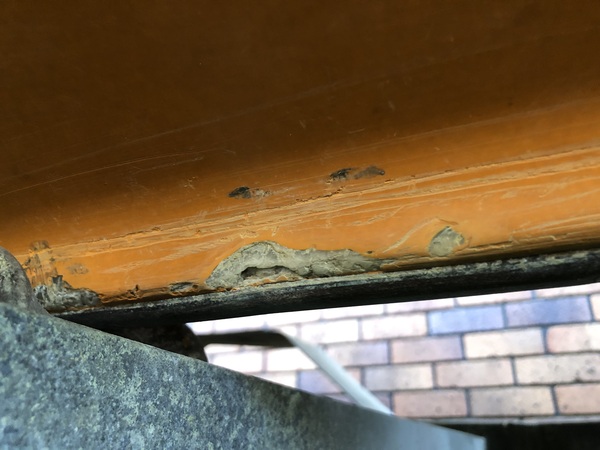
Just using gelcoat won't work for long - it will fall out pretty quickly due to adhesion issues on the mat. Its not a mission to do this properly though-they aren't big dings. Anything along the keel line or the strakes needs doing sooner rather than later as hull flex through pending plus trailer launching just makes things worse.

This is how I go about it-
1) cut back the gelcoat so you have a sound edge, give fiberglass and gelcoat a sand at edge- go gently- don't give yourself more work- something like a 400 wet will do trick. Then mask up as close as you can to site of repair.
2) Use a 2 pack micro filler- I use international epifill- its more expensive yes but its easily the best for small scratches and dings. It doesn't need gelcoat or paint if you can't be bothered and is easy to work. Fill to slightly proud.
3) Use sellotape or mylar tape  over epifill to shape to hull. You might need some extra wide tape. Thie tape not only compresses the filler but if you do it right you can reduce sanding after a lot and get a really good hull profile on the repair.
 4) leave it at least three days- pref 5.
5) Take masking and sellotape/mylar off. sand gently fine grade 1500+ - you only need a tiny difference for gelcoat with surrounding. gel coat is basically paint . Mask up surrounding again.
6)The color match for gelcoat on the hull will be a PITA- if you are not bothered much you'll get close enough. Frankly you can use a good marine enamel on anything  and prob get a closer match. If using gelcoat mix use clingfilm or mylar tape again till cured. Leave at least 72 hours
7) Unmask etc. Sand very lightly with a very fine grade- at least 1800 again
8) repeat gelcoat procedure again if req/biothered
8) T-cut if you're worried about that sort of thing
8) wax it.
9) go catch loads 

I would do all your dings at once-theyre not big- bearing in mind working time of epifill. You can adjust that by playing with mix a bit- but only a bit otherwise strength will be compromised. On the curing time/temp- I've used epifill midwinter lower north island a few times- yes it takes longer but if you are not fishing doesn't matter if the whole thing takes a week or two. As long as you use tape/ clingfilm on repairs and mask well-any rain that comes along shouldn't be a major issue- though obv don't start in the rain. Down south will be different for sure.

Hope this helps

cheers

Back to Top
Post Options Post Options   Likes (0) Likes(0)   Quote Primer Quote  Post ReplyReply Direct Link To This Post Posted: 10 Aug 2024 at 7:43am
Primer View Drop Down
Bronze
Bronze


Joined: 09 Aug 2024
Status: Offline
Points: 17
Thanks for the info guys very helpful.

A couple of questions for you Bertiesdad.

That damage at the bottom of transom/back of keel strip looks quite wet, when using the epifill do I need to grind back to 'good glass'? Or just sand back gel coat to sound edge?

The other dings look dryish/better to me so should I take gel coat back to sound edge, sand sound edge and exposed glass with 400 grit and apply epifill? no grinding out of glass or roughing up needed?

If I apply epifill uncoated, can I apply gel coat/marine enamel to it after using it in salt water?

I believe epifill is a epoxy based resin. I'm I shooting myself in the foot by using it on a polyester resin material when it come to working on it down the road? Or is that an issue for structural repairs not cosmetic surface touch ups?

I'm in the mid upper north island with highs around 14-16 degrees so the temps should be workable.  I'm not fussed if I have to let it set for a week or two.


Back to Top
Post Options Post Options   Likes (0) Likes(0)   Quote Bertiesdad Quote  Post ReplyReply Direct Link To This Post Posted: 10 Aug 2024 at 8:21am
Bertiesdad View Drop Down
Bronze
Bronze


Joined: 10 Jun 2022
Status: Offline
Points: 87
If the damage at the bottom of transom / keel is wet and staying wet then it’s possible you unfortunately have a bigger problem. The transom- which in a boat of this age is probably wood ( either ply or balsa) cored might have absorbed water over time and begun to rot under the glass. You can check this by trying to wobble the transom. Just grab it to one side or other of outboard and see if it flex’s/ bends when you pull and push hard. If it does the core is probably gone. Fixing that properly is a major mission but it can be fixed in short term at the area of damage. Basically dry it out as long as you can- keep the boat out of the water obviously and use a dryer / heat gun on area of damage. When it’s dry follow the sanding/ getting back to sound gelcoat steps and continue. If you find that as you cut back/ sand everything is still wet you will def have an osmosis/ rot problem. That is really difficult to fix without major work . If you don’t mind fugly you can go full workboat and use fresh mat round the damage onto sanded gelcoat surround. Soak it in resin mix and leave it to cure a week or so. It can be rough sanded to get the the worse bumps out but as it’s essentially a sticking plaster it’ll never look pretty and prob not worth getting too hung up about but it will stop things getting worse for a season or so. But fundamentally the boat needs proper attention. Cutting out and recoring a transom is possible- plenty get done- but it’s a major job and unless you are confident in your glassing/cutting/ templating one best left to professionals should it be necessary.


For the other dings above waterline don’t worry about epoxy /vinylester issue. Filler and fairing is not going to cause any iproblem on this scale. And sanding down any exposed fibre- as long as it’s dry- will be enough to provide a key for epifill. And yes if the epifill repair stays sound and is allowed to dry it can be glassed / painted at a later date. . None of the dings in your pics look worth reaching for a grinder on imo. That’s just making work on a boat of this vintage and runs the risk of doing more harm than good.

Sorry to sound a bit negative but transom issues are very common on older glass boats- it’s always there and the deck that rot starts. Older resins often don’t bond with wood cores very well and over time things like through hull mounting of accessories, engine changes and stern fittings allow water ingress. You shouldn’t worry too much about cosmetics but do check the transom. If you have a lot of flex there it can lead to failure- if not bad I would prob bodge the repairs and go fishing.i have done exactly that on one boat that’s proved fine if not showroom.
Back to Top
Post Options Post Options   Likes (0) Likes(0)   Quote Primer Quote  Post ReplyReply Direct Link To This Post Posted: 10 Aug 2024 at 2:52pm
Primer View Drop Down
Bronze
Bronze


Joined: 09 Aug 2024
Status: Offline
Points: 17
I've had a check and can't see any movement when yanking on transom or outboard. It does have a lot of penetrations in it so would be at greater risk rot that I haven't identified.  I allowed for a DIY transom (and floor) replacement when buying. I haven't done it before but hopefully with enough research and pointers could do it if needed. I wouldn't say you sound negative just realistic about the likely condition of these older boats.

I'll get the gear together and post up some pics as I get into it.

Keen as to get it fixed up and on the water.

Back to Top
Post Options Post Options   Likes (0) Likes(0)   Quote Bertiesdad Quote  Post ReplyReply Direct Link To This Post Posted: 10 Aug 2024 at 6:22pm
Bertiesdad View Drop Down
Bronze
Bronze


Joined: 10 Jun 2022
Status: Offline
Points: 87
Good luck with it. The final advice I would offer is to make a decision before u begin on the standard of finish you are going to get to now. If the priority is getting out there then water tightness/ not getting worse is all u need at the mo and permanent and pretty can be done next winter. If you want to go one and done to best effort now then be brutal on the preparation- but be prepared to find more work req than you thought at first. The latter nearly always happens on older boats if you go hard at itt that can be a bit disheartening if you are keen as just to go fishing. But fundamentally nothing is that difficult - just time and as usual money. There’s immense satisfaction in learning how to do glass as you go along and bringing these old girls back to work. Cheers
Back to Top
Post Options Post Options   Likes (0) Likes(0)   Quote Kandrew Quote  Post ReplyReply Direct Link To This Post Posted: 10 Aug 2024 at 8:50pm
Kandrew View Drop Down
Titanium
Titanium


Joined: 16 Apr 2012
Status: Offline
Points: 4176
I would think about taking the engine bolts out leaning the outboard back against something that will take the weight and having a good dig around in the bolt holes with a sharp screwdriver to see if there’s anything soft.

I would also check the keel strip screws for water tightness and rot where they screw in.

But as above rebuilding transum is a bit of a job but most good DIYers are capable of this type work. There’s plenty of good vids on the net and forums to get questions answered. New resin and and glass techniques have way improved from when this boat was built just make sure you use the right timber and foam and you’ll be fine.

Once you’ve repairing the boat I would look to paint it. I’ve painted a few sailing dinghies with a roller, cut and polished them and they’re come up great. Use a 2 pac epoxy paint there’s some good one around.
Back to Top
Post Options Post Options   Likes (0) Likes(0)   Quote Primer Quote  Post ReplyReply Direct Link To This Post Posted: 11 Aug 2024 at 8:27am
Primer View Drop Down
Bronze
Bronze


Joined: 09 Aug 2024
Status: Offline
Points: 17
Yip I've decided to do a rough patch up with epifill (no paint or gel coat) at this time. Then all going well with the boat a one and done on all the major hull work. So floor, transom and exterior hull depending on what my investigations find. I'll have to sort out shelter to do the work so getting up it and going gives me time to work out a solution. As well as enjoying and getting some boating experience.


Kandrew that's a good idea. I might just remove one bolt at a time so leaving 3 holding the motor while I have a dig around from the interior side.Will look into the keel strip screws too. I'll do bit of search to see how others have approached it.

Re painting I've only done light research into the pro's and con's of paint vs gel coat so will do more before I decide which way to go.
Back to Top
Post Options Post Options   Likes (0) Likes(0)   Quote Bertiesdad Quote  Post ReplyReply Direct Link To This Post Posted: 11 Aug 2024 at 8:59am
Bertiesdad View Drop Down
Bronze
Bronze


Joined: 10 Jun 2022
Status: Offline
Points: 87
As Kandrew says it’s almost guaranteed you’ll get better results ( assuming you fair and prep hull well) with a 2 pack enamel or similar. International again make a great 2 pack glass paint. Awlgrip is really popular in US. Given that ( assuming you don’t have a spray shop ) you will be applying anything by brush or roller- you will def end up with a better looking boat using a 2 pack paint.
Back to Top
Post Options Post Options   Likes (0) Likes(0)   Quote Pcj Quote  Post ReplyReply Direct Link To This Post Posted: 11 Aug 2024 at 9:23am
Pcj View Drop Down
Titanium
Titanium
Avatar

Joined: 27 Nov 2019
Location: papakura
Status: Offline
Points: 4106
I used Altex single pack roller and tip and holding up well 2 coats,even this cool weather holds a gloss and dries quickly,well paint at 10.00am and its good by 4.00pm for the cooler temps. only primed/under coated where I used filler, washed with sugar soap,good sand to break through gel coat and a good dewax..After 12 months still holding well.


"Times up"
Back to Top
Post Options Post Options   Likes (0) Likes(0)   Quote Primer Quote  Post ReplyReply Direct Link To This Post Posted: 11 Aug 2024 at 8:38pm
Primer View Drop Down
Bronze
Bronze


Joined: 09 Aug 2024
Status: Offline
Points: 17
Got the Epifill today and some 400 wet and dry. Gave a few spots a hit with the stanley knife to flick off the flakey bits of gel and fibreglass, then sanded with 400P W&D, 98% of the gel coat didn't flake at all. Here's a pic of the worst one.


Do you think I've broken the edges in enough for the fill to work properly?

After reading your guys post and watch the vidoe below, I have been leaning towards a paint system for ease of repairs and colour matching. Good to hear I don't need to spray to use a 1 or 2 pac paint as that simplifies the process. I found this video on gel coat vs paint quite helpful:

https://www.youtube.com/watch?v=X3XwvsorsYw&t=714s

Pcj that looks pretty damn slick I'd be stoked if mine came up like that.


Back to Top
Post Options Post Options   Likes (0) Likes(0)   Quote Pcj Quote  Post ReplyReply Direct Link To This Post Posted: 11 Aug 2024 at 11:08pm
Pcj View Drop Down
Titanium
Titanium
Avatar

Joined: 27 Nov 2019
Location: papakura
Status: Offline
Points: 4106
I would sand whole edge back and reglass it,does it go right through in to hull?
"Times up"
Back to Top
Post Options Post Options   Likes (0) Likes(0)   Quote Primer Quote  Post ReplyReply Direct Link To This Post Posted: 12 Aug 2024 at 6:56pm
Primer View Drop Down
Bronze
Bronze


Joined: 09 Aug 2024
Status: Offline
Points: 17
Its appears not. That hole is about 3-4mm deep through a layer of fibre glass to another one. There is some separation between the layers - don't know if its because of the damage or it was made like that. Its enough to get a stanley knife blade in between.  I plan to get some dremel bits and open that first layer to see the extent of the separation. I'll post some updated pictures when I get some time to work on it.
Back to Top
Page  12>
Forum Jump
Forum Permissions View Drop Down


This page was generated in 0.246 seconds.

Fishing Reports Visit Reports

Saltwater Fishing Reports
Tauranga Fishing Report - 28/05/26

Tarakihi on the bite Trips are few and far between at this time of year,... Read More >

28 May 2026
Freshwater Fishing Reports
Canterbury Fishing Report - 28/05/26

Fresh and salt turning it on! It is not very often I get to say... Read More >

28 May 2026
Saltwater Fishing Reports
Bay of Islands Fishing Report - 28/05/26

Lures paying dividends We finally had a break in the SE winds that have been... Read More >

28 May 2026
Saltwater Fishing Reports
Manukau/West Coast Fishing Report - 28/05/26

Snapper and gurnard in the harbour The weather has finally taken a turn for the... Read More >

28 May 2026
Saltwater Fishing Reports
Top of the South Fishing Report - 28/05/26

Snapper still in Tasman Bay Well, we are now at the end of May and... Read More >

28 May 2026
Saltwater Fishing Reports
Gisborne Fishing Report - 28/05/26

The bluefin are here The talk of the town is that the annual run of... Read More >

28 May 2026
Fishing bite times Fishing bite times

Major Bites

Minor Bites

Major Bites

Minor Bites