Re paint on fiberglass boat?

Page  123>
Post Options Post Options   Likes (0) Likes(0)   Quote Garry 23041 Quote  Post ReplyReply Direct Link To This Post Topic: Re paint on fiberglass boat?
    Posted: 04 Apr 2020 at 5:36pm
Garry 23041 View Drop Down
Platinum
Platinum


Joined: 19 May 2007
Location: Mangonui
Status: Offline
Points: 2231
I have decided to repower the old boat this winter and also step up and repaint the exterior. hull, deck, topsides.

I have been threatening it with repaint for 5 or 6 years but there always seems to be enough to do each winter with other boat projects that I just keep blowing it off..and going fishing.

Anyway it is a 1989 boat which I know was factory built and believe was vacuum bagged also.

The glass is all excellent but any gloss is long gone and the hull is just plain tired.

The walking areas have a pretty intense anti slip pattern but there is no gloss there what so ever so I believe a quick wire brush (fine) and a chem wash will suffice. It's a great surface and I refuse to sand it.

I am thinking one color (off white) for all but I don't want to go Epiglass etc unless I have to re price.

I have used some Carboline Carboguard on another project which is a 2 pot primer and that stuff rocks!
I wonder if I can use something like that and a couple of coats of finish and some kind of clear/semi clear last coats on the non walk areas to create a strong gloss/mirror? Not for appearance but to help getting bird **** off etc....
Anyone been here?
Back to Top
Post Options Post Options   Likes (0) Likes(0)   Quote Schampy Quote  Post ReplyReply Direct Link To This Post Posted: 04 Apr 2020 at 7:37pm
Schampy View Drop Down
Platinum
Platinum


Joined: 14 Aug 2014
Status: Offline
Points: 1968
Have used international Perfection (2 pot) in the past on a few boats and the results were outstanding. Very high gloss levels, extremely hard wearing. Its not cheap but the stuff is amazing if you do it right. Not ment to be sprayed on- rolled or brushed... then tipped.
I found using a foam roller gave best results, but everyone has different methods.
cheers
Lance.
Back to Top
Post Options Post Options   Likes (0) Likes(0)   Quote Steps Quote  Post ReplyReply Direct Link To This Post Posted: 04 Apr 2020 at 8:27pm
Steps View Drop Down
Titanium
Titanium


Joined: 14 Oct 2013
Location: Franklin
Status: Offline
Points: 12854
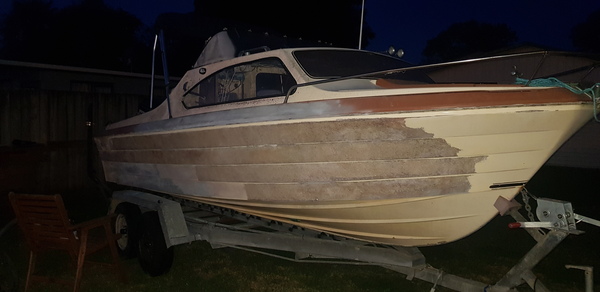
You are goi9ng to strip clean degrease then  sand every surface fil chips etc.. Anyway


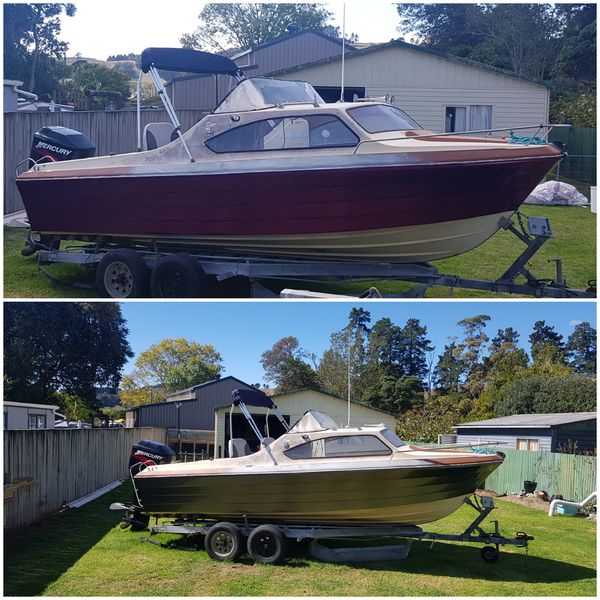
Try this you maybe rather surprised.. my boat is 1972 think..and has a near new gloss.
Get 3 sheets (boat may only take 2 sheets) of good quality 800 grit wet and dry.
Sand till just go thru  but not fully remove the top chalky surface.
 Its a very quick sand you move along quite fast.
Then get 3 sheets of 1200 grit.. a good rub to get the last of the chalk surface and the very faint deeper scatches where to 800 went thru.
This stage the boat starts to sparkle
Grab a bottle of fiber glass cutter / cleaner.. rather than a long hard machine cut.... A  very quick cut with couple cloths

And now it really sparkles.
Now hit with meguires quick detail, spray as little in the area, quick wipe ..whole car door side, then a quick buff.

Even just do a deck area, a gunnel and set if you then do the whole boat.

The hull will most likey to have a brown stain sorta.
Get some rust kill phosphoric acid... Do NOT spill or let drop on to a galvanised trailer.
Pour about an inch into a glass, top up with about 1/2 of that with water.
Put on a rag so it is rather damp but not dripping  and very quickly wipe the whole hull down,, and stern. Dont get on the motor .
 Go out next morning .. original white and can see strips where you missed wipingWink
It is just a wipe to wettrn it quick fast.
No need to wash  If wish to clean hit with the hose.

Acrylic windows.. dont do any of the above on them
Windows and clears If not clouded out scratched badly,
Again couple hits with megures quick detail car polish

If still going to paint. Boats take more abuse than cars..
Modern top quality 2 pot paints and 1st class preparation and systems are the only way to go.
 leave the laying of the paint to the pros . this is more high tech than the old paints pre 80s.
The prep blocking , slightest chip , scratch will show up like wh... drawers. Its not rocket science but  a very exacting job.
 
Back to Top
Post Options Post Options   Likes (0) Likes(0)   Quote Garry 23041 Quote  Post ReplyReply Direct Link To This Post Posted: 05 Apr 2020 at 1:02pm
Garry 23041 View Drop Down
Platinum
Platinum


Joined: 19 May 2007
Location: Mangonui
Status: Offline
Points: 2231
Thanks for the suggestions guys. Been a bit slow responding, my p.c is acting up a bit, sure hope it doesn't crouch during this period!

Schampy, I had wondered if I would get better results with dedicated boat product. I looked at that perfection a while back but I would have to use a spraying style because I am going to be painting a bunch of nooks and crannies as well as my boat being 8.5m on the hull length. This makes spraying seem more efficient. If I was just doing the hull I could roll and tip it.

Steps, I could have used that advice a few years ago when I polished it but now the hull is showing some matting/glass if you look in places and the cabin is painted black for accent and it's gone to the point it will have to be sanded off to the glass.
So it's definitely a re paint so removal of all beltings, rails, etc only leaving the windows in place will be called for.
I am pleased Schampy got a strong gloss with the product he used. I do have someone to spray it but I will be doing all prep....fun.
Back to Top
Post Options Post Options   Likes (0) Likes(0)   Quote Brad76 Quote  Post ReplyReply Direct Link To This Post Posted: 05 Apr 2020 at 2:04pm
Brad76 View Drop Down
Silver
Silver


Joined: 15 May 2012
Location: Kawakawa bay
Status: Offline
Points: 477


Takes a lot of prep and time.
Back to Top
Post Options Post Options   Likes (0) Likes(0)   Quote Brad76 Quote  Post ReplyReply Direct Link To This Post Posted: 05 Apr 2020 at 2:08pm
Brad76 View Drop Down
Silver
Silver


Joined: 15 May 2012
Location: Kawakawa bay
Status: Offline
Points: 477
Photos are not uploading very well. But i have just done mine during lockdown.

Lol have painted it twice this week as didnt like the first colour

My suggestion would be to find a decent spritz spray filler. Feather fill is pretty good.
Take back. Prime, sand, spritz fill, sand, prime, sand and paint.

No cutting cost/corners on products and prep or it will not last.
Back to Top
Post Options Post Options   Likes (0) Likes(0)   Quote Garry 23041 Quote  Post ReplyReply Direct Link To This Post Posted: 05 Apr 2020 at 3:26pm
Garry 23041 View Drop Down
Platinum
Platinum


Joined: 19 May 2007
Location: Mangonui
Status: Offline
Points: 2231
Nice result. Great lockdown project! What are you going to do for the next 3 weeks??
How many finish coats (if you are not changing the color!) and if more than one did you sand or spray again before completely dry?
Back to Top
Post Options Post Options   Likes (0) Likes(0)   Quote Brad76 Quote  Post ReplyReply Direct Link To This Post Posted: 05 Apr 2020 at 7:25pm
Brad76 View Drop Down
Silver
Silver


Joined: 15 May 2012
Location: Kawakawa bay
Status: Offline
Points: 477
Steipped all gelcoat off to bare fubreglas then 2 pack primed and sanded back. Put on a gunmetal finish to see if i liked the colour and find all pinholes.

Found 10 million pinholes so gave a skim coat of filler, sanded that back and then used a wet on wet primer and put the red on.

3 coats of red and 2 coats of 2 pack clear.

Still not sure i like the colour and might re-do it blue when I can get back into work to get supplies.

Next 3 weeks I might get the top rwady to do the white.

Also have a car in the garage almost compltely stripped down, getting it rqady to take in to work and re-paint.

LOL got another 6 house doors to paint, so plenty to keep busy for 3 weeks
Back to Top
Post Options Post Options   Likes (0) Likes(0)   Quote Garry 23041 Quote  Post ReplyReply Direct Link To This Post Posted: 06 Apr 2020 at 6:24am
Garry 23041 View Drop Down
Platinum
Platinum


Joined: 19 May 2007
Location: Mangonui
Status: Offline
Points: 2231
Ok thanks for the info. The more I think about it the more I realize why I have been putting this off so long!
Add an engine swap into the mix and this should be a walk in the park....
I am going one color for all to simplify and If I think it needs a boost when done I will get a vinyl for accent.
Are the pin holes left over from manufacture?
I have a few fine cracks/striations here and there I can see.
Back to Top
Post Options Post Options   Likes (0) Likes(0)   Quote pjc Quote  Post ReplyReply Direct Link To This Post Posted: 06 Apr 2020 at 7:09am
pjc View Drop Down
Titanium
Titanium
Avatar

Joined: 04 Apr 2010
Location: papakura
Status: Offline
Points: 12473
The last major repaint on top sides of a glass yacht was a few yrs ago,2005? good coat/wash of with a wax removal,sanded gel coat till dull,under coated with altex product,then a friend/boat painter squirted it with altex acrlic,it was 2 pot stuff,sprayed with airless and left for 3 days and then a good cut and polish ,saw the yacht about 3 weeks ago off te atatu still same paint on and still looking sharp.15 yrs on surprised me considering being a moored vessel.

Did a dinghy recently with 2 pot reaction lacquer,wish I hadn't.good cut n polish might of been better.

Preparation,take your time is the key.
Sex at 58.Lucky I live at 56
Back to Top
Post Options Post Options   Likes (0) Likes(0)   Quote Steps Quote  Post ReplyReply Direct Link To This Post Posted: 06 Apr 2020 at 8:45am
Steps View Drop Down
Titanium
Titanium


Joined: 14 Oct 2013
Location: Franklin
Status: Offline
Points: 12854
Brad why did you strip off the gelcoat?

A good guy on the back of a gun and the 2 parts/ solvent mix exactly right, they will be no need for a cut and polish. The paint will flow out to a perfect mirror finish straight of.. Sort of like the old enamels with 93plus on steroids except a very fast booth turn around time.
Back to Top
Post Options Post Options   Likes (0) Likes(0)   Quote pjc Quote  Post ReplyReply Direct Link To This Post Posted: 06 Apr 2020 at 9:00am
pjc View Drop Down
Titanium
Titanium
Avatar

Joined: 04 Apr 2010
Location: papakura
Status: Offline
Points: 12473
"Steps" we did the cut n polish as there were a few minor imperfections,using a airless gun.Being where we were ,spraying was a bit of no no,unless we erected a tent.being outside ,Most boat yards are the same today,nothing major.But it has held up nicely.The painter is no slug thats for sure.Seen what he done in a shed with gloss.Perfection
Sex at 58.Lucky I live at 56
Back to Top
Post Options Post Options   Likes (0) Likes(0)   Quote Steps Quote  Post ReplyReply Direct Link To This Post Posted: 06 Apr 2020 at 9:36am
Steps View Drop Down
Titanium
Titanium


Joined: 14 Oct 2013
Location: Franklin
Status: Offline
Points: 12854
Was not directed at you.. I have painted 2 boats up on the dry yrs ago.. pre 2 pot... Airless and open air at the best of times is very difficult if do not choose the day very carefully.
 Even so it will be a little orange peel or dust/ pollen not gloss that maybe require blocking out if fussy . Most ppl would not know the difference, even on a brand new car.
Back to Top
Post Options Post Options   Likes (0) Likes(0)   Quote pjc Quote  Post ReplyReply Direct Link To This Post Posted: 06 Apr 2020 at 9:45am
pjc View Drop Down
Titanium
Titanium
Avatar

Joined: 04 Apr 2010
Location: papakura
Status: Offline
Points: 12473
Originally posted by Steps Steps wrote:

Was not directed at you.. I have painted 2 boats up on the dry yrs ago.. pre 2 pot... Airless and open air at the best of times is very difficult if do not choose the day very carefully.
 Even so it will be a little orange peel or dust/ pollen not gloss that maybe require blocking out if fussy . Most ppl would not know the difference, even on a brand new car.
Thanks Steps,a lot of yards are spray free due osh regs,particularly sanding antifoul.Glad not to have moored vessel nowdays.
Sex at 58.Lucky I live at 56
Back to Top
Post Options Post Options   Likes (0) Likes(0)   Quote Brad76 Quote  Post ReplyReply Direct Link To This Post Posted: 06 Apr 2020 at 11:07am
Brad76 View Drop Down
Silver
Silver


Joined: 15 May 2012
Location: Kawakawa bay
Status: Offline
Points: 477
I will take a photo later and show you why.

It needed it.

If gelcoat is not damaged then no need to strip right off but mine was BAD.

If gelcoat is sound then I would be sanding with 240 and then using wet-on-wet primer, flash that off and put paint on.

I have the other side to do, that gelcoat is sound so will have it prepped and painted in a day easily
Back to Top
Post Options Post Options   Likes (0) Likes(0)   Quote Brad76 Quote  Post ReplyReply Direct Link To This Post Posted: 06 Apr 2020 at 11:11am
Brad76 View Drop Down
Silver
Silver


Joined: 15 May 2012
Location: Kawakawa bay
Status: Offline
Points: 477
The pinholes are because i had to go right back to fibreglass, all gelcoat taken right off.

If the gelcoat is ok, you dont need to sand right off.

If i was the painter, i would either say leave the prep to me or just get you helping under supervision.

If not prepped the right way for your boats condition, you can either prep it too much or not enough.

Every time something is painted there are different ways to approach the job depending on the condition of initial surface
Back to Top
Post Options Post Options   Likes (0) Likes(0)   Quote Garry 23041 Quote  Post ReplyReply Direct Link To This Post Posted: 06 Apr 2020 at 4:53pm
Garry 23041 View Drop Down
Platinum
Platinum


Joined: 19 May 2007
Location: Mangonui
Status: Offline
Points: 2231
agreed. I have done a ton of paint prep over the years but never a boat. I do know how to sand and fill so if my spray guy can tell me where I sit in the spectrum I think I can do ok. I am not looking for a faultless job. I just want to make sure my prep is such that I get longevity and not early failure..
Back to Top
Post Options Post Options   Likes (0) Likes(0)   Quote Steps Quote  Post ReplyReply Direct Link To This Post Posted: 06 Apr 2020 at 5:46pm
Steps View Drop Down
Titanium
Titanium


Joined: 14 Oct 2013
Location: Franklin
Status: Offline
Points: 12854
The pinholes are because i had to go right back to fibreglass, all gelcoat taken right off.

 Yep  They laid the SN up with some of the 1st chopper guns (Robinsons from memory) so not always resin rich on the back of the gelcoat..


Are the pin holes left over from manufacture?
 
Yes.. They should NOT be there We used to give a spray with resin, without the glass chopper  / rovings  running
(This is long 'rope' of glass fiber goes thru knife blades on the top of the resin gun that pre mixes the resin, The knives then throw the bits of glass into the glass and it all lands on the gel coat in the mould)
 Then turn of the rovings.. then roll out til no air and full wetted out.. usually 2 or 3 guys going hard out behind the chopper once get into a large mould.
Often in cnrs and edges you will find large air pockets.
 We used to lay spray resin, then lay  un cut rovinings into into these cnrs, then lay up.
 This prevented the guys rolling out missing getting into the cnrs .. usually because they where working with too much pressure , under manned for the job.

 If you have your boat out in the sun on a hot day , you can see looking down surfaces  the air bubbles under the gelcoat as the air expands.. not so much in cnrs  thu bad ones will show. 

I have a few fine cracks/striations here and there I can see.

 These grind out till get to solid glass in a shallow V. then repair  as if mig welding 5mm steel plates. This increases the strength in that area.. like a weld will if done right.
 If just fill, the cracks will re appear in the future.
  Scratchjes can use a polyester  or epoxy based srap filler as Brad suggests above...
 The epoxy is far more expensive, stronger but personally I dont believe is is worth the expense over polyester.

 Also you can put epoxy over polyester or repair (that is the also the type of resin in most boats) But you can not put polyester over epoxy  as a paint or as a repair. It will eventually de laminate.
 My view is stick with what the base is.. both are more than strong enough to do the job
 AND its like restoring a old British car with Whitworth threads, then find UNC and metric on different parts, and frustration and mistakes start to happen.
Putting aside, before someone mentions it .. some UNC threads are so close to whitworth you would never notice unless using whitworth spanners which are sized very different to metric and UN
Back to Top
Post Options Post Options   Likes (0) Likes(0)   Quote Garry 23041 Quote  Post ReplyReply Direct Link To This Post Posted: 07 Apr 2020 at 7:56am
Garry 23041 View Drop Down
Platinum
Platinum


Joined: 19 May 2007
Location: Mangonui
Status: Offline
Points: 2231
Can I tell by looking/testing somehow what my original layup is out of?
Back to Top
Post Options Post Options   Likes (0) Likes(0)   Quote Steps Quote  Post ReplyReply Direct Link To This Post Posted: 07 Apr 2020 at 9:17am
Steps View Drop Down
Titanium
Titanium


Joined: 14 Oct 2013
Location: Franklin
Status: Offline
Points: 12854
Dont understand the question..
Back to Top
Page  123>
Forum Jump
Forum Permissions View Drop Down


This page was generated in 0.383 seconds.

Fishing Reports Visit Reports

Saltwater Fishing Reports
Tauranga Fishing Report - 28/05/26

Tarakihi on the bite Trips are few and far between at this time of year,... Read More >

28 May 2026
Freshwater Fishing Reports
Canterbury Fishing Report - 28/05/26

Fresh and salt turning it on! It is not very often I get to say... Read More >

28 May 2026
Saltwater Fishing Reports
Bay of Islands Fishing Report - 28/05/26

Lures paying dividends We finally had a break in the SE winds that have been... Read More >

28 May 2026
Saltwater Fishing Reports
Manukau/West Coast Fishing Report - 28/05/26

Snapper and gurnard in the harbour The weather has finally taken a turn for the... Read More >

28 May 2026
Fishing bite times Fishing bite times

Major Bites

Minor Bites

Major Bites

Minor Bites