Re paint on fiberglass boat?
Printed From: The Fishing Website
Category: General Forums
Forum Name: The Boat Shed
Forum Description: Discuss all things boating.
URL: https://www.fishing.net.nz/forum/forum_posts.asp?TID=133229
Printed Date: 08 Jun 2026 at 3:12pm
Topic: Re paint on fiberglass boat?
Posted By: Garry 23041
Subject: Re paint on fiberglass boat?
Date Posted: 04 Apr 2020 at 5:36pm
|
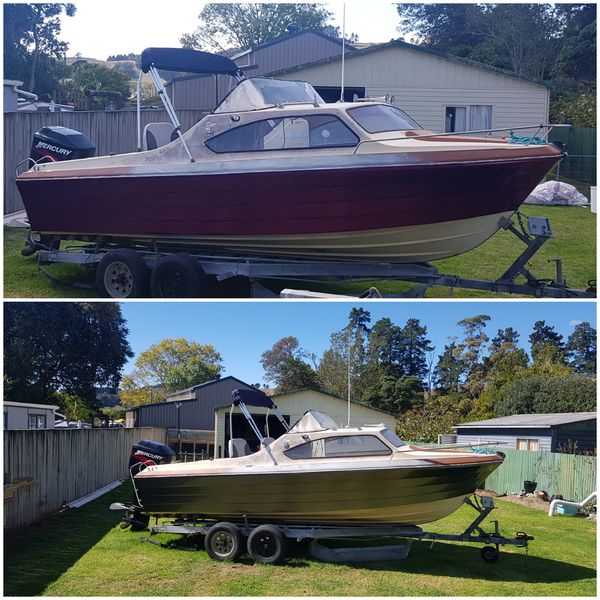
I have decided to repower the old boat this winter and also step up and repaint the exterior. hull, deck, topsides. I have been threatening it with repaint for 5 or 6 years but there always seems to be enough to do each winter with other boat projects that I just keep blowing it off..and going fishing. Anyway it is a 1989 boat which I know was factory built and believe was vacuum bagged also. The glass is all excellent but any gloss is long gone and the hull is just plain tired. The walking areas have a pretty intense anti slip pattern but there is no gloss there what so ever so I believe a quick wire brush (fine) and a chem wash will suffice. It's a great surface and I refuse to sand it. I am thinking one color (off white) for all but I don't want to go Epiglass etc unless I have to re price. I have used some Carboline Carboguard on another project which is a 2 pot primer and that stuff rocks! I wonder if I can use something like that and a couple of coats of finish and some kind of clear/semi clear last coats on the non walk areas to create a strong gloss/mirror? Not for appearance but to help getting bird **** off etc.... Anyone been here? |
Replies:
Posted By: Schampy
Date Posted: 04 Apr 2020 at 7:37pm
|
Have used international Perfection (2 pot) in the past on a few boats and the results were outstanding. Very high gloss levels, extremely hard wearing. Its not cheap but the stuff is amazing if you do it right. Not ment to be sprayed on- rolled or brushed... then tipped. I found using a foam roller gave best results, but everyone has different methods. cheers Lance.
|
Posted By: Steps
Date Posted: 04 Apr 2020 at 8:27pm
|
You are goi9ng to strip clean degrease then sand every surface fil chips etc.. Anyway Try this you maybe rather surprised.. my boat is 1972 think..and has a near new gloss. Get 3 sheets (boat may only take 2 sheets) of good quality 800 grit wet and dry. Sand till just go thru but not fully remove the top chalky surface. Its a very quick sand you move along quite fast. Then get 3 sheets of 1200 grit.. a good rub to get the last of the chalk surface and the very faint deeper scatches where to 800 went thru. This stage the boat starts to sparkle Grab a bottle of fiber glass cutter / cleaner.. rather than a long hard machine cut.... A very quick cut with couple cloths And now it really sparkles. Now hit with meguires quick detail, spray as little in the area, quick wipe ..whole car door side, then a quick buff. Even just do a deck area, a gunnel and set if you then do the whole boat. The hull will most likey to have a brown stain sorta. Get some rust kill phosphoric acid... Do NOT spill or let drop on to a galvanised trailer. Pour about an inch into a glass, top up with about 1/2 of that with water. Put on a rag so it is rather damp but not dripping and very quickly wipe the whole hull down,, and stern. Dont get on the motor . Go out next morning .. original white and can see strips where you missed wiping  It is just a wipe to wettrn it quick fast. No need to wash If wish to clean hit with the hose. Acrylic windows.. dont do any of the above on them Windows and clears If not clouded out scratched badly, Again couple hits with megures quick detail car polish If still going to paint. Boats take more abuse than cars.. Modern top quality 2 pot paints and 1st class preparation and systems are the only way to go. leave the laying of the paint to the pros . this is more high tech than the old paints pre 80s. The prep blocking , slightest chip , scratch will show up like wh... drawers. Its not rocket science but a very exacting job. |
Posted By: Garry 23041
Date Posted: 05 Apr 2020 at 1:02pm
|
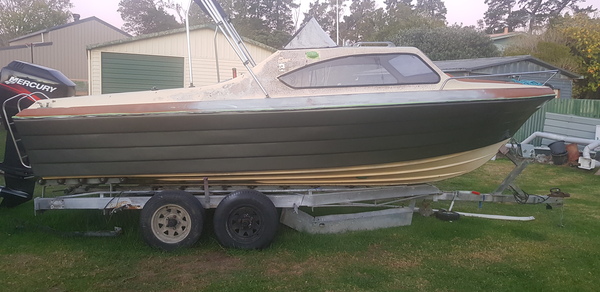
Thanks for the suggestions guys. Been a bit slow responding, my p.c is acting up a bit, sure hope it doesn't crouch during this period! Schampy, I had wondered if I would get better results with dedicated boat product. I looked at that perfection a while back but I would have to use a spraying style because I am going to be painting a bunch of nooks and crannies as well as my boat being 8.5m on the hull length. This makes spraying seem more efficient. If I was just doing the hull I could roll and tip it. Steps, I could have used that advice a few years ago when I polished it but now the hull is showing some matting/glass if you look in places and the cabin is painted black for accent and it's gone to the point it will have to be sanded off to the glass. So it's definitely a re paint so removal of all beltings, rails, etc only leaving the windows in place will be called for. I am pleased Schampy got a strong gloss with the product he used. I do have someone to spray it but I will be doing all prep....fun. |
Posted By: Brad76
Date Posted: 05 Apr 2020 at 2:04pm
 Takes a lot of prep and time. |
Posted By: Brad76
Date Posted: 05 Apr 2020 at 2:08pm
|
Photos are not uploading very well. But i have just done mine during lockdown. Lol have painted it twice this week as didnt like the first colour 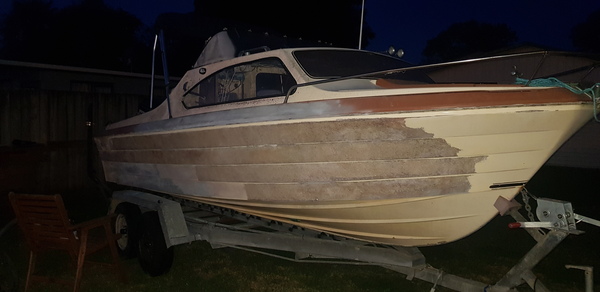 My suggestion would be to find a decent spritz spray filler. Feather fill is pretty good. Take back. Prime, sand, spritz fill, sand, prime, sand and paint. No cutting cost/corners on products and prep or it will not last. |
Posted By: Garry 23041
Date Posted: 05 Apr 2020 at 3:26pm
|
Nice result. Great lockdown project! What are you going to do for the next 3 weeks?? How many finish coats (if you are not changing the color!) and if more than one did you sand or spray again before completely dry? |
Posted By: Brad76
Date Posted: 05 Apr 2020 at 7:25pm
|
Steipped all gelcoat off to bare fubreglas then 2 pack primed and sanded back. Put on a gunmetal finish to see if i liked the colour and find all pinholes. Found 10 million pinholes so gave a skim coat of filler, sanded that back and then used a wet on wet primer and put the red on. 3 coats of red and 2 coats of 2 pack clear. Still not sure i like the colour and might re-do it blue when I can get back into work to get supplies. Next 3 weeks I might get the top rwady to do the white. Also have a car in the garage almost compltely stripped down, getting it rqady to take in to work and re-paint. LOL got another 6 house doors to paint, so plenty to keep busy for 3 weeks |
Posted By: Garry 23041
Date Posted: 06 Apr 2020 at 6:24am
|
Ok thanks for the info. The more I think about it the more I realize why I have been putting this off so long! Add an engine swap into the mix and this should be a walk in the park.... I am going one color for all to simplify and If I think it needs a boost when done I will get a vinyl for accent. Are the pin holes left over from manufacture? I have a few fine cracks/striations here and there I can see. |
Posted By: pjc
Date Posted: 06 Apr 2020 at 7:09am
|
The last major repaint on top sides of a glass yacht was a few yrs ago,2005? good coat/wash of with a wax removal,sanded gel coat till dull,under coated with altex product,then a friend/boat painter squirted it with altex acrlic,it was 2 pot stuff,sprayed with airless and left for 3 days and then a good cut and polish ,saw the yacht about 3 weeks ago off te atatu still same paint on and still looking sharp.15 yrs on surprised me considering being a moored vessel. Did a dinghy recently with 2 pot reaction lacquer,wish I hadn't.good cut n polish might of been better. Preparation,take your time is the key.
------------- Sex at 58.Lucky I live at 56 |
Posted By: Steps
Date Posted: 06 Apr 2020 at 8:45am
|
Brad why did you strip off the gelcoat? A good guy on the back of a gun and the 2 parts/ solvent mix exactly right, they will be no need for a cut and polish. The paint will flow out to a perfect mirror finish straight of.. Sort of like the old enamels with 93plus on steroids except a very fast booth turn around time. |
Posted By: pjc
Date Posted: 06 Apr 2020 at 9:00am
|
"Steps" we did the cut n polish as there were a few minor imperfections,using a airless gun.Being where we were ,spraying was a bit of no no,unless we erected a tent.being outside ,Most boat yards are the same today,nothing major.But it has held up nicely.The painter is no slug thats for sure.Seen what he done in a shed with gloss.Perfection
------------- Sex at 58.Lucky I live at 56 |
Posted By: Steps
Date Posted: 06 Apr 2020 at 9:36am
|
Was not directed at you.. I have painted 2 boats up on the dry yrs ago.. pre 2 pot... Airless and open air at the best of times is very difficult if do not choose the day very carefully. Even so it will be a little orange peel or dust/ pollen not gloss that maybe require blocking out if fussy . Most ppl would not know the difference, even on a brand new car. |
Posted By: pjc
Date Posted: 06 Apr 2020 at 9:45am
------------- Sex at 58.Lucky I live at 56 |
 Steps wrote:
Posted By: Brad76
Date Posted: 06 Apr 2020 at 11:07am
|
I will take a photo later and show you why. It needed it. If gelcoat is not damaged then no need to strip right off but mine was BAD. If gelcoat is sound then I would be sanding with 240 and then using wet-on-wet primer, flash that off and put paint on. I have the other side to do, that gelcoat is sound so will have it prepped and painted in a day easily |
Posted By: Brad76
Date Posted: 06 Apr 2020 at 11:11am
|
The pinholes are because i had to go right back to fibreglass, all gelcoat taken right off. If the gelcoat is ok, you dont need to sand right off. If i was the painter, i would either say leave the prep to me or just get you helping under supervision. If not prepped the right way for your boats condition, you can either prep it too much or not enough. Every time something is painted there are different ways to approach the job depending on the condition of initial surface |
Posted By: Garry 23041
Date Posted: 06 Apr 2020 at 4:53pm
|
agreed. I have done a ton of paint prep over the years but never a boat. I do know how to sand and fill so if my spray guy can tell me where I sit in the spectrum I think I can do ok. I am not looking for a faultless job. I just want to make sure my prep is such that I get longevity and not early failure.. |
Posted By: Steps
Date Posted: 06 Apr 2020 at 5:46pm
|
The pinholes are because i had to go right back to fibreglass, all gelcoat taken right off. Yep They laid the SN up with some of the 1st chopper guns (Robinsons from memory) so not always resin rich on the back of the gelcoat.. Are the pin holes left over from manufacture? Yes.. They should NOT be there We used to give a spray with resin, without the glass chopper / rovings running (This is long 'rope' of glass fiber goes thru knife blades on the top of the resin gun that pre mixes the resin, The knives then throw the bits of glass into the glass and it all lands on the gel coat in the mould) Then turn of the rovings.. then roll out til no air and full wetted out.. usually 2 or 3 guys going hard out behind the chopper once get into a large mould. Often in cnrs and edges you will find large air pockets. We used to lay spray resin, then lay un cut rovinings into into these cnrs, then lay up. This prevented the guys rolling out missing getting into the cnrs .. usually because they where working with too much pressure , under manned for the job. If you have your boat out in the sun on a hot day , you can see looking down surfaces the air bubbles under the gelcoat as the air expands.. not so much in cnrs thu bad ones will show. I have a few fine cracks/striations here and there I can see. These grind out till get to solid glass in a shallow V. then repair as if mig welding 5mm steel plates. This increases the strength in that area.. like a weld will if done right. If just fill, the cracks will re appear in the future. Scratchjes can use a polyester or epoxy based srap filler as Brad suggests above... The epoxy is far more expensive, stronger but personally I dont believe is is worth the expense over polyester. Also you can put epoxy over polyester or repair (that is the also the type of resin in most boats) But you can not put polyester over epoxy as a paint or as a repair. It will eventually de laminate. My view is stick with what the base is.. both are more than strong enough to do the job AND its like restoring a old British car with Whitworth threads, then find UNC and metric on different parts, and frustration and mistakes start to happen. Putting aside, before someone mentions it .. some UNC threads are so close to whitworth you would never notice unless using whitworth spanners which are sized very different to metric and UN |
Posted By: Garry 23041
Date Posted: 07 Apr 2020 at 7:56am
| Can I tell by looking/testing somehow what my original layup is out of? |
Posted By: Steps
Date Posted: 07 Apr 2020 at 9:17am
|
Dont understand the question.. |
Posted By: pjc
Date Posted: 07 Apr 2020 at 9:34am
------------- Sex at 58.Lucky I live at 56 |
Posted By: Garry 23041
Date Posted: 07 Apr 2020 at 9:49am
| polyester or epoxy.... |
Posted By: Durban
Date Posted: 07 Apr 2020 at 1:30pm
| [QUOTE=Garry 23041] Can I tell by looking/testing somehow what my original layup is out of?[/QUOTE Polyester has got a yellowish tint when cured and Epoxy resin has got an almost clear colour |
Posted By: Durban
Date Posted: 07 Apr 2020 at 3:17pm
|
Posted By: Durban
Date Posted: 07 Apr 2020 at 3:18pm
|
Posted By: pjc
Date Posted: 07 Apr 2020 at 3:44pm
|
Also you can put epoxy over polyester or repair (that is the also the type of resin in most boats) But you can not put polyester over epoxy as a paint or as a repair. It will eventually de laminate. https://www.fishing.net.nz/forum/gel-coat-repairs_topic102938_page1.html" rel="nofollow - https://www.fishing.net.nz/forum/gel-coat-repairs_topic102938_page1.html Dont use epoxy to repair polyester resin .. its incompatible, will eventually 'unstick' crack and fall out... And mixing water based anything into polyester or epoxy seriously effects strength curing and adhesion characteristics .. so caution when doing so and as to the application in which u do so. Even very humidty days will effect lay up and curing times also. So which is he to use "steps" you wrote both statements?? ------------- Sex at 58.Lucky I live at 56 |
Posted By: Steps
Date Posted: 07 Apr 2020 at 5:18pm
|
This is the correct Also you can put epoxy over polyester or repair (that is the also the type of resin in most boats) But you can not put polyester over epoxy as a paint or as a repair. It will eventually de laminate. The latter was from experience doing repairs we had to repair from a previous repairer, on a late 1970s Foden truck cab rear wall, many yrs ago where several different types of resins had been used in the past before we got it. |
Posted By: pjc
Date Posted: 07 Apr 2020 at 5:23pm
|
Thanks as I was confused as I a little job to do.I know lay was polyester so I need to sand through the wax?? to get a bond.
------------- Sex at 58.Lucky I live at 56 |
Posted By: Brad76
Date Posted: 11 Apr 2020 at 6:17pm
  Finally decided on the colour and fi ished the sides. Need to wait till lockdown is over for the top now as I need fibreglass supplies. |
Posted By: Steps
Date Posted: 12 Apr 2020 at 8:51am
|
Thanks as I was confused as I a little job to do.I know lay was polyester so I need to sand through the wax?? to get a bond.
Where the gelcoat has been sprayed on a internal part, it has a wax in it.. this sits on the surface and allows the resin to cure to a hard no stick surface.. If just spray resin or gelcoat without wax the surface will be tacky for a very long time. The wax needs to be decreased before laying over the top. Anything that has had polish/wax on should be decreased before sanding. Otherwise sanding will have the wax/ silicones be ground into the surface.. espec on plastics. All this is very noticeable as unexpected fish eyes when painting and unexplained delamination down the line. |
Posted By: Sanchez
Date Posted: 12 Apr 2020 at 9:16am
| Good infos here. Thanks fellas |
Posted By: Garry 23041
Date Posted: 12 Apr 2020 at 9:56am
| Nice work, Brad76.. |
Posted By: Steps
Date Posted: 12 Apr 2020 at 5:02pm
|
Im sure Brad will understand this... I do like the colour choices.. As to a nice job.. I know brad is handy with a gun.. Even so with utmost respect.. the number of pics of boats car trucks etc looking at pics is great.. see them for real can far too often be a huge disappointment... Everything from the quality of the pre, blocking, right thru to runs, fish eyes and orange peel. |
Posted By: Brad76
Date Posted: 12 Apr 2020 at 11:39pm
|
Fully ynderstand what you are saying Steps. How is this to show exactly what finish could be achieved. No hiding the finish on this one. Black, straight as can be and not a sign of orange peel in sight. The mirror reflection is even better in person on that finish. I could do this with the boat, BUT, then i wouldnt want to use it as i would be far too scared a fishing mate might scratch it 😀 Its a fishing and towing the toys boat. So have done as good a job as it needs. In saying that, it may be going in for another colour change at the workshop when thia lockdown is over. 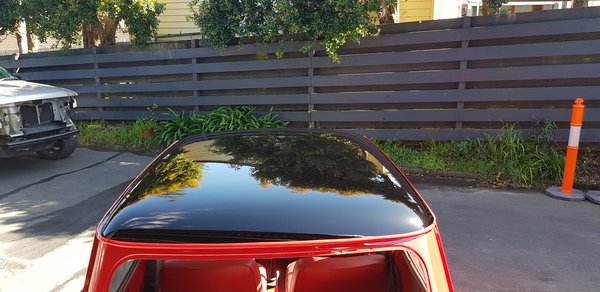
|
Posted By: Steps
Date Posted: 13 Apr 2020 at 9:40am
|
Thats not just no peel .. the blocking, straight lines in the reflections. That done old school with flexible padded 400/500mm block or sander? When using modern 2 pots, can you squirt straight over if full cure hasnt been reached , or do you have to scuff back? IE you will be re spraying well after full cure. I always went old school.. still recon its much faster Just need to be a bit fitter) and better prep, straighter panels. Espec on curves as in 50s morris minor / Beetles and late 60s muscle cars. |
Posted By: Brad76
Date Posted: 13 Apr 2020 at 8:27pm
|
That is hours and hours of prep. Easily 20-30 hours labour went just into the roof. Thats what you do for a show finish. Basecoat and then 2pac clear coat. Bake it leave it a couple of days then sand back with 800 and 1500 then flow coat the clear. Gives a beautiful mirror finish. To finish it off 2 of us then spent a day flatting back right through the grits from P1500 all the way to P5000 and doing a cut and polish. The last step was quite overboard but the roof on a mini really is the showpiece and I wouldnt let it leave the shop without being perfect. On a boat unless it is going to sit in a showroom, would usually do the sides in a weekend as long as there is a sound surgace to start with. With the proper tools it is easy. Dustless sanding with a 150mm discs on a 5mm random orbital sander. P320, wet on wet primer, basecoat and then clearcoat. Use the right producta and there is no worry about orange peel. Sure you will have some but only what is know as industry standard. I could write a novel on how to do it but wont. |
Posted By: Brad76
Date Posted: 13 Apr 2020 at 8:36pm
|
On another note Garry if you want any tips send me a PM. My background is 25 years in panel and paint with roles from managing paint shops, paint distribution and technical trouble shooting for the two top paint brands out there. So I know how to do old school as some people like to call it but actually prefer the new school and technology that is out there as it is far superior to the old school way of doing things in every way. |
Posted By: Steps
Date Posted: 14 Apr 2020 at 8:22am
|
I could write a novel on how to do it but wont. yep it is a trade with considerable technical expertise and some yrs of experiance.. not something learnt over night.. |
Posted By: Garry 23041
Date Posted: 14 Apr 2020 at 10:19pm
|
When this lockdown ends and I have a few much needed fishing trips under my belt I will give you a shout Brad and pick your brains a little thank you very much. I am heading out tomorrow to re attach some of my bird net that has blown loose and run my engine which is going to make me want to throw off the mooring and head out even if it is snotty as! Oh well. |
Posted By: Sanchez
Date Posted: 25 Apr 2020 at 7:42am
| I framed up a ski pole on my boat this summer, to sit up over the bait board. Did it with a mate in his shed. Welded galv pipe that I painted matte black. Its bolted into the transom and I'm taking it off today because the winter fishing will be better without it. I'm going to seal the holes and plug with stainless bolts. Any recommendation for the sealant ? cheers fellas. |
Posted By: Garry 23041
Date Posted: 25 Apr 2020 at 8:37am
|
I have my swim platform bolted to my transom and remove it each winter for access to my stern leg. 13 bolts. If you are passing through the wood core here is what I did. I drilled my holes substantially oversize. Then I filled the holes with an epoxy glue powder mix making sure they were full and packed one side to the other. Once dry I drilled my required holes correct size. This leaves a good thickness of hardened epoxy between the bolts and the wood core. You don't even need a sealant then unless it's below the waterline and I just use a basic one for that as I remove it each year and don't want them glued in. I do this for all bolts screws etc that penetrate my hull, topsides if there is a stringer or wood/foam core underneath. Gives piece of mind! |
Posted By: Sanchez
Date Posted: 25 Apr 2020 at 8:48am
| thats a great solution Gary. Wish I thought of that. How much over size exactly ? I might continue with my sealant plan this time however as i have not mixed epoxy before. will get prepared to follow your advice when i put it back in next summer. If you were going to choose a white sealant what would it be ? |
Posted By: Garry 23041
Date Posted: 25 Apr 2020 at 2:35pm
|
2-3mm between the bolt and original side of the hole if that makes sense? Epoxy is easy and in fact you could just purchase a small one of white repair if your boat is white? and you won't need the powder because it's non sag as it comes. https://www.smartmarine.co.nz/product/1193/epifill-21-2-part-white-epoxy-filler" rel="nofollow - https://www.smartmarine.co.nz/product/1193/epifill-21-2-part-white-epoxy-filler In terms of sealant for one season won't make much difference unless it's moored and below waterline. They sell the good sealants in small tubes now in black or white. Let them know you want to remove the thing again though because some compounds are very aggressive and considered permanent so ask. Don't be tempted by good old silicone though. https://www.smartmarine.co.nz/product/1910/291-flex-adhesive-sealant-tube-70ml-black" rel="nofollow - https://www.smartmarine.co.nz/product/1910/291-flex-adhesive-sealant-tube-70ml-black |
Posted By: Steps
Date Posted: 04 Aug 2020 at 6:10pm
|
Is Rust-Oleum Marine available in NZ? I know aerosol cans for interior and exterior use.. furniture and stuff, are available. 2 issues here.. paint a boat with aerosols?? really And 2 pot is the only way to go in 21st century to paint a boat.. or vehicle. This a genuine member/ post above? |
Posted By: OneWayTraffic
Date Posted: 07 Aug 2020 at 12:07am
|
Altex (Resene) make a 1 pot marine enamel that can optionally be mixed with a isocynate based activator. I don't know how it works but it's an interesting concept for those without a spray booth. Maybe best of both worlds? https://altexboatpaint.com/frontend/products.cfm?page=product&productid=171" rel="nofollow - https://altexboatpaint.com/frontend/products.cfm?page=product&productid=171 I really like the concept as to me it seems to be less fuss than a proper 2 pack. |
Posted By: Steps
Date Posted: 07 Aug 2020 at 9:00am
 Back in the day..would be late 60s early 70s, pre 2 pots, pre dulon lacquers, or about when they started to come in, Dulux produced an enamel car paint. One would squirt on a thin holding layer, wait 10 mins till would just lift with a finger touch. Then squirt the next coat. Just enough to cover or almost cover... Again wait till lifted with finger touch.. Then layer it up fast.. That last coat would hold, if you knew what you where doing, no runs or sags orange peel etc Get out of the room so no air movement , lock it for the next 12 to 16hrs. Since it dried slow the paint would flow out over the3 surface to a perfect mirror finish. But would stay tacky for quite a while.. which all meant slow turn around ... but get the hang of it and perfect , no Orange peel etc for the home garage ... If one did not do the elbow work on blocking down, showed every tiny defect. This is where a good paint job is made or broken. Then they introduced , from memory Plus1 additive think called, yes a isocynate.. the 1st introduction of isocynate. mixed art something like 5 or 15% by weight. Same procedure as above.. same finish... But 'dry' after 8 to 12hrs, and after 3 to 5 days, real hard. I didnt think this stuff was still around... If the same, yep OWT, ideal for the home painter. I cant emphasis enough that the pre blocking has to be perfect as there is no orange peel, every defect regardless how small sticks out. Later on Dulux brought out experimentally a product called Acran.. a full on 2 pot. We where able to play with this stuff in my fiberglass molding factory.. that stuff was hard, harder than modern 2 pots, and flexible for thin fiberglass panels. Dont forget your respirators with correct filters thu. |
Posted By: OneWayTraffic
Date Posted: 07 Aug 2020 at 10:36am
| Interesting Steps, how do you think it would compare to a proper 2 pack polyurethane brush on? |
Posted By: Steps
Date Posted: 07 Aug 2020 at 11:26am
|
Hmm.... Brush...? OK I see where your question is coming from.. your projects. I have used enamels in classic/,rod engine bays, because they are so forgiving (containants, etc) and flow so well. takes days. Some weith a artist brush and air brushing. The old school guys, before and just when I started doing this stuff, would use paint brushs, bloody good expensive ones, know how to thin down right, and work the brush.. so would flow right out. Saw it done once...its not like a gun, far far more skill. Guns, are easy, follow the rules exactly... Even after stripping our last house, plastering to paint finish, I always use3d rollers, even for wood windows cutting in.. small sponge rollers....cause I hate brush marks, espec mine.. So on that background, I was me, I would pick up a smaller top load finish spray gun and if need be hire a larger CFM compressor for a few hrs. Every workshop should have a small compressor.. from pumping up tyres , footballs, blowing down benches, to small paint jobs. You would still be using high build underneath (check product compatibility or you will get into an expensive , time consuming mess. So even there a spray gun will save a lot of time and money (latter, clean down, expensive brushes etc.) Oh and in the old school thing, the guys used to clean down brushes with jayes fluid disinfectant... And even the hardest, oldest of brushes, dropped in a jar of jayes will come back AS new (not 'like' 'as') That just popped up from memory... Jayes is saponified creosote with a bit of resin dissolved in it.. so its basically a soap on super steroids..with organic dissolving properties. |
Posted By: OneWayTraffic
Date Posted: 07 Aug 2020 at 12:33pm
|
I won't be spraying anything that has isocynates in it. Roll and tip or nothing. I can get a vinyl wrap as an alternative though. Old school will work fine I suppose. The additive is supposed to improve gloss, drying time and make the film harder. That's a decent amount. |
Posted By: Pcj
Date Posted: 31 Jan 2023 at 6:30am
|
Ok boys n girls. My repair work mixing gelcoat was ok but colour matching not great. So after reading through here,it seems best course of action is to paint. Gelcoat faded with a few scratches that can be faired out. What to paint with?? will be a roller/tipping job. Cant spray here Colour? Yes its a 1970s gold/yellow and thinking keep the same colour,no need to undercoat?? sand/degreaser wash with acetone? What brand of paint? Been looking around and 2 many choices. single pot or 2? Whats the best approach? ------------- "Times up" |
Posted By: SaltyC
Date Posted: 31 Jan 2023 at 8:46am
|
Talk to these guys they are great. Saw a demo old clinker style fibreglass dinghy they had hal done for demo at one of the on the water boat show. Came up great. They are also more than happy to talk you through it usually: https://altexpaintshop.co.nz/frontend/surfaces.cfm?page=fibreglass%20" rel="nofollow - https://altexpaintshop.co.nz/frontend/surfaces.cfm?page=fibreglass
|
Posted By: Pcj
Date Posted: 31 Jan 2023 at 10:13am
------------- "Times up" |