
Troutfishing - using flies

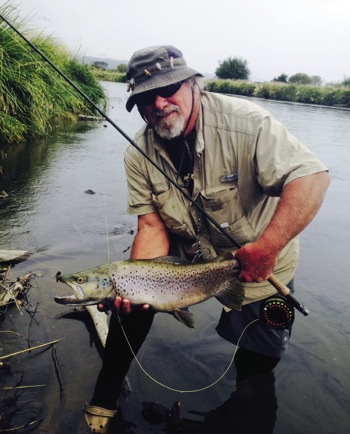
A very long time ago, when I lived happily in Turangi immersed in the fabulous Taupo trout fishery as a guide and an obsessed angler, I had occasion to invent a couple of trout flies that were really successful fish catchers.
My first commercially-sold fly was my ‘Louie’s Lure’, tied back then by Drapers in Taupo around 1982. It was a take-off on the standard Red Setter, green Hairy Dog, etc, type of wet fly.
 At that time there was a type of fluorescent chenille around in hot pink and peach colours – it was so ‘hot’ it actually had a bluish tinge to it. I added a white tail and double white hackles, and this fly may have been the first commercially-sold fluorescent wet fly in NZ. It sold all over NZ like hot cakes! I am sure many old timers remember that chenille – I am still looking for some!
That, of course, led to the Glo-bug, but enough has been written about that amazing fly.
Back about 1983 I became good mates with Lyn Lloyd, then owner of the Sporting Life trout-fishing shop in Turangi. Lyn was, and still is, a highly innovative fly-tyer. We had been having a good cicada hatch, and Lyn came up with a cicada fly using foam and deer hair. Foam was not a well known material in New Zealand back then.
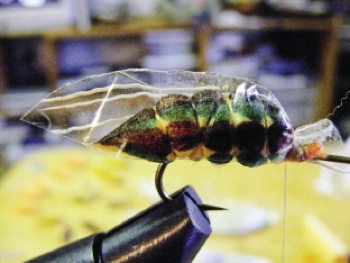
After seeing his fly, I began experimenting with foam, and eventually came up with a cicada dry fly that I still use religiously all over the world today.
My version added wings made from Cellotape, and I paid very close attention to the shape or silhouette of a real cicada, as seen from a trout’s perspective. I soon realized that size and colour mattered a lot, too.
There are about nine species of cicada in New Zealand. The big dark ones around Turangi frequent the lower sections or woody areas of all Taupo’s rivers. Hatches can be phenomenal – and noisy!
Nearby trophy trout lake, Otamangakau, had its own hatch of smaller cicadas in tan or green colours. So it pays to catch a few, dry them out, and keep them on your fly bench.
About the same time that I developed my cicada pattern, NZ Fishing News sponsored a fly-tying contest in the magazine. I entered and won with my cicada.
I was guiding by then, almost full time, and having great client success with my cicada.
I particularly remember taking out two gents from the UK, one who lived on the River Test, but had never tried fly-fishing. We went up the lower Tongariro in my boat Glo-bug to the Cherry Pool. I gave the novice a quick casting lesson, along with the standard tip about only striking after saying, “God save the Queen!”
I started to walk away with his mate, when he began yelling. Soon after, we helped him land a 12-pound (5.44kg) jack brown trout. I then tried to hurry off to set up his mate, but only got about 30 metres away when he started up yelling again – this time it was an 11-pound (5kg) brown hen. He got both mounted by Paul Blakeley, to brag to his trout-fishing mates back on the River Test about how he landed two trophy browns in two casts in NZ!
I was having equally great success at ‘Lake O’ on my smaller cicadas, often fishing two in tandem. These flies really take a bit of an artist’s eye to get them right. Full instructions can be found on Dan Blanton’s HOT FLIES page archives – www.danblanton.com. A quick rundown of the tying process is on page 57.
This fly floats super-high. I know there are now many new cicada patterns out there, but try my antique design and you will be amazed – a guaranteed no-refusal cicada dry fly!
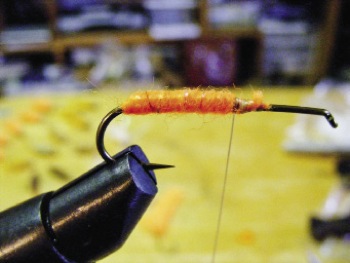
How to:
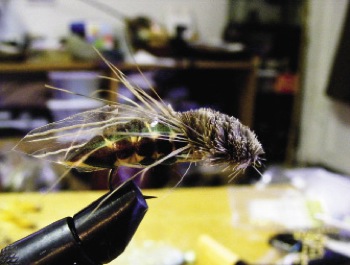
Make a base with Kevlar thread and then tie-in a tight layer of bright orange Glow-bug yarn, leaving a third of the long-shanked hook bare.
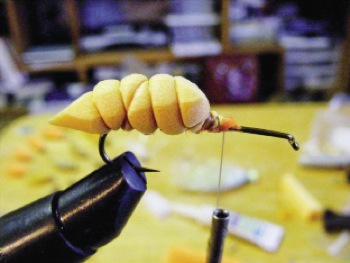
Cut some high-density foam into a boat shape. Saturate the Glow-bug yarn in Supaglue, then press the shaped foam on top. Tie down the front of the shaped foam with the thread, then spiral down and back up again to give it a segmented shape.
Use indelible felt pens to colour the body, then place some Sellotape over the body – it needs to be doubled over, sticky side onto sticky side. This version has a few strands of deer hair incorporated, but that’s not necessary.
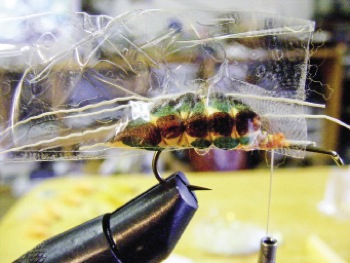
Tie down one end of the Sellotape and shape the wing.
Spin some deer hair at the front, and cut to shape, ensuring the base is flat so it floats better, and that a few longer strands are left to act as legs.
The Silicone Smelt
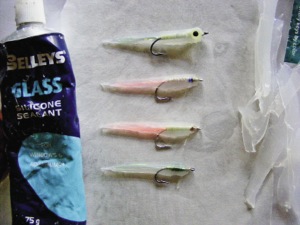
Also at about that same, very creative time, I was spending a lot of time chasing smelting trout at the Delta, the Tailrace, and in shallows around Lake Taupo. One famous character in Turangi, Murray Spalding, and I often fished together at the tailrace canal, where really big trout were common then. Murray showed me his secret weapon back then: a rabbit fly coated in silicone. It was a bit rough, but caught fish, and turned a light on in my head. Totally inspired, I sat down for a week or so fooling with silicone, and eventually developed my Silicone Smelt.
This was many years before there were any in the shops, and I still prefer it to the newer versions.
.jpeg) Take a long-shank streamer hook (back then I mostly used size 10, because weighting anything bigger was illegal), and tie-in some Flashabou fibres in the tail, about as long as the hook shank.
Take a long-shank streamer hook (back then I mostly used size 10, because weighting anything bigger was illegal), and tie-in some Flashabou fibres in the tail, about as long as the hook shank.
Cover the body with wraps of white yarn or anything else you might like, such as wrapped Flashabou or even lumo skirt.
Add a head of thread and a painted-on eye, or start with a silver bead head for a handy weighted version. Once you have a bunch of these all tied and ready – maybe six or more – you need to prepare a surface.
Stretch a heavy plastic bag or sheet over a flat board surface to form a working area, and lightly smear a coat of Vaseline over the plastic.
Carefully touch a wee bit of Vaseline to the hook point and curve of each fly – being careful not to get any on the fly material – and some on the eye as well.
 Buy a tube of clear window silicone and squeeze about one or two centimetres onto the plastic.
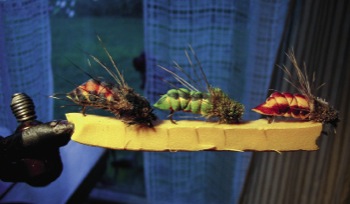
Next, find a stiff card, like a playing card, and trowel the silicone into a tapered smear. Lay the fly on that, tail toward the thin end, pushing it down into the silicone and straightening it out. Sprinkle on some glitter at this point if you have it.
Add another squeeze of silicone on top near the fly head, and trowel that flat with your card, tapering it thin toward the tail. Your fly is now embedded in silicone, on its side.
Do this to all your flies at once, then wait eight hours for the silicone to dry before peeling off each smear.
Using straight scissors or a razor knife, carefully cut out your smelt fly, leaving plenty of hook exposed.
There you have it: your own handmade Silicone Smelt, invented years before the Gummy Minnow. They work great when nymphed under an indicator, or use the bead-head version on a long leader and floating line in shallow areas for smelting trout. I have even made really big ones of these and caught everything from bonefish to albacore!
|
This article is reproduced with permission of |
Fishing Reports Visit Reports
Hauraki Gulf Fishing Report 11/06/26
Workups the best option mid-Gulf for quality snaps and kingfish Fishing across the Hauraki Gulf... Read More >
Bream Bay Fishing Report - 11/06/26
Normal transmission returns! It seems only the hardy have been wetting a line these last... Read More >
Raglan Fishing Report - 11/06/26
Solid snapper hook-ups out deep With the continuation of more settled weather there’s been some... Read More >
Canterbury Fishing Report - 11/06/26
Brave the cold, reap the rewards With a big southerly blow through here yesterday, it’s... Read More >


Major Bites
Minor Bites
Major Bites
Minor Bites
Comments