
Maximising the Eating Quality of Fish
The way fishers look after their fish has certainly improved over recent years, but there are still a few people who neglect their fish once they have been caught by not looking after them properly. At the end of a day’s fishing, the fish you have kept is the best reward; however, not looking after them correctly will see fish deteriorate much quicker than they should, and the quality of the flesh will not be as good as it can be.
Given the significant investment these days to get out fishing, not only financially but in time as well, we should make every effort to look after the fish we catch to ensure that when it hits the dinner table, it is in the best condition possible.
Looking after your fish starts from the moment it leaves the water until the time it is served on your plate. The following sections summarise a few steps you can take to help look after your fish to the highest standard.
Dispatching fish – iki jime
The first step to preserving fish quality begins the moment the fish is landed, with the quick, humane dispatching of it using the iki jime technique. Iki jime involves putting a sharp spike through the brain of a fish, causing immediate death.
You will know if you have hit the brain as the fish will tense up, curl its tail up, and flare its mouth and gills, and there should be no more movement in the fish. It can take a bit of practice, but it is worth persevering with as it is a very good way of dispatching the fish quickly and easily.
The Japanese are the world experts in seafood preparation and consumption, and they are responsible for the development of the iki jime method for producing high-quality, commercially caught fish. Once the fish is dead, the rigor mortis process can commence, and this is an important element to achieve the best quality fish.
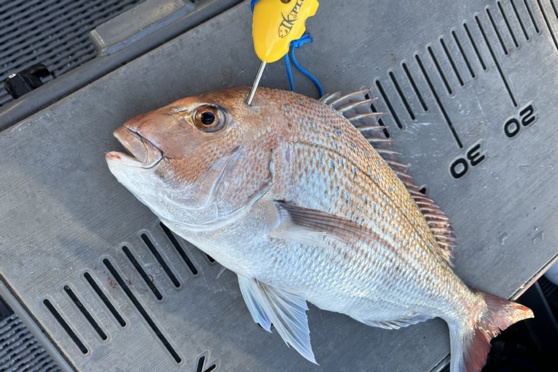
The type of fish dictates the position that you place the iki spike, but generally you are aiming for directly between the middle of the eyes, as that is where the brain cavity is located which connects to the spinal cord and nerve cord.
Correct iki jime placement for snapper.
Bleeding – clean flesh, better taste
Once the fish is dispatched, bleeding the fish is essential, especially for species such as tuna, kingfish and snapper where the flesh quality is important.
When a fish dies and it still has blood in its system or body, particularly the muscular tissue and capillaries, that blood will quickly start to degrade. This is a result of the haemoglobin within the blood breaking down, which contributes towards faster spoilage, a darker, red-coloured flesh, a strong or ‘fishy’ odour, and sometimes a metallic or bitter taste.
However, if you bleed the fish quickly, what you are doing is flushing that blood out before it has a chance to taint the flesh. As well as ensuring a much better taste, bleeding your fish also helps maximise its shelf life. Other benefits you will find is that the flesh will be firmer and have a much cleaner, more natural taste.
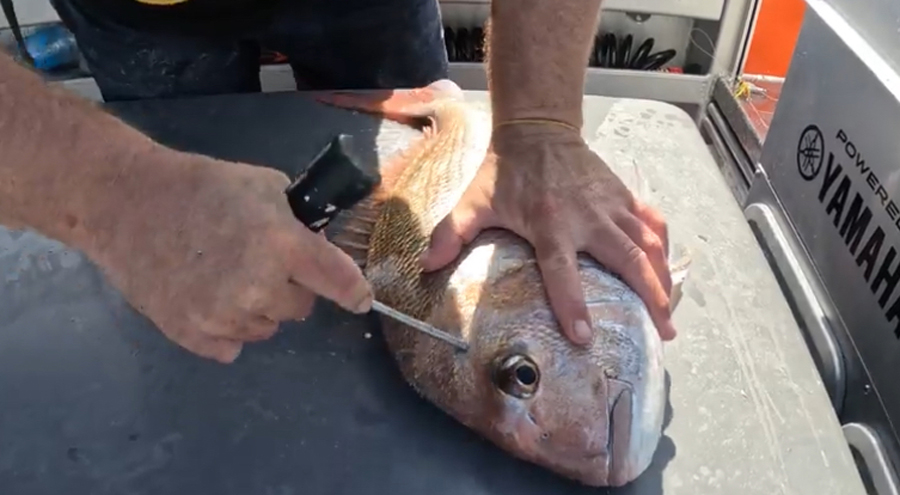
There are a few ways to bleed a fish, but the most effective way to release the maximum amount of blood is to cut the membranes on the gill arches of the fish, as this severs the major blood vessels. Don’t slit the throat, just the membranes. This allows the fish to pump out the maximum amount of blood – you will be surprised how much actually comes out.
Another tip is to bleed the fish in a 20L bucket, containing the mess and allowing you to wash it out over the side of the boat – much easier than having to wash the deck down and then use the bilge pump to get rid of the mess. The other advantage of this is that gravity helps drain the blood out of the fish quicker, too.
As a result of bleeding your fish, you will end up with cleaner, better-tasting fillets with a longer shelf life.
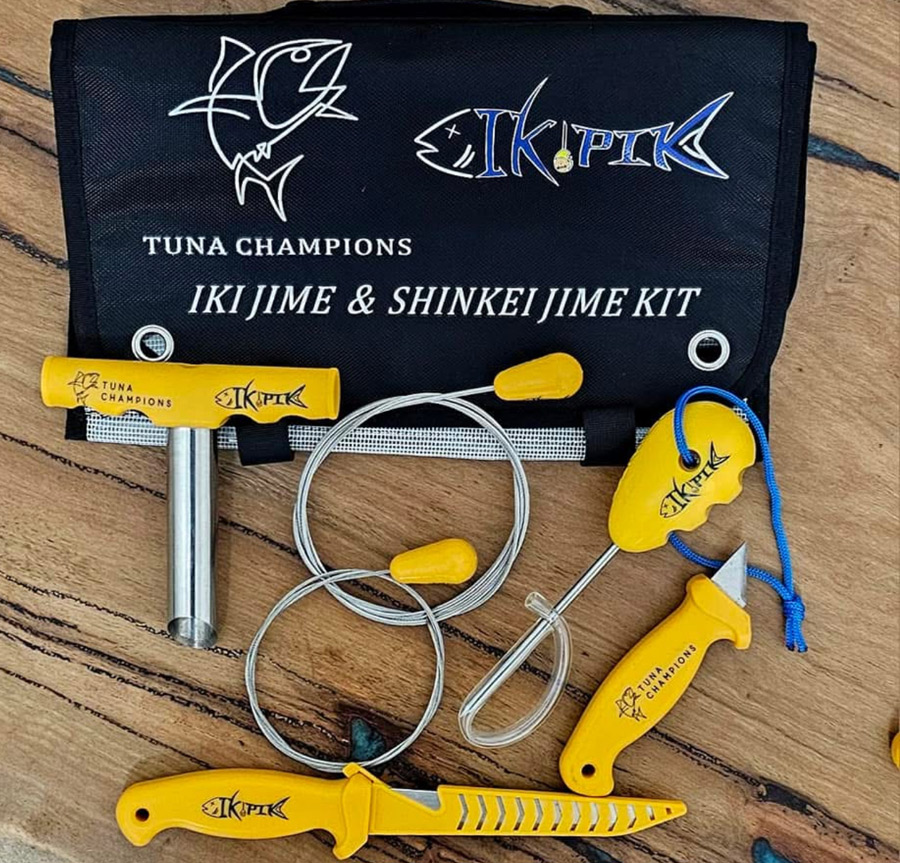
Shinkei jime – the next level
For anglers chasing the very best quality from their catch, especially if you enjoy sashimi, shinkei jime is the next step in fish care.
Shinkei jime is a traditional Japanese technique that goes beyond just killing and bleeding your fish; it’s about preserving flesh quality by stopping nerve-induced muscle activity after death. The process improves taste, texture, appearance, and shelf life.
Once you’ve spiked your fish through the brain as described earlier, it’s no longer alive in the conventional sense, but its nervous system can continue firing for up to 30 minutes, sending electrical impulses through the muscles. This continued firing causes lactic acid buildup in the muscles, blood seepage into the tissue, and a rapid decline in eating quality.
To stop this, you need to perform the shinkei jime method, which involves inserting a thin, kink-resistant wire into the fish’s neural canal, destroying the nerve cord that runs just above the spinal column. The nerve cord contains the nervous tissue that runs from the brain down the length of the body of the fish.
There are two common ways to access the nerve cord: through the head or the tail. For many species, especially snapper, I find tail entry to be the quickest and easiest.
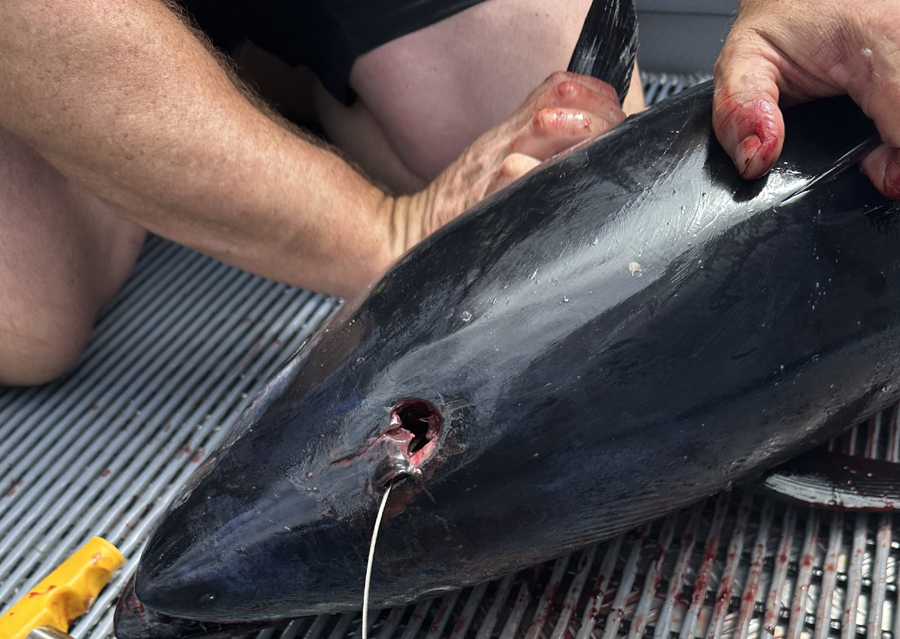
There are two common ways to access the nerve cord for shinkei jime: through the head or the tail. For tuna, through the head is the best approach, while for snapper, Dan finds tail entry to be the quickest and easiest method.
Here’s how I do it:
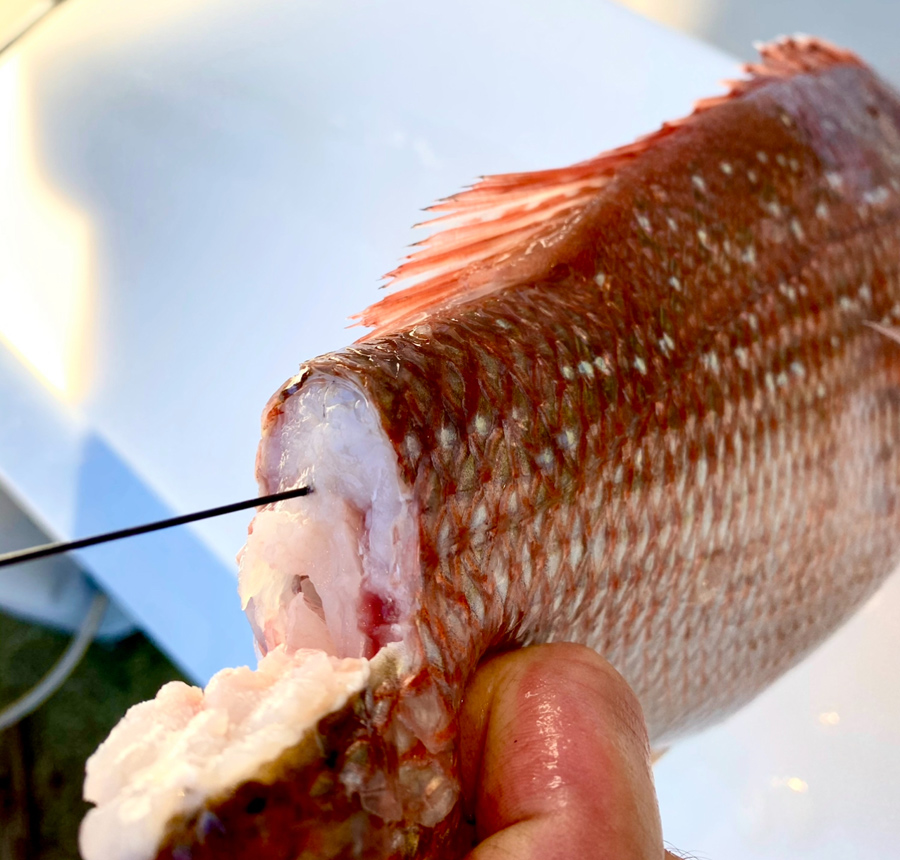
• Make a vertical cut down through the tail, just before the tail fin, deep enough to expose the spinal cord.
• Above the spinal cord, you’ll see a tiny round hole – that’s the nerve canal.
• Insert your shinkei jime wire into that nerve canal and push it in towards the head, working it back and forth to ensure all the nerves are fully severed.
• Even though the fish is dead, you’ll often see it kick and twitch as the nerves fire one last time – this is why a kink-resistant wire is important.
One of the most striking parts of the process is how the fish’s colour changes immediately, especially in snapper where the vibrant red and blue spots fade to a clean silver. It’s amazing to see and a sign that the job’s been done right. This colour does come back to the fish after it has been in ice slurry or ice.
Some may ask, “Why bother?” Well, the results speak for themselves. Shinkei jime halts lactic acid buildup, reduces muscle stress, and keeps the flesh firm, translucent, and clean tasting. It’s a method long used by Japanese commercial operators, especially for high-end sashimi fish, and it’s now gaining ground among Kiwi recreational fishers who want to make the most of their catch. Once you’ve tasted the difference and noticed the change in texture, you won’t go back!
Gutting your fish
If conditions allow, gutting your fish at sea is a smart move. It not only improves flesh quality but also saves you mess at home. Removing the stomach contents early helps eliminate bacteria and digestive enzymes that can quickly taint the flesh, especially if the gut cavity is accidentally pierced or exposed during filleting.
It also opens the gut cavity, allowing ice or ice slurry to get right into the body of the fish, helping it chill faster and more evenly compared to a full, intact fish.
There’s another benefit, too. If you’re like me and give away your snapper heads and frames, it’s a much better experience for the person receiving them. Clean, gutted frames with no blood or gut contents are ready to go, whether they’re heading into a stock pot or smoker.
Icing your fish
Chilling your fish properly after capture is one of the most important steps in preserving quality, yet it’s still one of the most overlooked.
To maximise shelf life and eating quality, you need to get the fish’s core temperature down as quickly as possible. This slows the activity of enzymes and bacteria, as well as the natural chemical and physical breakdown processes that can impact texture, flavour, and freshness.
Fish flesh is highly perishable when left at room or air temperature; it can start to deteriorate within hours. The faster you chill it, the better the result on the plate.
The most effective and accessible way to chill fish is with ice. Some anglers use frozen bottles, which are certainly better than nothing, but they don’t surround the fish or cool it evenly. Salt flake ice or, better yet, an ice slurry made from seawater and ice is far more efficient.
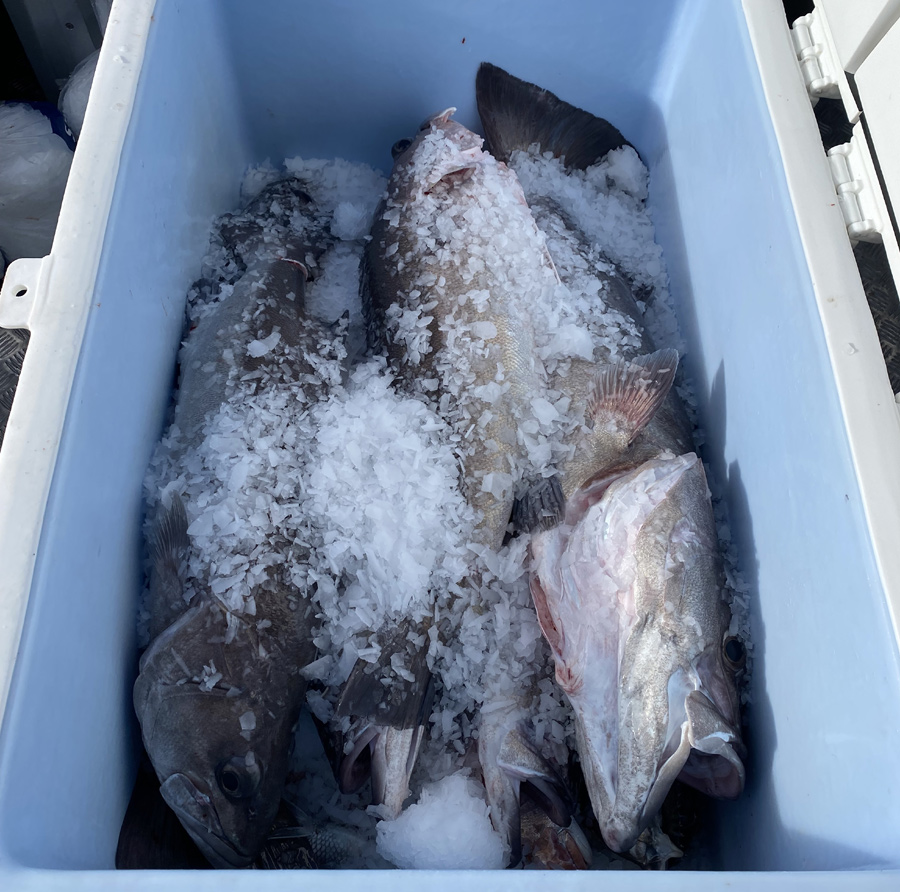
Chilling your fish properly after capture is one of the most important steps in preserving quality.
The salt in seawater lowers the freezing point so the slurry becomes even colder than standard ice, rapidly drawing heat from the entire surface of the fish. This method is especially effective for larger species like tuna and kingfish after long fights or in warm conditions.
Using an insulated bin or bag helps maintain the cold environment and keeps the fish out of direct sunlight. There’s a wide range of insulated fish bins on the market, and quality varies. However, if space is limited, a well-sealed, insulated bag will do everything you need.
Rigor mortis – don’t rush it
After a fish dies, it goes through rigor mortis, a natural process where the muscles contract and stiffen before eventually relaxing again. If you fillet your fish too early, while rigor is still setting in, you risk tearing or gaping your fillets, shrinkage or curling edges, and a loss of texture and/or shape in the flesh.
Once death occurs in a fish, chemical changes cause the muscles to contract. Rigor mortis is considered complete when all the muscle fibres have fully tightened, after which the fish will gradually relax and soften again. The time this full rigor mortis process takes can vary by species, but it is typically between 12-24 hours. The muscles soften as the protein breakdown begins, and this is when the flesh becomes more tender and ideal for eating.
Filleting during the rigor mortis process means the muscle fibres are still tightening. As a result, the fillet can continue to shrink after being cut, losing structure and appearing warped or uneven. I always try to leave my fish as long as possible before filleting. Not only does it make the fish easier to work with when filleting, but the result is much better on the plate.
So, if you’re fishing in the morning, try filleting your fish later that evening. Even better is leaving the fish on ice overnight if you can – you’ll really notice the difference in the filleting and how it tastes.
My go-to method after a fishing trip is to keep the fish well packed in ice, with the bung open on my chilly bin so any melted ice can drain off. That way, the fish stays cold but not waterlogged, and once rigor mortis passes you’ll find it far easier to fillet, and this will result in a much cleaner and better-looking fillet with a much firmer texture.
This step is especially important if you’re preparing fish for sashimi or raw dishes, where quality is everything.
Filleting your catch
A clean filleting station and a sharp knife make all the difference when it comes to turning your catch into beautiful fillets. If you’ve followed all the steps up to this point — brain spiking, bleeding, gutting, chilling, and resting — your fish should be firm and clean with no need to rinse it before or during filleting, especially not with fresh water.
A sharp, purpose-built filleting knife is a must. I use Victory knives, and I always have two on hand: one for filleting, and another for boning out the pin bones. These tasks are easier and cleaner with blades specifically shaped for the job.
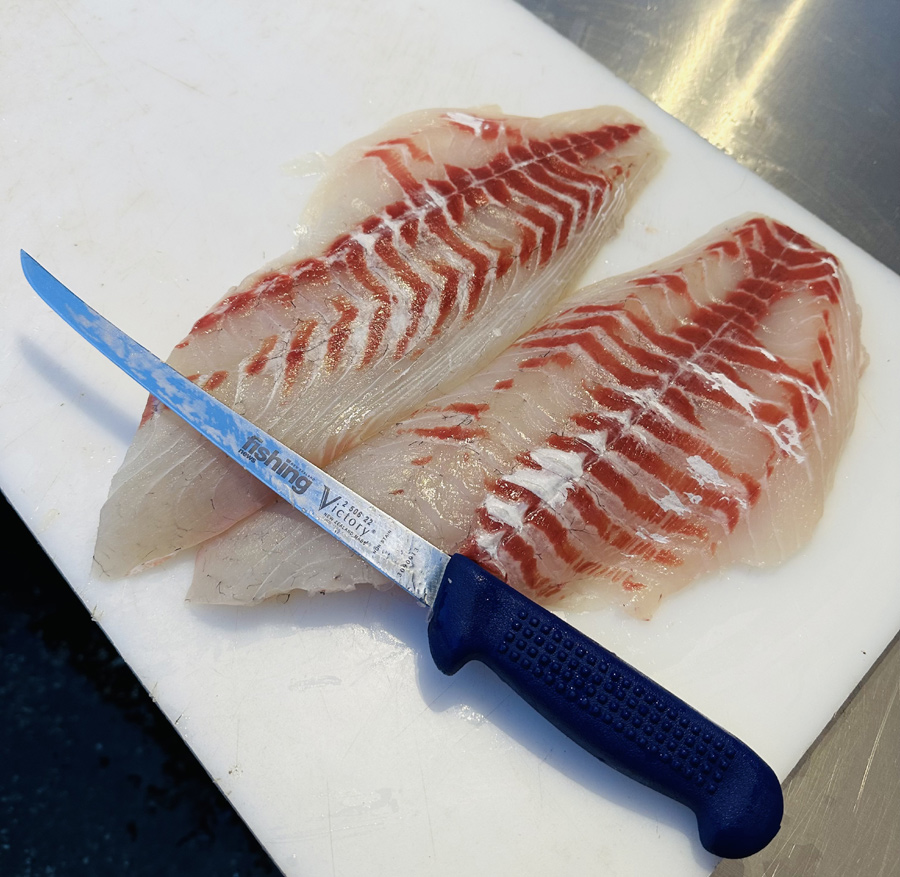
The final result.
I also keep my filleting surface as clean and dry as possible. A window squeegee is one of the best tools for wiping slime and water off the board. It helps keep mess to a minimum and prevents excess moisture from getting near the fillets.
Once the fish is filleted, I’ll trim off the red muscle. This part of the flesh breaks down the fastest and can taint the fillet if left on, so removing it is well worth the extra step for better flavour and shelf life. Again, a sharp knife makes light work of it.
For thicker fillets like snapper, I’ll slice the fillet with the grain into uniform portions. This ensures all pieces cook evenly; otherwise you can end up with dry edges while the centre is still underdone.
Storing your fish
When it comes to storing your fillets, moisture is the enemy.
Once your fish is filleted and trimmed, lay each piece on absorbent towels or cloths inside a container. This will draw out excess moisture and prevent the fillets from sitting in their own juices, which is one of the fastest ways for fish to spoil.
Fillets stored in liquid can quickly turn soft, develop a strong fishy odour, and lose that clean, fresh flavour we all want. You know that ‘fishy’ smell people try to avoid? It’s not from the fish; it’s from bacteria feeding on the moisture and breaking down proteins. Remember, fresh fish should not smell.
I recommend changing the towels daily or every second day, especially early on when the fillets are still releasing moisture. It might seem like extra effort, but the payoff is huge; your fish will stay firm, clean-smelling, and tasting just as fresh as the day it was caught.
By following this method, along with good icing, bleeding, resting, and filleting practices, I often have fish in the fridge for up to a week with no smell and no compromise in taste or texture.
Freezing your catch
If you’re planning to freeze your fish so you’ve got a meal ready down the track, vacuum packing is by far the best way to preserve quality.
But there’s one common mistake that many people make: rinsing fillets in fresh water before freezing. While it might feel like a clean-up step, it can reduce the shelf life and degrade the texture of your fish.
Saltwater fish are adapted to live in a saline environment, so their cells are naturally balanced to that salt level. When you rinse them in fresh water, the osmotic imbalance causes water to rush into the cells, making them swell and rupture. This damages the muscle structure and often leads to soft or mushy flesh after thawing.
On top of that, fresh water from a tap or hose can introduce bacteria which accelerates spoilage, especially through the freeze-thaw cycle when surface bacteria can multiply quickly. In contrast, clean seawater has natural antibacterial properties, which make it far less risky.
Freshwater rinsing also adds excess moisture to the fillets. If they’re not dried thoroughly before freezing, you risk surface ice crystals forming. This can cause freezer burn, which dries out the flesh and gives it an ‘off’ flavour and texture.
So, if you’re freezing your fish, here are a few simple tips for the best results:
• If you must rinse, use clean saltwater only.
• Pat fillets completely dry with absorbent towels or paper.
• Vacuum seal to exclude air and lock in freshness.
• Freeze quickly – the faster the freeze, the better the texture when thawed.
Done right, frozen fish can still taste fresh and clean – and it’ll be a pleasure to cook with, not a disappointment.
If you’re after proven tools to make caring for the catch easy, from iki spikes and shinkei jime wires to filleting knives and absorbent towels, head to dangovierfishingnz.com and gear up to do it right.
Final word
Looking after your fish isn’t just about taste, it’s about respect. Respect for the fish, for the time and effort it took to catch, and for the meals it will provide.
By following these simple steps – from the moment your fish hits the deck to when it hits the plate – you’ll get the best quality, waste less, and take real pride in what you serve your family and mates.
- NZ Fishing News
Fishing Reports Visit Reports
Tauranga Fishing Report - 28/05/26
Tarakihi on the bite Trips are few and far between at this time of year,... Read More >
Canterbury Fishing Report - 28/05/26
Fresh and salt turning it on! It is not very often I get to say... Read More >
Bay of Islands Fishing Report - 28/05/26
Lures paying dividends We finally had a break in the SE winds that have been... Read More >
Manukau/West Coast Fishing Report - 28/05/26
Snapper and gurnard in the harbour The weather has finally taken a turn for the... Read More >


Major Bites
Minor Bites
Major Bites
Minor Bites
Comments