
Kayaking - preparing for longer trips
Getting organised
 This is going to be a mean schedule, especially since the weather at this time of the year isn’t very forgiving. The key to making it work is being organised enough to have everything ready to go at a moment’s notice: tackle rigged, paddling kit packed, and the kayak on the roof rack ready to hit the road.
One of the biggest changes for me has been to properly set up my on-board tackle boxes. I know it’s such a simple thing and there are probably many kayak anglers out there already doing this. I was doing it to a limited extent before, but was never serious enough to make it work properly. Now I effectively have a series of ‘modules’ that take moments to select and load into the kayak’s Tackle-Pod, depending on what the goal is for the day.
Bait box: This has a range of ledger rigs, live-bait rigs, balloons, sabikis and leader material. It also has the special-purpose rigs I use when targeting fish like big trevally. I always have my stray-line rigs with me regardless, so these, along with swivels and scissors, live in pockets in my PFD. The bait box basically contains all my other bait-fishing requirements for inshore coastal fishing.
Jig box: This contains jigs, spilt-ring pliers, assist rigs and everything else needed for mechanical jigging.
Lure box: This contains a selection of bibbed and other hard-bodied lures, a few trolling feathered lures and saltwater flies, as well as a few inchiku/butterfly-style lures and their necessary hardware.
Deep water box: This has everything from tarakihi rigs, deep-water sabikis for catching bait, and heavy-duty stray-lining rigs, through to hapuku and bluenose rigs.
In addition to the above, I have a small container for a selection of ball sinkers and a partitioned tackle box with a range of soft-bait jig heads that can be slipped in when required.
This system makes it possible to change on-board tackle in seconds to accommodate different fishing plans, and makes an incredible difference in two ways. Firstly, it’s easy to swap between different types of paddling missions to make the most of weather windows up and down both coasts. Secondly, it’s a breeze to change to ‘Plan-B’ if you get to your launch spot and the weather has changed.
This whole concept is easy and inexpensive to set up, but has dramatically improved my flexibility. It has also taken a lot of the stress out of deciding what to take for each trip. Finally, it also means I’m not carrying so much tackle on board trying to cover every conceivable scenario; I can decide on the beach and, if needed, I can head back to shore and reconfigure in moments.
If it’s not on film it never happened
This is one area that’s seen massive change over the last couple of years. The advent of excellent quality wide-angle POV cameras has opened whole new worlds for capturing the antics we get up to on our kayaks. Both video and stills with high enough resolution to adorn the pages of this magazine are easily possible, and the old adage of ‘if it isn’t on film it never happened’ is now truer than ever.
Even the excuse of not having anyone else present to act as photographer is no longer valid. Most of these cameras have viewing angles wide enough to make on-board selfies a breeze – all it takes is a little effort in setting up camera positions to capture the best angles.
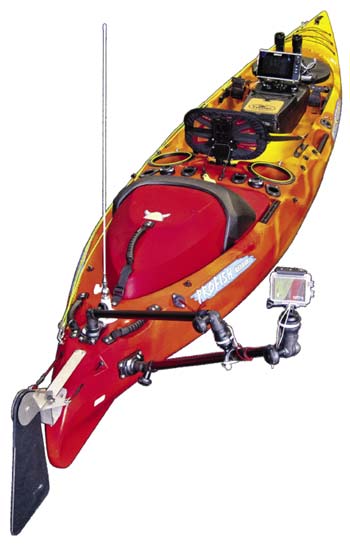
One shot that’s been difficult for me in the past has been an angle that properly captures loaded rods and some of the frenetic action as a fish is landed at the side of the kayak. RailBlaza has just released their new StarPort HD, a heavy-duty version of their StarPort with a larger footprint and four fastenings – twice as many as the standard StarPort. This removes a lot of flex when fitted to rotationally-molded polyethylene and has made it possible to mount cameras in new locations.
The greater rigidity can be enhanced with a backing plate in areas with internal access, but even in areas without, a little ingenuity can provide a stable camera mount. In my case the StarPort HDs are simply fitted with self-tapping screws, and by bracing the camera boom and loading it with a tensioner I now have a means of capturing a new perspective of the battle and what it takes to bring some of the fish aboard.
More power
One aspect of using one or more POV-style cameras, particularly when away from mains power (i.e. in remote camping locations while fishing or aboard motherships where there is often limited means to charge batteries), is keeping them charged. The same applies to other important equipment such as mobile phones.
There are a variety of compact-sized USB power packs available, but I’ve found most are too small to really be useful (one or maybe two full charges for the camera and battery backpack is often all they’ll deliver). I’ve found the solution for those times when multiple charges are required for each of two cameras and a cell phone is by utilising one of my larger sounder’s 12-volt SLA batteries and an inexpensive 4-port USB charger designed for automotive accessory sockets.
As a result, one of my old 18 amp-hour batteries I had retired when converting my kayak to much lighter lithium iron (LiFePO4) technology has been brought back into service. This battery is capable of charging the GoPro wireless remotes, camera battery, and accessory battery backpack four times, as well as my mobile phone at least once before needing to be recharged. For those needing more capacity, a solar panel could be added to help maintain the main battery’s charge for as long as possible.
Managing all the recorded video and images is as straightforward as carrying additional data cards, then getting to relive the trip when editing everything back at home.
Final checks and safety kit
One critical step when gearing up for a hectic paddling and fishing schedule is to maintain a regular safety check. This means going over your kayak before and after every trip with an eye to detail, looking for anything that’s loose or dislodged that may not perform as expected and, most critically, has the potential to create leaks.
When washing the kayak at the end of a trip I use the hose and spray gun to focus my attention. Everywhere the water hits gets a detailed look. Fittings are then grabbed and wiggled to see if there’s excessive play, and any shackles or quick links are checked to ensure they’re tight. I finish off by squirting the hose at hatches before checking inside to see if they’ve leaked. Doing all this at the end of a session means that if I do find a problem there’s time to remedy it before the next trip.
Equally critical is doing the ‘pre-flight check’ before launching – I’ve witnessed many kayak anglers scrambling to get on the water fail to do this. A classic example is not realising one of the rudder-cable shackles has vibrated loose on the rough road while driving over. Again, I’ve seen this happen, and the result was a highly embarrassing broach as the loose shackle let go right in the middle of the surf zone!
|
|
This article is reproduced with permission of |

Fishing Reports Visit Reports
Outer Hauraki Gulf Fishing Report 17/09/26
Spring wind the handbrake. Spring is starting to make its presence felt in the outer... Read More >
Top of the South Fishing Report - 17/09/26
Early snapper in Tasman Bay. Well, spring is finally here, and the days are getting... Read More >
Bream Bay Fishing Report - 17/09/26
Good snapper catches reported. After Tangaroa turned off the fish tap for a month or... Read More >
Bay of Islands Fishing Report - 17/09/26
Pacific bluefin tuna for the lucky few. The last fortnight has seen more fishable days... Read More >


Saturday 26 September 2026
Major Bites
 - -
- - Minor Bites
 - -
- - Sunday 27 September 2026
Major Bites
- Minor Bites
 - -
- -
Comments