Back in early 2003, while on a trip to Brisbane, I first happened across some assist hooks and knife jigs in an Aussie tackle store.
At that time this gear was just a glimmer on the fishing horizon and had yet to make it to New Zealand. I grabbed some assist hooks and a couple of the early River2sea knife jigs to try on our Kiwi kingies.
----- Advertisement -----
Kingfish jigging had risen and fallen in popularity twice already over the years. The hard core aside, anglers would be initially enthusiastic about the technique, but the hard yakka involved with speed-jigging using seven-foot jig rods, heavy reels with a lot of torque, stretchy 15kg mono and big bulky jigs that were hard to move through the water, saw many anglers reverting to live and dead-baiting when targeting kingfish after a couple of years.
This time round, however, things would be different. A Japanese-led tackle revolution had solved many of the technical problems: short, powerful jigging rods; compact, powerful, high-tech reels; fine, strong, low-stretch polyethylene lines; and long, slim, beautifully finished Asian jigs mounted with ‘assist’ hooks that hung from the head of the jig by a length of cord – a lot of the development had already been done by the time the latest incarnation of jig fishing washed up on our shores.
Six years after I shuffled back across the Tasman with the new toys tucked in my bag, jig fishing for kingfish is stronger than ever and still developing.
At first the advantages of braid, long jigs and short rods were applied to the standard Kiwi kingie technique of speed jigging (read ‘crank as fast as you can’) and this new gear certainly made life easier and got more people enthused. A little later we were introduced to ‘Japanese’ or ‘mechanical’ jigging, largely promoted by Chris Wong of BCS Enterprises and on-line company Jigs Direct. Chris had learned the method from some of the Japanese experts, and this synchronised lift-and-wind method, once you get the hang of it, is effective and not so hard on the arms and back as flat-out speed jigging. And it allows the use of lower ratio (and hence wider, stronger teeth) gearing on reels.
Roll your own
Demand creates supply, and a wide range of tackle is available these days. This includes a great many jigs and associated assist hooks.
With barracouta often found in the same areas as kingfish (especially in the colder months), even the heavy Kevlar cord favoured for assist hooks can be damaged and need replacing.
Every angler has his or her own ideas about tackle, and there are aspects of some commercially-made assist hooks I personally disagree with. One is length. Judging by the wear from the strike marks on old jigs, I reckon kingies (and some other fish) tend to hit long jigs between half and two-thirds of the way down the lure, so this is where I like to position my hook. Sometimes the assist hooks supplied with jigs are much shorter than this.
In addition, there are the components and construction used. With 37kg braid and very serious drag settings used, I have seen whippings come undone, apparently strong-looking hooks snap, and punched steel washers with square edges cut straight through 130lb hard mono traces. You learn from these incidents, and for all these reasons I prefer to make my own assist hooks these days.
In the October 2008 edition a simple and strong method of constructing assist-hook rigs, as shown to me by Justin ‘Fluff’ Wilson of Whitianga, was illustrated, and it is repeated on page 53 to save you looking for it. Don’t skimp on the quality of the cord, the solid rings or the hook; I speak from sad experience here, having lost some very powerful fish through terminal gear failure.
Tie the assist hook down, sport
A point of discussion between keen jiggers is whether you should have your assist hook tied down to the jig or not. Personally I prefer the hook tied down, as I feel it can fly out to the side as the lure sinks, resulting in fewer hook-ups if you get ‘bit on the drop’ and there’s also greater potential for the hook to tangle around the lure or leader.
The argument on other side of the coin though, is that predators which use suction as an aid to catching baitfish (a john dory is an extreme example) tend to pull a free-floating assist hook into their mouth anyway. I am not sure if this is the case with kingfish or toothy tropical species such as dogtooth tuna (why would the latter have such a great set of fangs if they were suction feeders?), but tie-down hooks seem to work best for me most of the time. You can make your own judgement.
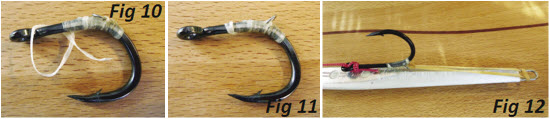
I like rigs to be simple, strong and effective. My original tie-down rig was a #16 rubber band hitched around the hook just above the eye and also to the bottom eye of the jig. This idea was greeted enthusiastically when I first wrote about it a few years ago and reprinted as far away as the USA. The rubber band often breaks when a fish is hooked, but a box of hundreds of bands costs only a couple of bucks. This rig worked OK, but sometimes the hook was not ideally positioned and could turn back into the lure body. As an improvement to this I now whip a small solid ring (or a split ring) to the back of the hook shank, and hitching the band to this sets the hook up perfectly on the jig. I use the same heavy waxed thread that I use for rigging baits for gamefish, as it beds down well and doesn’t rot, but other products may do the job.
When tying down the assist hook this way, I find it best to hitch the loop end of the assist cord direct to the metal eye of the lure and avoid the solid ring and split-ring arrangement. This way there is no springing back and forth of the hook rig while jigging, caused by the tension of the rubber band. Tie the end of your mono leader separately to the jig eye. As long as the jig has through-wire construction, this should be strong enough to cope with big fish and there is no need to muck around with split-ring pliers any more.
Make your own assist hooks - simple, strong assist hooks

1. Take a strong hook, such as a live-bait hook, and a length of cord. Specialist fishing stores or www.jigsdirect.com can supply ideal cord made from aramid fibres such as Kevlar.
2. Double the cord and pass the tag ends through the hook eye from the point side.
----- Advertisement -----
3. Turn the cord loop back across the hook shank behind the eye.
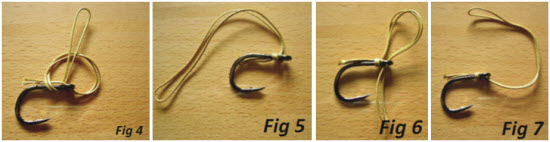
4. Take the doubled cord back around the hook shank and through the loop formed.
5. Pull the knot up.
6. Pass the cord loop back through the hook eye.
7. Pull up.
 8. The knot looks basic, but will not slip.
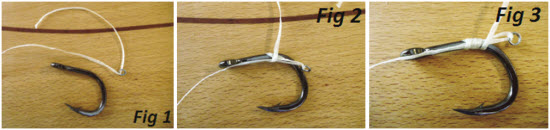
9. Hitch the cord to a solid ring/split ring combination (a JigStar product is shown)
10. The leader is also tied to the solid ring, taking pressure off the weaker split ring. Lures can be quickly changed with split-ring pliers, while the assist-hook rig stays semi-permanently on the leader.
Tie Down Rings
1. Materials are a jig hook, small solid or split ring and about 30cm of waxed rigging thread. Put the thread through the ring and double it back.
2. Lay the thread along the hook shank and back-bind one leg of thread to the hook shank with the other leg of thread.
3. Make four turns of thread.
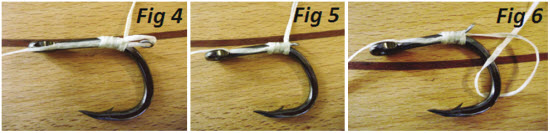
4. Pass the thread through the loop formed, above the metal ring.
5. Tighten the loop up by pulling on the bound-down thread leg.
----- Advertisement -----
6. Make a half-hitch with the waxed thread below the metal ring.
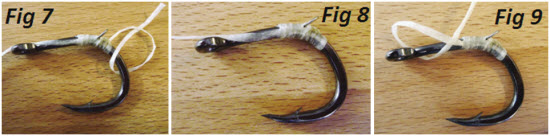
7 Make four half-hitches, tightening firmly each time.
8. Trim the thread.
9. Taking the remaining waxed thread, begin half-hitching back towards the hook eye.
 10. Make four half-hitches, tightening well each time.
11. Trim the thread. The assist hook cord can now be added as previously shown.
12. A rubber band is hitched through the ring and also through the bottom eye of the jig.
13. When banding down the hook, the assist cord sits best when looped direct to the top eye of the jig. The leader is tied separately to the top eye of the jig.
|
 |
This article is reproduced with permission of
New Zealand Fishing News
2009 - by Sam Mossman
Re-publishing elsewhere is prohibited
|


Comments