floor footprint 2003 Mac360 anyone?
Printed From: The Fishing Website
Category: General Forums
Forum Name: The Boat Shed
Forum Description: Discuss all things boating.
URL: https://www.fishing.net.nz/forum/forum_posts.asp?TID=136881
Printed Date: 06 Jun 2026 at 4:44am
Topic: floor footprint 2003 Mac360 anyone?
Posted By: e.m.p!
Subject: floor footprint 2003 Mac360 anyone?
Date Posted: 24 Jul 2022 at 2:03pm
|
Hi there, I have access to a cnc router and am keen on cutting a floor for my Mac, including hatch, box for fuel tank, some plinth/pedestals for seats, etc. Just wondering if someone has the measurements incl. radii for corners? I'd be keen on a tight fit rather than a hack job, hence the cnc. If not, I'll measure/trace the classic way of course - thought I'd ask first. |
Replies:
Posted By: Bounty Hunter
Date Posted: 24 Jul 2022 at 9:24pm
|
consider ed asking the manufacturer? ------------- No disintegrations! |
Posted By: Apex Predator
Date Posted: 25 Jul 2022 at 9:35am
| I made a floor for a Mac 360 a couple of years ago. It was simple. A 1220x2440 sheet of 10mm ply is a perfect fit. Mark the centre line along the inside of the boat as well as the ply and measure from there to create the shape. You will need to round the corners and taper the edges but the fillets off each corner are straight cuts. You will also need to cut the shape around the aluminum box that forms part of the outboard bracket. The floor will finish approx 150mm from the transom but this is good and allows access to the bungs |
Posted By: e.m.p!
Date Posted: 25 Jul 2022 at 12:48pm
|
Sweet – I already sent an email to Galloway, see what they say. Thanks for the tip on how to measure best. Makes sense. |
Posted By: kitno
Date Posted: 25 Jul 2022 at 1:08pm
I don't know if a 2017 360 is different but mine is 1230mm wde inside.    The floor was in it when I got it. I've since cut it in half by the change of angle so it can be removed without having to take the seats out. |
Posted By: e.m.p!
Date Posted: 25 Jul 2022 at 5:33pm
|
That looks mint - what's the white surface made of? I thought glueing down some gym mats (the cheap ones are black only so may get a tad toasty on a sunny day). I found these pics on TM so I'd be keen on a similar setup. Took the benches out and will replace with seats. I'd rather have more unobstructed floor area since it's mainly a spearo rock hopper.  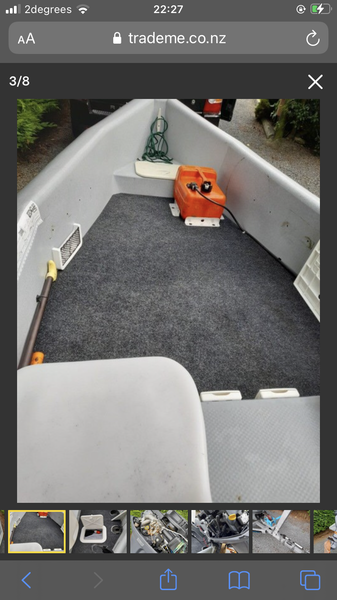 
|
Posted By: bigred1
Date Posted: 25 Jul 2022 at 5:34pm
| We have a Mac 5.7, I made the template as described above but out of cardboard. You can get big boxes from out the back of Noel Lemmings, bed shops etc. I then used that to make another template from packing sheets (Carters in Tauranga sell them for $10.00-$15.00 but you have to ask for them) as with the angle of the sides sloping away from the floor it changed the meaurements. Then I cut my final version from 18mm ply. I did it with marine ply, which only lasted a few years outside. Then I re-did it again in tanilised ply. So far there has been no reaction with the ali boat bracket or the stainless underfloor tank. It has been about 7 years now and it sits outside permantly. I did varnish it but that was slipperly. I then put rubber matting in, but that is heavy. It is now stained and bare. |
Posted By: e.m.p!
Date Posted: 25 Jul 2022 at 5:39pm
|
Great, thanks for the tips - so much to think about. The matting I'm. planning to add are EVA foam, so weigh next to nothing. Should be right I guess. I'm planning on giving it a lick of epoxy with lots of attention to the raw edges. Boat is stored indoors and I have a pulley under the rafters for lifting it up a gap and dry out after use. |
Posted By: kitno
Date Posted: 25 Jul 2022 at 6:25pm
|
The floor is 17.5mm tanalized ply. The surface is some sort of textured paint making a grippy surface. Never feels slippery even when wet. |
Posted By: bigred1
Date Posted: 25 Jul 2022 at 6:34pm
| I tried EVA sheets. It was quite slippery when wet and the big sheet warped in the summer sun as I had it lying loose. I did have dark grey and it got quite hot. I have glued them down to the ply in the cabin area and that has worked well. Next I tried the camping mats that clip together (600? X 600?) with the big holes but they were not comfortable for extended periods with bare feet (there are no seats in our boat). |
Posted By: e.m.p!
Date Posted: 25 Jul 2022 at 7:02pm
|
So you don't think these foam mats are worth it? https://www.bunnings.co.nz/q-d-cor-610-x-610-x-12mm-interlocking-foam-mat-4-pack_p0035633" rel="nofollow - https://www.bunnings.co.nz/q-d-cor-610-x-610-x-12mm-interlocking-foam-mat-4-pack_p0035633 What would be a good alternative? I have some marine glue for flooring left, and of course want to keep the weight down and prefer to have it soft under the foot. I tried ordering some faux teak eva flooring from aliexpress, but they can't send it due to their lockdown. |
Posted By: bigred1
Date Posted: 25 Jul 2022 at 7:20pm
| They will get hot in the sun, but if you're wet from spearing that will be okay. We had a 1200X2400X10mm sheet, that is what warped. The cabin area that is glued down is these and it has been good (and still is about 5 years later). At that price buy a pack and give it a go. If you like it glue them down later. |
Posted By: OneWayTraffic
Date Posted: 25 Jul 2022 at 9:27pm
|
Marine ply the only way to go if you want it to last forever. But then you'd need to epoxy coat both sides, glass the top with a light glass, seal the edges very very well, and keep it painted to protect the epoxy. Any and all penetrations into the plywood also need epoxy sealing. Ideally screwholes for example should be overdrilled and filled with epoxy putty and then the screws drilled into putty. Will add a significant amount of cost and labour. But will outlast you if done right. Marine plywood is untreated and will not last in an exterior application if unprotected. The value is in the good bending properties, high quality wood, and lack of voids in the laminations. If you only want it to last 10-20 years then treated ply would work. You should still seal the edges very well all around and coat both sides to stop checking. Epoxy might not bond to it, depending on moisture content and what treatment has been used. I have however managed to epoxy coat H5 treated wood (boat trailer skids) so it can be done. IF the epoxy bonds well then this will also last as long as you. I have used a roll on bedliner ( https://duraspec.co.nz/product/nutech-bullyliner-4l-kit/" rel="nofollow - Nutech BullyLiner - Fisher Group (duraspec.co.nz) ) to coat my sole. Seems very tough and was easy to apply. Also waterproof, you might get away with just this on treated ply. I'd go for option B myself on that boat. I'd still strongly recommend that you get a small pack of epoxy glue and use it to seal all edge grain and screwholes everywhere. Then a couple of light coats on the surfaces. Epoxy makes an excellent primer and works better than sealant on wood and cheaper too.
|
Posted By: e.m.p!
Date Posted: 26 Jul 2022 at 6:54am
|
yeh, given that it has been resurrected after it flipped and washed onto the rocks for a couple of days by hurricane Gita, I don't think I want to spend too much money on the upgrade. I was weighing up between marine and treated ply, but cost difference isn't too dramatic. Also, i tested my epoxy skills on the box housing the fish finder and it has held up perfectly fine - I guess keeping it dry (especially the floor's underside) while not in use will make a big difference. Thanks so much for all the hints and tips, I never expected such a big response. Keep it coming, please |
Posted By: bigred1
Date Posted: 26 Jul 2022 at 7:40am
| If I did it all over again I would go treated ply with stain to help protect it and look pretty. As ours lives in the sun everyday it is now started to look old, but it has been about 8 years since I redid the floor so I'm happy with that. We use our boat; drop weigt belts, dive tanks, wakeboards, stack kids bikes in it for trips etc. It is there to be used, keeping it simple is part of the trick. |
Posted By: kitno
Date Posted: 26 Jul 2022 at 10:36am
|
If you're after cheap easy and effective. H3 treated Plywood is the go. 16mm might do it but I know 17.5 will definitely. It takes one screw per piece to remove mine which screw into the factory inserts in the centre keel. Easy to hose out blood guts and sand. The sides where the ply will rest aren't on an even plain with the centre keel. So you'll need a couple of packers along the edge to support the floor nice and flat. Are you in Wellington? |
Posted By: e.m.p!
Date Posted: 26 Jul 2022 at 11:57am
|
Hi Kitno, yes – I'm in Wellington. I saw yours is the highside 360, so mine is significant older (last run with the low transom, before they raised it). It does not have inserts in the centre keel and I do not mind packing the sides, actually I wanted to run a small foam strip anyway for dampening and leveling. So here's my plan – I'm after a 30hp 2 stroke for safety reasons and to expand range (south coast up to cave bay) Currently running a 15hp, so I have to be quite smart on what gear (and whom) I'm taking with me. Coming in at Makara with a swell rolling is a bit of a nail biter so I think 30 horsies will help quite a bit to get out of some tight corners. It will also allow for a tad more weight, but then I have to be smart again due to the low transom (wake hopping on board when stopping). I'm looking at 12mm marine ply and add some joists where needed. Friend and colleague is boatbuilder by trade so he knows the Mac's shape and is confident to be sufficient thickness. Both benches are going and are replaced with fold up seats on pedestals. Occasionally I'll have my squirrely kiddos with me on the harbour, so I need to be able to quickly jump from one end to the other without having to hurl myself over the benches. I can/will be quite precise with the fittings since I have access to a flat bed cnc router (shopbot) and will add trays and drawers wherever I see fit. Should be like flat pack furniture… |
Posted By: kitno
Date Posted: 26 Jul 2022 at 1:17pm
|
Yes you will get away with 12mm if you add joists/ribs underneath. It'll reduce the weight aswell. 17.5mm ply isn't light. You'll need the 30hp when loaded and much safer with instant acceleration . Pretty flash using a cnc machine, a skilly and jigsaw would suffice. Using a couple of self tapper screws to the centre keel will hold it in place nicely. As for the surface, choices are endless. |
Posted By: Apex Predator
Date Posted: 26 Jul 2022 at 3:52pm
|
Perhaps the 2017 is different. Mine was a 2005. I used 10 or 12mm and it was fine. I also covered it with garage carpet which might explain why it was a perfect fit across the beam. Also didn't need any packers on the sides - the sides and centre were level. Mine had 25HP and had plenty of power with 2 pob  |
Posted By: Bounty Hunter
Date Posted: 26 Jul 2022 at 7:27pm
|
some good looking Mac360 setups in this thread! ------------- No disintegrations! |
Posted By: Kandrew
Date Posted: 26 Jul 2022 at 8:23pm
| Is it worth seeing if a plastic welder can lift the transum height and then get a new alloy engine plate made. |
Posted By: e.m.p!
Date Posted: 26 Jul 2022 at 8:48pm
|
Good question - I think Galloway can do it and has done in the past, but so far I haven't flooded it and never had any issues with the low transom. But on the other hand, I currently only have 35kg of motor in the back and no flooring. A 30hp adds 16kg and flooring may put another 7-8 kg on top of that? I have a hand lever bilge pump in the back and only needed it once in 45km/h winds (was pushing it). I think if i make a sharp turn after stopping I could avoid the wake and if that fails, an electric bilge pump will be cheaper than rebuilding the transom. I already learned a LOT of plastic welding getting it afloat in the first place, so this thing is a bit of a construction site anyway - I could add a bit of plastic on top of the transom to stop any water coming in. it's rated up to 25hp and there's no weight difference between an old 25 and new 30hp 2stroke.   |
Posted By: kitno
Date Posted: 26 Jul 2022 at 8:55pm
 A water tank fitting used as a scupper will get rid of water fast. As long as you're going forward. |
Posted By: bigred1
Date Posted: 26 Jul 2022 at 10:38pm
| Is this sitting below the waterline, and does it empty past the waterline. I’ve always wondered if that would work. It’s amazing how much water ends up inside the boat after a couple of dives, rough weather, etc. |
Posted By: e.m.p!
Date Posted: 27 Jul 2022 at 7:05am
| wow, this is a smart idea, Kitno. is that going through both hulls or ending up on the inside of the first layer of plastic only? I like that you're storing your boat in the lounge too, how did you get that past your wife? |
Posted By: kitno
Date Posted: 27 Jul 2022 at 9:27am
|
I copied it following Snapper Geoffs advice. Yes it empties below the water line. He has one each side but I've only installed one because the transducer is in the way. It has a bung on the inside aswell. It goes through both layers of the hull. No Emp, that hideous carpet is in front of the dart board in the garage lol. |
Posted By: kitno
Date Posted: 27 Jul 2022 at 9:29am
|
The left side will only empty down to the top of the keel unless I remove the keel bungs and allow it to flow through. |
Posted By: kitno
Date Posted: 27 Jul 2022 at 9:36am
  |
Posted By: OneWayTraffic
Date Posted: 27 Jul 2022 at 10:17am
If going forwards it will empty regardless of water level. One can estimate the amount by calculating area of the tube*forwards speed. For a 50mm diameter tube going at a high displacement speed of 6 knots (308cm per second) you get pi*2.5^2*308=6050 cubic centimeters per second. Or about 5600 GPH. In the real world there is a lot of friction, so actual performance is quite a bit less. This is a ballpark estimate only. But the same is true of bilge pumps. Lots of losses in the tubing and fittings. That little scupper will outperform a large bilge pump. Go faster and you drain faster as well. I'm putting scuppers on my boat. Two small ones (25mm internal) below the waterline, and two large ones (65mm internal) at the waterline. The hoses can be pegged up above the waterline when not needed. |
 Skoolinfish wrote:
Posted By: e.m.p!
Date Posted: 27 Jul 2022 at 10:30am
|
Mine doesn't have the keel bungs and since it never took on a lot of water I didn't bother to put any in (this may change though after the motor upgrade). Actually, taking in half a litre of water hasn't been too bad over the last couple of years since it keeps on flushing out sand which is still logged inside the hull. The hull originally was an insurance write off, my mate salvaged it and I fixed it over winter. The gash in the pics above was a crack through the hull and it filled up with tons of sand as well as crumbling the bits of foam in the pontoons. It took me the better part of a day to flush the sand it, but still… One upgrade i added is a small extension of the hull for the transducer to be tagged on to (pics to follow). The lip on the mac was notorious for sucking in air bubbles making the transducer a bit unreliable while skipping along. Damn, I love this thread, there are so many great ideas. Quite tempted to add the scuppers too… 
|
Posted By: e.m.p!
Date Posted: 23 Aug 2022 at 12:31pm
 So here we go – I've measured and fiddled with it quite a bit, so if anyone is in need of the floorplan as a printable pdf, hit me up (PM). These are 18 A3 pages. DISCLAIMER: I won't take any responsibility if this isn't working on your nutshell. Heck, I don't even know if its a right fit for mine (yet).
So in sort-of-related news: I managed to get my hands on a 30hp motor. Wheeeeee! |
Posted By: e.m.p!
Date Posted: 01 Jan 2023 at 12:06am
just a quick update on how the cnc cut floor ended up. Quite happy with it, the swivel seats are great and finally I don't need to negotiate the benches anymore to reach the anchor. If anyone needs the files, let me know. 
|
Posted By: OneWayTraffic
Date Posted: 01 Jan 2023 at 7:56am
| That looks good. What did you treat the ply with? If epoxy you will need to get some UV protection on it. |
Posted By: e.m.p!
Date Posted: 01 Jan 2023 at 9:57am
|
Thank you! I don't mind if it turns yellow over time, but if you mentioned it because it will become brittle, I'll have to find a solution. Thanks for the heads up. Will a simple Norski PU varnish suffice or do I have to bring out the pricey options? The pedestals and boxes are treated with UV stable surfboard epoxy, the floor is done with west system. Bottom of the floor is glassed. The boat is stored in a garage, so doesn't get too much UV- exposure. Initially I wanted to add EVA foam or carpet for flooring, but happy as is |
Posted By: OneWayTraffic
Date Posted: 01 Jan 2023 at 9:40pm
|
Even UV stable epoxy will yellow over time, and the WEST will absolutely need protection day one. I spilled some on my driveway in 2017 and it completely degraded in a couple of years. How fast depends on how much sun it gets, but it's weakening day one, even indirect sunlight will damage it over time. If you keep it in a dark garage and only use it a few times a year varnish would be sufficient. Four coats of varnish every year, or two coats of paint every ten years. Or varnish plus a mat that you can lift off and clean will last years. Personally I think for a fishing boat varnish is too much work for something that will just get blood on it. I'm using Bullyliner on the floor of my boat. Water reducible, easy to roll on and seems to be as tough as nails. I'd recommend it, but I can't speak to longevity yet. Also using POR15 as it's about the only one part polyurethane available in NZ. Then there's a lot of good marine options. https://www.supercheapauto.co.nz/p/bully-liner-bullyliner-coating/590603.html" rel="nofollow - BullyLiner Coating | Supercheap Auto New Zealand |
Posted By: kitno
Date Posted: 01 Oct 2023 at 11:34am
|
How's that new floor working out e.m.p! I've recently had the draw bar extended 350mm so I can easily open the rear doors of the vehicle without them hitting the winch post. Also fitted a decent Jockey wheel.  |
Posted By: e.m.p!
Date Posted: 05 Oct 2023 at 12:37pm
|
works a treat, didn't end up with carpet or foam mats. The swivel seats are great for putting flippers on - turning around 180° and hopping off. Best of all the floor stiffened up the hull by a big margin, it's almost like a new boat, very smooth ride now. I had to replace the coupling on my trailer, VTNZ said it was worn out. Drove over to get it re-wofed at another VTNZ and they said they wouldn't have noted as a fail. Now I have two. looking good on your trailer, jockey wheel makes a big difference - just remember flipping it up before heading on the highway. Learnt a lesson there 
|