Lockdown woodie project
Printed From: The Fishing Website
Category: Diving
Forum Name: Spearo's Corner
Forum Description: Free-divers & spearos chat about their sport
URL: https://www.fishing.net.nz/forum/forum_posts.asp?TID=135841
Printed Date: 26 Jul 2026 at 7:21pm
Topic: Lockdown woodie project
Posted By: e.m.p!
Subject: Lockdown woodie project
Date Posted: 22 Aug 2021 at 8:27pm
|
This is my second gun I started July 2018, however life got in the way and I got tangled up in various other things. I’m quite lucky to have (had) access to a mill and got the rail channel and the mech pocket sussed from the get go. I was planning to do a whole lot of experimentation with it, and did quite some screw ups I’ll go over in the pictures so you don’t have to. This round of lockdown let me dust off the old lady and continue where I left her three years ago. So this is the state of today without workshop access, but a small router, a rasp and sanding paper…  
|
Replies:
Posted By: e.m.p!
Date Posted: 22 Aug 2021 at 8:39pm
|
First experiment success and failure: when I layered the teak i decided to go progressively thinner from the middle out, with the filet in the middle. This worked really well, but guess just an aesthetic choice, won’t make any difference in performance. Now here’s where it went haywire: I mixed the epoxy with fluoro textile dye (another test) that cured the epoxy too quick and sent me into panic mode. I couldn’t get all layers done in one go and had to scrape some cured epoxy off the unfinished stock under the buzzer. This took off a mil or so and made it less centred for the track, but hey - experiment. The rest I glued with black epoxy (proper dye this time). 
|
Posted By: e.m.p!
Date Posted: 22 Aug 2021 at 8:47pm
|
Not too confident in my epoxy job, I decided to thread carbon tubes in an X-pattern through the length of the stock to avoid delamination in the future. This went well to start with, but I lost concentration towards the end so they’re ever so slightly misaligned. Again, I put this into the experiment basket and are still happy tinkering with what I got. Time to get pocket and track done.  
|
Posted By: e.m.p!
Date Posted: 22 Aug 2021 at 9:08pm
Plan is to have it on twin rubbers, but this time round I wanted two holes to get the rubber aligned along the track without interfering each other on release or while loading. No idea if this is working, but found similar concept working well on one of my off-the-shelf guns. Time will tell, I spent a lot of time to get the look I was aiming for, but can tell only once the rubber are in. Should be fine me thinks. 
|
Posted By: smudge
Date Posted: 22 Aug 2021 at 9:34pm
|
Wow, thats a work of art
------------- Best gurnard fisherman in my street |
Posted By: JustAnotherSpearo
Date Posted: 22 Aug 2021 at 10:44pm
|
Beauty! Whats the length overall? And also shaft length / shaft thickness? Be a weapon completed! |
Posted By: e.m.p!
Date Posted: 23 Aug 2021 at 3:19pm
Thank you! Gun is 95(ish) from last hole to mech, shaft 130/7mm. The completed length I don’t know yet, though I’ll leave a longer loading butt (short arm syndrome). The shaft is a 17-4ph Sporasub with a pretty wacky flopper, looking forward to seeing how that goes.
|
Posted By: Catchelot
Date Posted: 23 Aug 2021 at 5:18pm
Wicked bro, I like what you say by... life got in the way I have a rod I built but never glossed coated the eyes, etc only 30 odd years... again life got in the way. 
------------- "The sea, once it casts its spell, holds one in its net of wonder forever." - Jacques Cousteau |
Posted By: e.m.p!
Date Posted: 23 Aug 2021 at 7:49pm
|
Now is the time, Catchelot - one more week (or more?) to go. Ok, here’s for another c*** up on the gun, but I was to wound up to take pictures, you’ll see the results in the final anyway. When planning to rounding off the square blank I needed to fill in the holes of the carbon rod so that the bearing of the router bit could run smoothly along the edge. For that I stuffed them with dowels and thought that may do the trick, one side towards the muzzle still had a thin strip of mdf attached which in hindsight was the better choice of course. I grabbed the biggest and meanest table router bit i could find (I think around 60mm?) and got my beefier mate to push the stock as hard as possible against the bit – you see where this is going – the bearing pushed the dowels deeper into the rods resulting in a very unique pattern on the bottom of it, but only partly. I decided to make it a design feature again and named them “hydrodynamic speed dimples”. They’re not this bad, I won’t bother sanding them out, but rather add some to make it even. Will see. That was the event that let me reconsider and put it aside till now. In the meantime I invested a bit more time in the handle - this again took me ages and uncounted sanding drums, but I’m very happy with the outcome, especially since my first gun’s biggest fault was the distance between trigger and handle end. For this I made my own micarta and experimented with different epoxies, dyes and cloth. I cut up a whole lot of high vis vests and for every 2 layers of this colour used 2 of white cloth. What I learned - high vis looks awesome in micarta if alternated with white. Pick a white cloth that stays white when wet (dipping the cloth in water is a good indicator of what the final hue will be). Alternating with dark cloth looks nice too, but a bit dull. Use white resin dye if you need the fluoro pop even more. Finally I mixed the micarta with teak and started sanding… and then some more sanding. I regularly checked for fit wearing my dive glove and managed to slowly rotate my grip by carving out an indentation for my palm. Now the handle fits like a glove - think it was worth the effort, I learned lots about resins and how to clean them up from the shop floor. Next updates will be a bit slower to come, the small router demands bloody jigs for the tiniest cut, haha  
|
Posted By: e.m.p!
Date Posted: 04 Sep 2021 at 7:27pm
|
got the business part done, midway through I decided I like the handle to sit a tad higher so I chopped off 5mm off the plug and index finger and thumb part of the handle. Once set, I noticed that cutting shifted the geometry to the back and giving me 80mm from back to trigger rather than the 60mm I’ve planned for. Mind you, that distance was the biggest screw up on my first gun so I was extra vigilant to not have that again. Well, that goes there then, I guess, so back to dremel and rasp again… Worked out fine in the end and if I ever get picky it would be an easy fix. Now this end only needs a butt pad and a swivel to attach the float line. The orange from the epoxy, micarta and dyneema really pops, especially when wet… Muzzle next : ) 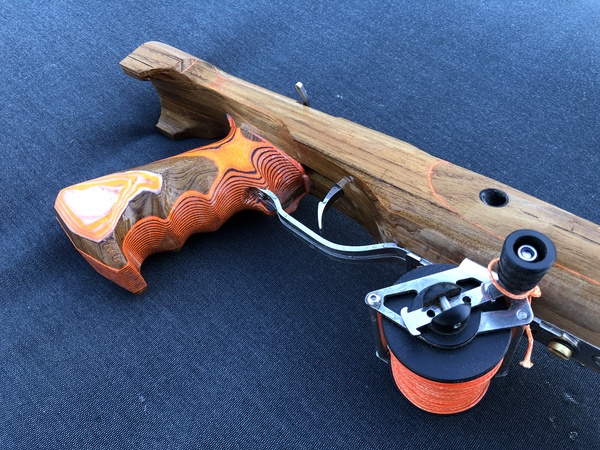 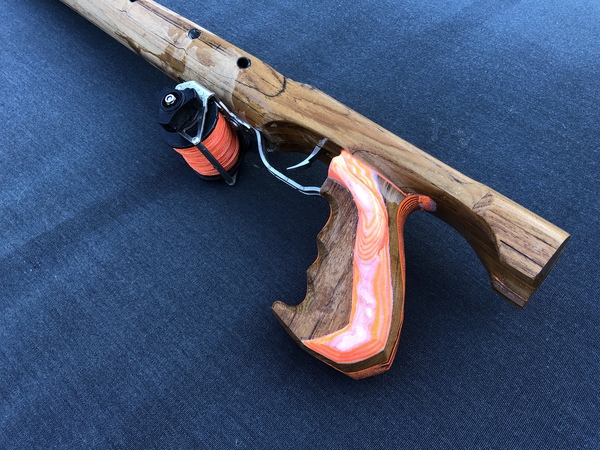
|
Posted By: Steps
Date Posted: 05 Sep 2021 at 10:55am
|
This round of lockdown let me dust off the old lady and continue where I
left her three years ago. So this is the state of today without
workshop access, but a small router, a rasp and sanding paper… And that is the part I really l appreciate. And those who think cant do it no tools and ability.. well no machine tools , basically by hand means slower more carefully and next to no mistakes.. Doesnt take a phD just bit of common sense hand saw, file, sand paper and time.. |
Posted By: smudge
Date Posted: 05 Sep 2021 at 1:57pm
Impressive workmanship EMP but that's coming from a guy who's big job for the day was refitting a broken handle to my rake  ------------- Best gurnard fisherman in my street |
Posted By: e.m.p!
Date Posted: 12 Sep 2021 at 10:39am
|
got some more stuff done, rasping, sanding and routing on the muzzle. Also added a swivel and the buttpad plus a tad more hardware. Unfortunately I got a bit too confident and cracked the muzzle when putting the final screw in… not too much damage done, me thinks. I filled the screw hole with a dab of epoxy, put the screw back halfway to push the resin into the crack and called it a day. This (literal) screw up let me reflect on the overall strength of the muzzle, so I figured the limits of the teak the hard way. Got me some fibreglass tape yesterday and will patch it up today. Only thing left then is to ballast it and maybe buff it if I can be bothered. Quite like the matt look and it will be bashed around anyway.    
|
Posted By: Steps
Date Posted: 12 Sep 2021 at 11:20am
|
Cool.. put the screw back halfway to push the resin into the crack and called it a day. I have just finished restoring an old low power plinking vintage Russian air rifle.. grand children testing it out yesterday.. sighting in .. groups exceptionally well... 1" @ Anyway the stock was split across the wrist..So I thought if drilled from the back of the breech part down thru the wrist.. tap it out , pack a heap of epoxy down the hole , then screw the threaded rod right down into it would work.. Like you, putting the epoxy in then 'compressing it , it then forced it right thru the split and excess to the outside . I recon , even if I have pulled the rod , filed off with the epoxy, the split join would have made the stock wrist far stronger than original. I dont know if suitable for your application, scarped and sanded back the stock.. was a mess, even think had fence stain .. and used tru oil sort of like danish oil on steroids. Use so little yet amazing finish. |
Posted By: e.m.p!
Date Posted: 12 Sep 2021 at 1:04pm
| Hmmm. I’m tempted to use tung oil or danish, though on the other hand I’m quite curious how it will age and weather over time. Last year I talked myself into staining the deck (as you can see in the pics) and tbh I prefer the untreated silvery gray. |
Posted By: Steps
Date Posted: 12 Sep 2021 at 5:23pm
|
NO not fence/ or deck stain .. no no no. That stuff will kill the effects you have, not stain but pigment the grains and look absolutely 5h1t. Use a dye.. not a stain Even if going polyurethane , or International Ships Varinsh you experiment on a bit of scrap to get the right proportion of dye and urtathene/ varnish and dye. Then 1st coat with the dye .. and any further coats as you deem needed without dye. Last house about 30yrs go I made 2" X2" laminated heart rimu kitchen benches and splash backs. I then had to match the pine floor board to the bench by the method above.. polyurethane , dye in 1st coat only. The bench did in the International Ships decking varnish, just hint of dye needed. Both to this day , after 30 odd yrs near good as new. Just do not drop egg white on the vanish.. its like paint stripper. Ok so go dye not stain. |
Posted By: e.m.p!
Date Posted: 12 Sep 2021 at 9:57pm
|
Oh, re-reading my post, I noticed it could be misunderstood. I’d never stain the gun, heck no. If at all i’d use Danish or teak oil, I’ve had all kind of projects done with either oil, PU, epoxy, you name it (the only stuff I never tried is two pack pu, but i never needed nor liked the super gloss/glass like finish). My friend made a gun from teak and never used any treatment and it holds up mint, so I’d be keen to go the same way… I can always sand back a tad and buff it up in case I have a change of heart. Great info though, Steps, I appreciate your input! |
Posted By: Steps
Date Posted: 13 Sep 2021 at 10:51am
|
Another option is just oil it.. boiled linseed, even raw. Made a macrocapa slab mantle piece (same home as above) using raw linseed. Natural finish, gets bit scrappy, so long as dry, pour and spread out a layer and leave to soak in couple days. I do like tru oil thu.about 1/4 or less of a small bottle I put around 8 to 10 coats on the gun stock. Used a tiny bits of an old linen bed sheet about 4cm X 3cm max.. put on top of the bottle and gently skaken , not turned over to wet the rag. Then rubbed in section by section, give an idea a big 'section' would be one side of the stock from wrist to front end. Spread/ rub till just feel the slight drag.. no more. 18 to 24 hrs later, a wipe with 800 grit sand paper, wipe down any dust.. repeat You may get a bit anal at this point, because as you lightly sand, in the reflection of the light you see the tiny est scratch, hollow, imperfection, and can sort of block these out as the number layers are put on. I do suggest dont get to damn anal.. once put all that extra work in, and the perfection of the surface you will never use it  Anyway after the 1st few 800 grit layers, go to 1200 for the last couple, then the finish. Oh this may be useful.. maybe. I looked at blueing the steel on the air rifle.. L4 lockadown, Im not set up to do so properly, thought about black 2 pot automotive, enamel with and without plus 1... Some yrs back on the suspension one of the vintage cars, I sorts experimented.. degrease water based tyre black , build up with thin layers till a nice even looking 3 may 4... then put bit polyurethane over. Well it lasted yrs when it was not really meant to. So did the same on the air rifle barrel , breech etc... except 3 very thin layers of the tru oil. Grand children, primary school to early high school.. not a scratch..I never mentioned anything about "be gentle " etc. And if doesnt work out, its real easy to clean off with damp rag of IPA, and even easier if put a little acetone in as well (nail polish remover.) |
Posted By: e.m.p!
Date Posted: 18 Sep 2021 at 10:00am
|
second to last update: After some reinforcing the muzzle with glass, I finished the gun yesterday and will give it a go later. Wish me luck (yes, it needs ballasting too, I’ll find out today how much lead it needs).   
|
Posted By: Steps
Date Posted: 18 Sep 2021 at 3:44pm
That is real cool.. bit like the top end expensive guns back in the 60s  |
Posted By: e.m.p!
Date Posted: 18 Sep 2021 at 8:52pm
| Thanks Steps! I’m just back from the testrun. The first three shots went nowhere, somehow the shooting line wrapped itself around the rubber and stopping the spear in its track. Wasn’t very fishy either so I went to look for crays while thinking what could have caused it. Turns out, the line is too close to the rubber when the gun is loaded, so I took tool number 2 – piece of gaffer tape – and glued the line to the spear. Tada! fixed. (i’ll come up with a better solution). The gun has quite some power and is super accurate, although I didn’t use longest rubber stretch possible. And on another note – doesn’t need ballasting, the holes in the side work as hoped. Sinks very slowly when loaded, floats when fired. |
Posted By: Steps
Date Posted: 19 Sep 2021 at 9:34am
|
Thats to me seems all great news. 1/ proof of concept works 2/ Now just fine tuning stuff.. which in many cases does require some mods. Shame the bath tub is to small to do testing.... |
Posted By: Crippy
Date Posted: 20 Sep 2021 at 2:54pm
|
Very nice! You can tell that sporasub flopper has been designed by a European, no such thing as keep it simple. ------------- Go hard or die trying. |