C17 new project.
Printed From: The Fishing Website
Category: General Forums
Forum Name: The Boat Shed
Forum Description: Discuss all things boating.
URL: https://www.fishing.net.nz/forum/forum_posts.asp?TID=132653
Printed Date: 27 Jul 2026 at 2:57am
Topic: C17 new project.
Posted By: OneWayTraffic
Subject: C17 new project.
Date Posted: 06 Jan 2020 at 5:26pm
Some assembly required. 
https://bateau.com/studyplans/C17_study.php?prod=C17" rel="nofollow - https://bateau.com/studyplans/C17_study.php?prod=C17   |
Replies:
Posted By: Steps
Date Posted: 07 Jan 2020 at 9:45am
|
That is so much like My dad old 14' 6" (think it was) kauri clinker boat with 25 hp seahorse from the 150s/ early 60s. Used to from KK bay and other places, out past Rakino, up around the Harbour bridge..Noises, well out into the Furth.. Towed with a Hillman Mix Saw some rather narrly weather , coming in well after dark as weather forecasts then where by Balloons, and they traveled west so much of the prevailing data was from Aussie and obsolete. So they made solid design Sea boats back then. I always have a spot spot for these old school type boats. |
Posted By: OneWayTraffic
Date Posted: 07 Jan 2020 at 5:04pm
|
Old school design and hull shape. The C stands for classic. The engineering is anything but old school. Hull panels, frames and stringers will be Meranti. Superstructure Okoume. Glassed both sides with 400g double bias and WEST epoxy. |
Posted By: MacSkipper
Date Posted: 07 Jan 2020 at 5:29pm
|
Looks fab love the lines. What trailer/motor are you thinking of? Will you buy new or secondhand, will you make trailer yourself?
------------- Good fishing trip nothing breaks, great trip catch fish. |
Posted By: OneWayTraffic
Date Posted: 07 Jan 2020 at 7:13pm
 Image of frame explanation to follow. Mac: Rated outboard is 50hp as designed. She should go 25mph with that with a full load of five adults. In the designers words 60 or 75 is fine 90 is getting dangerous and 115hp is excessive. I’ll see what is available when the time comes. If buying new will go a 60hp. I am cutting the transom at 20” and wide enough for a kicker. I have a 2.3merc two stroke that will work. Trailer likely to be multi roller. I’ll sort that out before the sole goes on so I can line up the reinforcements with the rollers. 6mm Meranti with biax both sides is stronger than the standard 8mm glass layup especially if you look at long term fatigue so rollers shouldn’t be an issue. |
Posted By: OneWayTraffic
Date Posted: 07 Jan 2020 at 10:28pm
|
Thought I would post a bit on how to draw the frames as there might be some interested. Old school boat building has a table of offsets, which need to be lofted full size. That is because the designer draws the plans on paper, and when scaled up 30x the width of the pencil can be inches wide! Modern plans are done with CAD and the lofting is done on the PC to far more precision than required for this method. In my previous dinghy I had some gaps of over 10mm to fill with epoxy putty. No issues other than cost and weight. I am aiming to do a better job this time. 3mm (1/8th") is the precision of the plans. No more is needed. To draw a frame start be drawing the baseline and Centrelines on a sheet of ply. The centre line is the centre of the boat (vertical pencil line) the baseline is (in this case!) the top of the solem marked in red vivid. All measurements are taken from the CL and BL unless stated. It is IMPERATIVE that these lines are perpendicular! I measured against the edge of the sheet multiple times over the line. For tools I used a rafter set square, a fabric tape measure and a standard builders tape. The fabric tape measure is best for quick checks of distances along the sheet. One can use another sheet of ply as a straight edge and right angle if needed. The edges should be very close to square from the factory, but always check. This frame is E (last frame in front of transom). It will form the motorwell bulkhead, reinforcing the transom and preventing swamping from waves over the stern. I measured left of the CL 822mm then directly down 70mm. Drew an X in pencil. Then up 641mm from BL and left 1015mm of CL. Repeat for the other side. Draw in the boundary in pencil then over in vivid so I can see it more easily when cutting. I found in my previous build that when holding something that will have your fingers off in a second you don't want to be losing the cutting line. The top of the frame has a slight camber (curve) in it. This is a parabolic shape drawn by putting a batten through three points shown on the plans. The curve is for the side decks later. A batten is a really effective way to draw a nice fair curve. I'm using an Aluminium flat bar on edge from Mitre10, but anything that will bend with little effort in a fair way will work. Hold the batten down on three points and draw the line in pencil. The flat bar also makes a very useful and cheap straight edge. It will end up on the keel or rubrail later on. Easy as, just take your time and measure measure measure. |
Posted By: OneWayTraffic
Date Posted: 07 Jan 2020 at 11:15pm
|
Profile picture. I am cutting the outboard well wider. That will mean not as much storage near the transom, but room to hang an aux without using a bracket. My 2.3hp two stroke will manage (shaft length 17"). The rest of the transom area will be boarding platform and flotation compartments. Drainage will be through elephant trunk scuppers RIB style. I am planning to cut down the rear panels to meet the transom, similar to some more modern designs. I think it looks good as designed but would much rather have easy access to the rear for hanging the aux if I ever need it. |
Posted By: MacSkipper
Date Posted: 08 Jan 2020 at 6:37am
|
thanks for the replies interesting. Have you considered saving a search on trade me for an outboard used in case a suitable one turns up?
------------- Good fishing trip nothing breaks, great trip catch fish. |
Posted By: OneWayTraffic
Date Posted: 08 Jan 2020 at 8:40am
|
Wee while off that still. I don't want to have an outboard lying around for possibly years while I finish her. I do keep an eye on TM though I don't want to put a cheap ass motor on a once in a lifetime project. I would like to get it in the water summer 2021, but that depends on being able to use all my holidays on her. I am a teacher so that helps.
|
Posted By: MacSkipper
Date Posted: 08 Jan 2020 at 9:05am
------------- Good fishing trip nothing breaks, great trip catch fish. |
 OneWayTraffic wrote:
Posted By: Steps
Date Posted: 08 Jan 2020 at 9:10am
|
What total gross weight with ppl etc do you recon it will be on the water? What speed do you realistically recon it will get over the bow wave on the plain? Havnt done this sort of old school hull or looked into them. It is a plaining...yet,. going of my dads old clinker 25hp @the powerhead.. not prop.. it was more a displacement to semi displacement, which is a total different kettle of fish in calculation.. formula. Messed with some planing hulls trolling as displacement , semi displacement.. defiantly hull length a serious factor. Would like to play with some numbers. I have no accurate data base of similar hulls to even estimate hull constants on the plain. I would certainly not take the results as anymore than a very generous ball park.  |
Posted By: OneWayTraffic
Date Posted: 08 Jan 2020 at 4:21pm
|
It's a constant deadrise planing hull. 45 degrees at cutwater, but 10 degrees at the transom. Very very similar hull form to the Tolman skiff. Almost exactly the same deadrise chine width etc. I know that several of these have been built and easily done 25+mph with a 50-60hp motor and several adults on board. Stepping up to 70hp is a fair bit more weight on the transom.
(Edited deadrise. Closer to 10 than 9.) |
Posted By: otdrmn
Date Posted: 09 Jan 2020 at 12:05pm
|
Nice, check out the otdrmn YouTube channel for a pictorial video of the first OB17 being built ,also by bateau boats ------------- The 4 R's ~ Rods, Reels, Rifles, Rooting |
Posted By: Steps
Date Posted: 09 Jan 2020 at 3:12pm
|
very ball park stuff Say 690kg (assume includes motor gas batteries etc) plus several lets say 2 ave 80kg say 850kg total. say 55hp 25 mph Gives a hull constant around the 145...which would at a guess would be a little high but certainly on the high side of ball park. Interesting. A lot would depend on construction...ie dont get too carried away with too many glass layers .. go over board. I was looking at a wood over ply boat the other day, some 50yrs old, similar construction ('little toot' nic named) bit bigger.. glass mat over ply over ply with polyester resin. Still as solid as the day made..and not over board on the glassing.. The builder in trade..no filling between joins..again that starts to add weight.. After the 1st 'practice' project this Im sure will come out really well... |
Posted By: OneWayTraffic
Date Posted: 09 Jan 2020 at 5:12pm
| Glass resin ratio is another. Good hand layup is 50:50. New guys get 33:67 often as not. That’s twice the resin for no gain in strength. I’m not sure if the hull weight quoted is for Meranti or Okoumé. That’s a 40kg delta easy. I’m using Meranti for the structural stuff Okoumé for interior parts. |
Posted By: Steps
Date Posted: 09 Jan 2020 at 5:38pm
|
Good hand layup is 50:50 Back when most of our lay up was poly and 95% chopper gun we weighed out resin and rovings 3:1 Light hop strand hand laid depending on weight and day humdity/ temp a little heavier and heavy C strand getting up to 1:1 Cloth was far easier to wet out and roll so that was close to the chopper gun. Chop stand type issue .. dont know if you will use that.. used to lay up behind gelcoat when mould making was far better than 3:1 Yes ratio backs a huge different to strength and weight. Back then epoxy was imported (Muldoon days) very very expensive and very rarely used. I see these old glass over ply very well made poly resin boats and old glass boats from workshops like lotus, Sea nymph, Haines still around these days in excellent condition...I do wonder about why the extra expense/ weight of epoxy.. yes it is stronger but is that strength and durability in engineering terms required? It has been debated before .. but just a thought to consider maybe. |
Posted By: OneWayTraffic
Date Posted: 09 Jan 2020 at 7:09pm
|
The designer (Naval architect with 40years experience) specifies Marine epoxy and wouldn’t condone polyester. The engineering relies on it. Weights the same cost differential is about 2% of the whole project. I am not aware of any modern design that specifies polyester in this type of boat. Maybe for a ply on frame build with the strength in heavy framing and fasteners. Even then I would use epoxy as the amount in such a boat would be very small. In this build I’ll use only the best materials available for the hull. |
Posted By: smudge
Date Posted: 09 Jan 2020 at 8:29pm
Nice work. Did you build that? Do you still have it? ------------- Best gurnard fisherman in my street |
Posted By: OneWayTraffic
Date Posted: 09 Jan 2020 at 9:56pm
|
I asked him that. He sold it. That was the first OB17 built. Many others built since. |
Posted By: Steps
Date Posted: 10 Jan 2020 at 7:58am
|
Weights the same cost differential is about 2% of the whole project.... ....Maybe for a ply on frame build with the strength in heavy framing and fasteners. Even then I would use epoxy as the amount in such a boat would be very small.  I understand that on a boat that size..no bulk heads etc. |
Posted By: otdrmn
Date Posted: 10 Jan 2020 at 11:13am
|
Yes I built it No I dont have it although it has recently been for sale (may still be), although she looks a bit rough around the edges now the hull is still as sound as the day she was built ------------- The 4 R's ~ Rods, Reels, Rifles, Rooting |
Posted By: OneWayTraffic
Date Posted: 10 Jan 2020 at 9:06pm
| That’s the truly outstanding thing about building your own. No need to hope or guess that it was done right. And by the time you’re done there’s nothing you could not fix if need be. |
Posted By: OneWayTraffic
Date Posted: 13 Jan 2020 at 9:43pm
|
Bit of progress over the last few days. Built a strongback to hold the jig. Set up the tunnel house that will be the boats home until it is ready to go on the trailer. Cut out transom, clamping boards, all of the frames and stringers. |
Posted By: OneWayTraffic
Date Posted: 13 Jan 2020 at 9:44pm
 
|
Posted By: Steps
Date Posted: 14 Jan 2020 at 8:58am
|
Coming inside the Waikato bar the other day, Im sure it was one of these anchored up near the 3 buoy from the bar.. didnt get a chance to get a pic.. Really tidy. |
Posted By: OneWayTraffic
Date Posted: 14 Jan 2020 at 8:57pm
Stringers glued up today after evening out some of the rough cuts with a power planer. I was using fast hardener so needed to work fast. 
|
Posted By: MacSkipper
Date Posted: 15 Jan 2020 at 4:41am
|
Enjoying thanks ------------- Good fishing trip nothing breaks, great trip catch fish. |
Posted By: OneWayTraffic
Date Posted: 15 Jan 2020 at 6:34pm
|
The stringers will need to be redone from scratch. I was using small medicine cups to mix epoxy, one for A and one for B then both put into a paper cup for mixing. With the small batches I was using the residue left in the cups was enough to put it off ratio. The epoxy has cured, but is too rubbery and not nearly strong enough. I can get a screwdriver in between them. $80 for a new sheet of marine ply and a few hours labour to fix it. Not really a big deal in the scheme of things. In the meantime I can use them in the jig, they don't get permanently installed until much later. First time I've screwed up a mix. I was using the dregs of the jug and the pumps weren't pulling. Next time I'll put it all in the same cup. Much easier. |
Posted By: OneWayTraffic
Date Posted: 17 Jan 2020 at 4:51pm
|
I've been a bit busy: Photos to follow soon (I write on the PC but use my iPhone for photos.) On Tuesday I screwed up the epoxy gluing the stringers. I took the day off on Wednesday to sit back and regroup. Got some other work done and asked a few questions on the Bateau forums about what to do. Bottom line: I can not trust the stringers, and the epoxy is cured very well in some places and others I could pick the epoxy off with my fingers. They will go to landfill. I will try to rescue the motorwell support braces at the back. So I ripped a board of 9mm (my last decent board) into strips roughly 125mm-130mm wide. I then tried to get my sad looking strips straight and parallel with a power planer and circular saw. No go. I did get within 3mm. This morning I went out and purchased a flush cut router bit. I used the straight edge of a sheet of 6mm ply to act as the jig and got it done. Amazing the difference the correct tool makes. Epoxy is on the way to CHCH, summer slow hardener, and I have bought a scale to do small batches accurately. Next job is to cut out the hull panels, splice them together glue up the stringers again, laminate the transom and set up the jig. |
Posted By: OneWayTraffic
Date Posted: 17 Jan 2020 at 4:54pm
  . Photos are of the best I could do with a planer and after the flush cut bit. Nice to have the right tools for the job. . Photos are of the best I could do with a planer and after the flush cut bit. Nice to have the right tools for the job.
|
Posted By: Steps
Date Posted: 17 Jan 2020 at 5:14pm
|
The post above you mentioned fast cure hardner 1st thing that crossed my mind was "why" 1st workshop rule of mixing is accuracy of measure.. this very much determines the strength of any sort of 2 pot mix.. epoxy, paint whatever 2nd rule.. when you think you have it mixed, mix that much again.... Using a fast cure is for small quick emergency fixes or specialist application only.. where small quick repairs are needed...a patch fix...and also compromises end strength days or sometimes weeks later. Both rules.. and appears you may have broken both at the same time... mistakes everyone makes at some time. Even when have been told previously. You have the good sense to do both at the same time  |
Posted By: OneWayTraffic
Date Posted: 17 Jan 2020 at 6:54pm
|
Fast cure was what I had leftover. I built my previous boat in winter. 24L with slow are on the way. I thought I’d get away with it if I mixed small batches. Evidently not. Combination of not enough epoxy in the jug for the pumps and not mixing both parts in the same cup. My bad and lesson learned. First time I’ve ever had a non cure. |
Posted By: OneWayTraffic
Date Posted: 17 Jan 2020 at 6:56pm
|
WEST epoxy strength is basically the same regardless of hardener. It was just too hot. I got impatient. Could have been worse.
Edit: just checked the data sheets. Slow has the advantage of slightly more elongation. But in most relevant properties they are the same. They can be used interchangably as well in any combination as long as they are the same ratio (5:1). Most important thing is to match temperature to hardener. I have used Fast in the summer before; but earlier in the day.
|
Posted By: ET487
Date Posted: 18 Jan 2020 at 7:37am
| Why don't you not using the West System 5 to 1 pumps? Small price to pay for getting the correct ratio everytime and slow hardener is the way to go. |
Posted By: OneWayTraffic
Date Posted: 18 Jan 2020 at 9:24pm
|
I have the pumps. Have a careful look at the photos they are there. I was using the last bit in the bottom of a jug. The tubing for my pumps doesn’t go all the way down to the bottom of the containers. If the pumps get air bubbles in the mix they don’t work. Moreover they need regular checks anyway so some manual confirmation is required. When I pick up my new order of epoxy the pumps will be back in business. Anyway hopefully sorted now. All the hull panels are cut out. Splicing them is next:one layer tape per side. Then getting the jig together and Gluing stringers and transom |
Posted By: OneWayTraffic
Date Posted: 18 Jan 2020 at 9:26pm
| ET487 is that a bowdidge boat? Wpuldbe interesting to compare plans sometime. |
Posted By: ET487
Date Posted: 19 Jan 2020 at 8:40am
|
Yes i agree you need regular cleaning of that pumps. I bought some clear plastic tubing from Smart Marine and fit to my pumps. They going right to the bottom of container now. I am busy to build the ET487 but it going slow as i do contract work away from home. Also do not have much photos of the build left as i dropped my phone into a watertank so most is gone. Last week i snapped my biceps muscle so not a good start for year either, lol but iwill get to the end sometime. Good luck with your build. |
Posted By: OneWayTraffic
Date Posted: 19 Jan 2020 at 7:17pm
|
So I've cut out all the hull panels. The bottom panel is two full sheets of plywood long (4880mm). The sides are in two pieces, lower and upper with a 150mm overlap. This helps to stiffen the sides, I'll install the upper side later after the bottom glass goes on. One oopsie on the cutting, circular saw grabbed and cut a little slash in the upper side panel. For now I've just patched the gap with epoxy, it will be covered up properly later. Didn't take a photo of that. The best way to cut large panels that need to be symmetrical is to screw two sheets of plywood together and cut them at the same time. Otherwise little differences creep in. I then used a power planer to tidy up the places where I cut outside the lines, rebate a little bit where I'll splice the panels and drilled some stitching holes along the chines and keel.  
|
Posted By: OneWayTraffic
Date Posted: 19 Jan 2020 at 7:41pm
| It doesn’t really show in the photos but looking at the hull panels makes it obvious. This will be a big 17’ boat. |
Posted By: OneWayTraffic
Date Posted: 21 Jan 2020 at 7:37am
Have a bit more information here. 260kg is the calculated hull weight: Okoume plywood, epoxy, glass (calculated at 40% glass content) and some fairing putty only. I will be running glass up the topsides (specs say only hull bottom) and will probably put another layer on the bottom. I'll also glass the sole with biaxial. I may or may not put a light glass (100 or 200g) on the cabin roof and other places. So add about 30kg there. I'm using Meranti for the hull panels and frames/transom. Add another 25kg or so. I'm planning to buy Okoume for the rest but may not. Add another 30kg-50kg for a couple of side benches(storage for tote tanks/ice box and leaning post for me. Add 50kg for rigging/steering/gauges/fishfinder/hatches/bunk cushions etc. Add 50kg for anchor and batteries, 20kg each for up to two tote tanks (full.) 20kg ice, fishing gear, food and drink and other misc. 150kg for a BFT, 125kg for a Marlin  , 400kg for a sword... or not. , 400kg for a sword... or not.110kg for a 60hp outboard,10kg for aux. Subtract 10kg for not putting the rear lockers in, and if I manage a better than 40% glass content. Possibly subtract more as I plan to build the cabin from 6mm ply glassed with a light cloth rather than 10mm ply. 85kg for me. 140kg approx for two/three others. (This could be more, but then it could be less.) Add that all up: 845kg, call it 850kg. That will put the sole right at the waterline, unless I raise the sole. There is room to raise it 2.5cm or more. The PPI is 350pounds, 160kg per inch. Cockpit depth is at least 640mm plus any coaming. Currently I don't really plan to raise the sole much if any. I will run elephant trunk scuppers out the rear, a bilge pump for leakage, and possibly side scuppers that will be plugged almost all the time. The side benches will be designed in a way that they act as temporary buoyancy chambers in the unlikely event of a swamping. |
Posted By: Steps
Date Posted: 21 Jan 2020 at 9:55am
|
850kg 60 hp use same 145 for hull constant 26 mph WoT Do you really need the extra layers? Laminating the areas highly exposed to sun could end up being a mistake in the long run. Considered using under gunnels as buoyancy chambers. Having them higher should aid to keeping the boat cabin up. (??) Which could also mean can foam fill.(?) And not loose any stowage space. you mention pumps/ volumetric dispensers. We used to measure out when hand mixing, by weight on scales to +/- 2gm. No bubbles , leaks etc. Keep in mind when doing so the volumetric weight , ratio required will be a little different to the weight ratio due to the specific weight of each component A mistake many painters etc have commonanly made. |
Posted By: OneWayTraffic
Date Posted: 21 Jan 2020 at 6:29pm
|
I rang adhesive technologies today re WEST ratios. 5:1 is fine by either volume or weight. Ideally by weight though 5.2 or 5.4 to 1 is better if I can manage that. There is more leeway being a bit resin rich than hardener rich. I used scale for todays job: splicing panels. Had to chuck a batch when I needed to change epoxy bottles halfway through the pour, when I had the pump screwed in the new jug, I added the amount I thought it would be by memory, but didn't trust it. It cured in the pot ok. Edit: My scale will auto off after a minute or so. Usually not an issue.
|
Posted By: OneWayTraffic
Date Posted: 21 Jan 2020 at 8:04pm
Glass on sole and sides, is purely for impacts while docking etc. Not required as such, but listed as an option, extra glass on bottom panels recommended if one is expecting to use more power than suggested, or if one is expecting hard and heavy usage. I think roller trailers on NZ roads may qualify  At this stage the cost in weight isn't particularly much, and the extra glass is a non issue. I bought a 50kg roll (more economical) so have more than twice the amount I need. I also have learned that adding glass will never be easier than now. At the end of the day it's my boat and I'll sleep better with a bit more glass than the minimum listed on the plans. No matter what I do it will still come out lighter than an equivalent glass or aluminium boat. |
Posted By: Steps
Date Posted: 22 Jan 2020 at 8:26am
I think roller trailers on NZ roads may qualify  You mean non keel wobblies? Thats maybe a though thinking right thru..At this stage rather than later. Old school keel boats where designed to take the weight on a keel roller trailer with side rollers there to keep even.. Correctly setup the side rollers should be able to just be turned by hand when boat not tied down. Wobblies on a non keel trailer , not positioned well on a keel boat can cause problems breaking the glass corrugations formed over the stringers, Stress on hulls between between bulk heads etc Modern non keel boats construction tends to be a bit different in placing of bulk heads and such match trailers or visa versa I had a minor incidence a while back.. new truck, hitch different height , loading on hitch too light. Moved the boat forward about 3/4" did not re set the side wobblies.. punched a very minor crack in the hull about 1" inside the chine, going over a speed hump. We leaked around 2 to 3L over a 8hr day. |
Posted By: OneWayTraffic
Date Posted: 23 Jan 2020 at 12:12am
|
I've given it a fair bit of thought. The designer assures me that:
I'm planning to either build a trailer to suit the structure of the boat, or if I get a trailer first, I'll put internal structure where the rollers are. At this stage of the build it's not a big deal to ensure that the stringer layers or chine laminations extend to where the rollers go. That would be 2 layers of 400g on one side and 3 layers total on the inside right on top of the rollers. At this stage I am leaning towards a 300mm wobble roller with one under the stringer and the other 100mm inside the chine, where I will have reinforcement. Keep in mind that your boat would have much more load on the trailer than mine. 6m glass vs 5.3m wood epoxy composite. |
Posted By: OneWayTraffic
Date Posted: 23 Jan 2020 at 12:15am
|
I went hiking today but spent a few hours at the end of the day splicing the other side of my bottom panels. I think I've done this side much better than yesterdays, where I will have some voids to drill and fill. They really only need to be strong enough to hold together while planking, but I don't want voids anywhere in this hull if I can help it. |
Posted By: OneWayTraffic
Date Posted: 23 Jan 2020 at 12:17am
 Voids visible, side underneath has glass on it. I should have butted the panels into some putty. 
Cleaned up and ready for putty and glass. At least glass on the other side acts as a scrim for the putty, and I can fill it later. |
Posted By: Steps
Date Posted: 23 Jan 2020 at 10:25am
|
Keep in mind that your boat would have much more load on the trailer than mine. 6m glass vs 5.3m wood epoxy composite. No 5.5m glass, not 6m I would not, regardless of what anyone says, rely on an extra layer of glass, or even more layers within reason to provide enough strength in a hull, between bulkheads .. even thu a stringer or chine very close. You are putting a sudden thump from a pot hole or a speed bump, onto a VERY SMALL area that has a huge impact properly going into several tons / per inch... and even more so if it is a keel boat on wobbles. Keep in mind a bottom hull impact strength is designed to take a hit on the same plane the boat is traveling in.. a glancing hit....a supporting wobbly is direct 90 deg impact. If want to strengthen for that, use plate steel. |
Posted By: OneWayTraffic
Date Posted: 23 Jan 2020 at 2:35pm
|
Several tons per inch? Given that the average roller should support about 25-40kgs that’s well over 10g acceleration. If that were the case in normal use no boat would survive a wobble roller. I’ll keep what you say in mind but at the end of the day it’s my call. I might give figlass or someone a ring. Anyway out to glue the transom. |
Posted By: Steps
Date Posted: 24 Jan 2020 at 9:18am
|
Several tons per inch? Given that the average roller should support
about 25-40kgs that’s well over 10g acceleration. If that were the case
in normal use no boat would survive a wobble roller. lets use the old example, a ladies stiletto shoe heel.. She may weigh say 70kgs, but the pressure on that small area of the heel.. from memory.. works out to around 10 ton ..maybe was 1 ton.. whatever thats a a huge amount of pressure. Now apply that to th every small area of hull, that is in contact with the top edge of a wobbly.... I put a small crack in my hull.. next to a chine cause hull was sitting just a little heavy on a wobbly.. not supported fully by the keel... in between bulk heads... and hit a speed bump... and even slowed down for it. And its not an uncommon repair. |
Posted By: OneWayTraffic
Date Posted: 24 Jan 2020 at 9:31am
|
Weight of boat on trailer ~700kg. Divided by 20 rollers =35kg per roller. Surface area on a roller 7.5 square cm. (rubber roller with the little flats.) That's about 5kg/cm2. Multiplied by unknown factors for impact, and a safety factor of 5 (for long fatigue life.) |
Posted By: Steps
Date Posted: 24 Jan 2020 at 9:54am
|
20 rollers.. now that makes sense... |
Posted By: OneWayTraffic
Date Posted: 02 Feb 2020 at 6:39pm
|
I haven't posted in a while, but have been busy. I had issues with some voids in my stringer and transom lamination, especially the stringers. The cause was basically uneven pressure and possibly not enough glue. Anyway, I bit the bullet, decided that the stringers would need to be redone (again!) and scrapped the transom as well. Cost for two more sheets of 9mm marine ply =$200. I'm hoping to salvage some of the scrap for the cradle when I flip it or cleats or something so it's not a total loss. This time I did what I should have done for the start. I used screws and plenty of them. Precoated both sides, spread the epoxy (thickened to at least mayo) and then used hand tightened screws in predrilled pilot holes. Worked a charm. Photos of new transom ready for last layer of 9mm ply. 
|
Posted By: Steps
Date Posted: 03 Feb 2020 at 9:03am
|
Anyway, I bit the bullet, decided that the stringers would need to be redone (again!) and scrapped the transom as well. Full credit plus more for that attitude..there are many projects, not just boats where ppl keep on keeping on .. then find at the end , nothing fits and strength etc is compromised. A extra mm here another there , espec in early stages, will end up having you tear your hair out later cause stuff doesnt fit... |
Posted By: OneWayTraffic
Date Posted: 03 Feb 2020 at 11:47pm
|
Yeah. I'm not too fussed about gaps in joinery or whatever but voids in a structural lamination? Not if I can help it. I'll accept pin holes here or there I suppose. I know some production boats come of the line with much worse if some of the pictures out there on the net are anything to go by. On the brightside, I'm a lot better at ripping straight cuts with a circular saw. Used a sheet of ply as a guide, and done. Easy as. |
Posted By: OneWayTraffic
Date Posted: 04 Feb 2020 at 12:26am
|
Couple of other things in my new transom: Clamping boards go right across, 4 layers of 9mm ply total. Will get glass both sides, one layer everywhere, plus overlaps and tape in stress areas and panel joins. I moved the rear scuppers. These will be just above the DWL over a sump for the bilge pump. Idea is that the pump deals with the normal stuff and the scuppers are emergency use only. They will get layflat hose or or something similar. Still thinking that through. I predrilled and filled with epoxy plugs holes for the outboard. The plugs are 30mm diameter, vs the 12mm bolt size. Plenty of wiggle room. Also filled the holes that will drain the motorwell. They will also be redrilled at a smaller diameter into the epoxy: No possible path for water to get to the wood. There was an annoying 5mm inwards bend in the transom after the first lamination. After a bit of pondering I cut a couple of kerfs, filled with epoxy putty, and screwed the transom flat to the old transom. No more bend. Then the last layer of 9mm on the top with glass to follow. The epoxy filled kerf should be stronger than the wood, and it's in the neutral axis of a sandwich, no strength issues. |
Posted By: OneWayTraffic
Date Posted: 14 Feb 2020 at 10:44am
|
After a bit of mucking around with stringers and transom I am starting to set up the jig. This method does not require the accuracy of a traditional jig, which is just as well. CNC cutting would be the only option for me if that were the case. To complicate things the ground is not perfectly flat. I checked with a hose pushed into duty as a water level. One end of the jig is 100mm higher than the other. That's about 1.5 degrees off horizontal. The strongback is as level as I can get it on the ground like it is, and I will make first measurements off that, and then adjust the frames so they are lined up. Hoping for +-3mm everywhere if I can get it. Photo of the first attempt. I quickly decided that was too high and lowered the frames 20cm so I can reach the keel. Room to get around it will be tight. 
|
Posted By: MacSkipper
Date Posted: 15 Feb 2020 at 5:43am
------------- Good fishing trip nothing breaks, great trip catch fish. |
Posted By: OneWayTraffic
Date Posted: 16 Feb 2020 at 11:27am
|
Well the stringers and transom are basically done, I am calling them done. Glassed over the transom top with two layers biaxial tape offset a little bit. Had to cut out a few voids in the first layer where it lifted. Filled with epoxy PB. Second is curing now. The jig is nearly complete, Frames A-E all lined up as accurately as I can, with a lot of measuring of diagonals. The ground is on a slight slope, so I am squaring off the strongback then checking measurements and adjusting so the notches lie even with the stringer (useful straightedge). I used the trick of drilling a 10mm hole in the frames at BL and CL and pushing a bike LED light into frame E. The light is visible through a hole clamped over the CL of frame A (Frame A doesn't go through the baseline.) |
Posted By: OneWayTraffic
Date Posted: 16 Feb 2020 at 11:30am
   
|
Posted By: OneWayTraffic
Date Posted: 23 Feb 2020 at 12:00pm
|
Deleted double posting. |
Posted By: OneWayTraffic
Date Posted: 23 Feb 2020 at 12:04pm
 Bit of progress yesterday and this morning. Bit of progress yesterday and this morning. Coated the inside of the four hull panels with a very very thin coat of epoxy. The idea is to prevent moisture absorption when it rains. It may be a while before I get around to the flip and I dont' want too much swelling. Fiddled around with the jig a bit, moved a frame left, then right, up then down. Then with help from my son we put the bottom panels on top of the jig. I checked the line up and then moved frame D up to meet the bottom panel. It is the hull panels that define the shape of the boat, not the jig. Finally I filled a few small holes in the transom, and put a generous fillet under the clamping board. I won't be able to see it once in the boat, so I want to be sure that there is no crack or gap for water to get in. It will also stop delamination and stress concentration at the edge.  I'll get the side panels on today if I can and then stitch them. Transom will go last, supported on a couple of blocks. |
Posted By: OneWayTraffic
Date Posted: 23 Feb 2020 at 10:09pm
  And it's all stitched, almost perfectly. Just a couple of places where there is a slight overlap. I'll have a play with it but use a Dremel if need be. And it's all stitched, almost perfectly. Just a couple of places where there is a slight overlap. I'll have a play with it but use a Dremel if need be.  Got the feeling that something is still missing though :)
|
Posted By: OneWayTraffic
Date Posted: 28 Feb 2020 at 10:06pm
|
Well the boat is now tack glued and the cable ties are gone. I went around the seams today with a electric planer, and over the glass tape with some sandpaper. For better or worse this is the hull shape. |
Posted By: OneWayTraffic
Date Posted: 28 Feb 2020 at 10:09pm
    
|
Posted By: OneWayTraffic
Date Posted: 29 Feb 2020 at 10:12pm
| Hey if you are reading this, click like on the posts that you like so I know that I am not just talking to myself. |
Posted By: MacSkipper
Date Posted: 01 Mar 2020 at 5:59am
|
interesting watching it take shape - liked ------------- Good fishing trip nothing breaks, great trip catch fish. |
Posted By: Steps
Date Posted: 01 Mar 2020 at 10:57am
|
Hey if you are reading this, click like on the posts that you like so I know that I am not just talking to myself.
All u have to do is keep tabs on the number of views on the thread... which is consistently growing with every new step Asking for likes is going down the FB popularity competition BS it is based on. |
Posted By: OneWayTraffic
Date Posted: 01 Mar 2020 at 1:05pm
| Didn’t think of that. It’s enough to know that I’m not talking to myself. |
Posted By: OneWayTraffic
Date Posted: 01 Mar 2020 at 1:11pm
|
Anyway got a bit of pondering to do. Need to put on the bottom glass. Some secondary bonding is unavoidable but where? At this stage looking at two layers of cloth overlapping at the keel for four layers there and running both down the chines. One layer will go right down; the other will stop about 5-10cm past the chine. The chines need another layer of tape per specs, as does the transom join. I can put it on first or save it for later taping over a chime sprayrail. Edit: just checked plans. Two layers total over the chines is fine. But the keel and transom, bow will need tape. |
Posted By: OneWayTraffic
Date Posted: 02 Mar 2020 at 8:14am
You know I never actually checked the number of views until just now. I often post photos etc on my iPhone, which recently seems to be struggling with the post window, major slowdowns. 3000+ views! I was actually thinking that I was talking to myself half the time. It's good to know people are reading, so I put more effort into the posts. Anyway I didn't have time yesterday to do much. I had covered the boat with plastic as showers were forecast Saturday. A good thing too as Sunday morning I get up and found that I forgot to put the chickens away the night before. Big stinkalicious piles of poo on the hull and jig. I also went around the boat checking the tack welds, and especially the sections where I taped the hull panels. Looking for voids and air bubbles partly and also trying to ensure a good secondary bond to the epoxy. I've been reading about adhesive bonding to cured epoxy especially. Technical information ahead. A good adhesive bond requires that the adhesive wet out the surface to be adhered to. For epoxy to wood it soaks into the wood and bonds that way. If the epoxy is still a bit tacky then no surface preperation is required. As the epoxy reaches final cure chemical bonding becomes less achievable though some may still be there after a couple of days. The typical method for a DIY guy like me to energise the surface is sanding. (Other methods include media blasting, peel ply and plasma treatment.) Wet sand and wash first to remove containiments, then a good rough up with 80-120 grit sandpaper. Sanding into the glass itself is sometimes unavoidable but not recommended as it removes sizing (coating that allows wetout) from the exposed glass. The photos of the glass tape show the shiny areas where I will need to get in there with a small bit of sandpaper before I glass over. The bonding layer is only about 6 molecules thick. A fingerprint is about 1000 molecules thick and residue from a breath is about 50 molecules thick. Even well prepared surfaces lose surface energy after a few hours, let alone days. Containiments interfere with the attraction between the liquid adhesive and the surface. If you are wondering how well a surface is prepared a water droplet test is simple and reliable. If the water beads up on a surface bonding will be poor, but if it wets into and spreads out on the surface bonding will be good. Obviously wipe with a clean paper towel before coating with epoxy.   
|
Posted By: OneWayTraffic
Date Posted: 04 Mar 2020 at 9:49pm
|
Bit of a detour in the build. I had noticed that a bit of rocker developed over station D about 1.5m in front of the transom. I swear that it wasn't there when I stitched it. Anyway the hull panels were lifting off the stringer there. After a bit of pondering and playing around with it, I decided to weigh down the hull at that point with a couple of upside down benches and tack glued the hull panels to the stringers. In a Bowdidge boat all the interior frames are glued in while the boat is upside down, then filleted and glassed after flipping. This enables a direct bond of the frames to the hull but breaks up the continuity of the inside glass. In a Mertens design the interior structure is removed and the whole inside is glassed in one piece. Then the frames and stringers are glassed in with secondary bonds. I'm not sure which is faster or stronger, but I can tell you that both designers prefer their own way.    |
Posted By: OneWayTraffic
Date Posted: 04 Mar 2020 at 9:58pm
After the weight. Flat as a pancake. The putty should lock it in place until I've glassed. I wasn't planning to, but I may add a couple of strakes purely to help keep the bottom in shape.  |
Posted By: pjc
Date Posted: 05 Mar 2020 at 7:11am
|
Hmm my way of thinking is to leave frames in place and glass/fill,removing of the frames,being flat ply,good chance of hull moving . helped a friend build a strip plank kaikatea hull,built over temporary frames,glassed outside first,turned hull over and fitted permanent bulkheads in before removing temporary frames,both inside and out glassed with tri axle cloth.
------------- Sex at 58.Lucky I live at 56 |
Posted By: OneWayTraffic
Date Posted: 05 Mar 2020 at 8:44am
|
Yes, the hull will need to be very well supported when I remove the frames. There will be an overlapping side panel, skeg on the bottom, all glassed. But I will need a very good cradle and tie the sides in somehow. Some on the Bateau forums use clamps with cables to stop the sides hanging out, and the rubrail is installed prior to flipping. On the other hand, the natural inclination is to follow the plans, which call for glassing the bottom with frames and stringers out. Most of the boats are built that way, though I know at least one of the OB17s was built by an Aussie who did it the Bowdidge way. If I had a set of Bowdidge plans for a similar sized boat then I could see some of the finer details of the way he does it, or if his forum was open to all to see. If anyone has those details, now is a good time to share them. MarkE? Scampy? |
Posted By: Ecko
Date Posted: 05 Mar 2020 at 9:41am
I'm reading with interest but have zero to contribute 
|
Posted By: Steps
Date Posted: 05 Mar 2020 at 10:13am
|
Like PJC.. Holding shape. Now I have never done this sort of thing.. sorta. When we popped large fiberglass items out of their moulds.. bus fronts, rears, rooves campervan bodies/ lids, baptismals etc.. If lifted right out they would sag (and distort slightly) all over the place like a unsupported plastic bag. So we never lifted them out till we got the internal bulkheads, framing bogged and glassed in to hold the shapes for final finish. Another thought.. way back in the day, as a kid (about 15/16yrs) we made canvas kayaks to do the Waikato and a few other rivers. Again we made the bulk heads, then cut the stringers to fit exactly and then fixed, individually. Doing so we got a very symmetrical shape. Anything not symmetrical would have resulted in a craft that would not go straight in the water. With that experience in mind, I would have cut the bulk heads, supported exactly lined up. Cut each of the panels then trimmed and beveled edges and tied to the bulkheads/ transom. At the end of the day they are your 'master' shape 'formers' This would then have near to closed joints.. then glassed to the bulkheads, then seams filled and glassed. I would not be moving anything until seams and bulkheads/transom are fully glassed "strength" think a glass boat skin.. it doesnt have that greater impact strength or need it. But does need bracing to prevent flex. I would be thinking more along the latter lines. |
Posted By: MarkE
Date Posted: 05 Mar 2020 at 11:17am
|
Tab the frames in place while upside down. Trying to fit them once the boat is flipped while not allowing any of the hull panels to move will be near impossible. ------------- Sea Strike 18' Centre Console - Under Construction.... http://www.fishing.net.nz/asp_forums/sea-strike-18-build-thread_topic87723_page1.html" rel="nofollow - Build Thread here |
Posted By: OneWayTraffic
Date Posted: 05 Mar 2020 at 1:02pm
|
I have some questions for you Mark: There must have been some places where the hull panels (that define the shape of the boat) did not sit nicely against the frames. How did you deal with this? Any concerns with hardspots with frames pushing against unglassed wood? The more I think about it the more I realise that I should have considered this earlier. The stringers, especially do not have any preparation on them to take a good bond. I also have box tape in places between frames and hull as in the bateau method you do not want to glue them in at this stage. A quick review of the specified method with photos of a C17 built ten years ago. Hull panels left in with temporary glue spots for the flip on to a cradle to support the hull. Cradle is prebuilt on the upside down hull to fit it exactly.  Then the interior is removed and the inside glassed in one strong continuous lamination.  Then the structure is put back in. Stringers first, then frames.  I know this method works and works well. I also know that some builders struggled with supporting the hull properly. I presume the Bowdidge method also works, though I don't know all the details. I have a few months to ponder it through. I would probably rather do it the Bowdidge way, but I never stray from the plans without a lot of homework and thinking. |
Posted By: otdrmn
Date Posted: 05 Mar 2020 at 1:18pm
|
I think i posted this earlier in the thread but here is a video by pictures in sequence of my OB17 build It answers a lot of your questions - re taping, frames in out on flipping etc etc ------------- The 4 R's ~ Rods, Reels, Rifles, Rooting |
Posted By: OneWayTraffic
Date Posted: 05 Mar 2020 at 2:04pm
| Cheers, I see that you followed the specified method. Did you have any issues with the hull falling out of shape? I suppose the bottom strakes would help substantially? |
Posted By: otdrmn
Date Posted: 05 Mar 2020 at 2:59pm
|
No significant issues - you'll see the piece of timber and straps holding the side in position to stop them pulling in / out. IMO - if the hull is well glassed (outside) and caution is used to turn the boat then there shouldnt be an issue. Benefit is that you can then glass / tape the seams in full lengths
------------- The 4 R's ~ Rods, Reels, Rifles, Rooting |
Posted By: Steps
Date Posted: 06 Mar 2020 at 9:16am
|
You cabn also brace very well with temp diagonals acrosse the gunnels and chine tio gunnels. Before we used to pull the old wooden frames out of vintage car bodies, we would square them up and weld bracing to maintain shape. Then strip them to repare bodywork and put in new frames. As mentioned above, if you turn or move , and its sags or moves out of shape, it will be a ***** to get back. Thu if turned and it is braced and when measure up, find it needs a tweek, its not hard to do if think about the triangulation well before hand. Dont even think about moving without at least the gunnels braced diagonally in several places. |
Posted By: OneWayTraffic
Date Posted: 06 Mar 2020 at 10:55am
|
I'll tab in the frames to the sides for the flip, build a cradle to fit the hull while upside down so I know the correct shape. I've been wrestling with some changes in the panel shapes recently. Humidity changes swelling the wood, causing some uneveness. The inside has a very thin coat to prevent this, but the outside is still bare. I'm hoping that I can coat it tonight, then glass tomorrow while the epoxy is still green. |
Posted By: OneWayTraffic
Date Posted: 08 Mar 2020 at 4:45pm
|
When I started this build I told myself two things. 1. That I'd do the best job that I was capable of considering my experience at the time. 2. That I'd post the bad and the good online, so I could get reliable advice. Brag posts are for my Facebook page. So I had a bit of a setback during the hull glass layup. I've layed up glass before, but never so much. Anyway day dawned fine and hot so I got into it. I had decided to glass one side of the boat at a time with secondary bonding along the keel. One layer 400g along the bottom running down the hull side. Glass isn't required all the way down the side. A second layer on top. Wet on Wet  So I started. Cut out the first layer of glass, and got it wet out in about 3 hours. It got hot, probably about 35 degrees C pushing 40 in that tunnel house. Even with WEST Slow I had to hurry at times. That layer actually wet out ok. There were a few air bubbles here and there, but nothing to cry about. After finishing at about 2pm I was buggered. So I went inside and took a break. I was beginning to feel the heat, which may explain why I left my bubble buster roller outside rather than in the container of acetone.  Anyway time for the second layer. The first layer was barely tacky by then and I was beginning to worry about getting wet on green without sanding. So after considering whether I should just stop at one layer for the day, I started being in "get 'er done" mode. Mistake.  The problems started almost immediately. I managed to get the glass spread out fairly smooth with a bit of wrestling. But as soon as I started wetting out, bubbles! A lot of them, mostly small buried under the glass. I tried pushing them out with a lot of force from the squeegee, but I really needed that roller! So anyway 7pm done, quick shower and off to a restaurant for tea. This morning I drilled out all of the bigger bubbles, injected epoxy in those that I could, filled the weave with epoxy thickened to ketchup consistency and put a first light coat of fairing on the sides. But the more I look at the remaining bubbles the more it bothers me. I think that they aren't a structural issue, due to the first layer of cloth laying down well. I am worried about water getting in. I know now how to prevent most of this happening again: Fill the weave between layers, and apply in the pm when it's cooling down. But I have a bit of pondering to do. Photos to follow.
|
Posted By: OneWayTraffic
Date Posted: 08 Mar 2020 at 5:49pm
  
|
Posted By: OneWayTraffic
Date Posted: 08 Mar 2020 at 5:51pm
| Photos show a couple of the worst spots but there are others. I’ve already drilled out anything bigger than a 20c coin. These are all smaller usually only a few mm across. But so many of them. I think I see some drilling and filling in my future. |
Posted By: OneWayTraffic
Date Posted: 08 Mar 2020 at 9:02pm
|
A lot of air bubbles around the bottom to transom overhang as well. I put a radius on but should have done twice as much. I got some of the glass to lay down, but not all. Being my own QA, I am currently thinking that I will reject that job and introduce the layup to my Saw-max diamond blade. Then a belt sander, much bigger radius on the corner and retape with some generous overlaps.
I will mull it over a bit first, but that joint is very important; it needs the best work possible and currently that's not on it. One of the reasons I chose to build rather than buy is I like solving interesting problems, and I wanted a challenge. Well I have no shortage of interesting problems so far, but each step is a step closer to launch. |
Posted By: MacSkipper
Date Posted: 09 Mar 2020 at 5:59am
|
please post lots of pictures on launch day will be very satisfying!! ------------- Good fishing trip nothing breaks, great trip catch fish. |
Posted By: Steps
Date Posted: 09 Mar 2020 at 8:52am
|
Bubbles between the glass and the wood is not good.. Yes A roller.... The main cause will be laying up in temps way too hot if in the past hasnt been an issue..add to that no roller and on your own. The bubbles between the glass and the wood will be very prone to moisture seeping in over time the simply delaminate the lot. Only real fix is to get out the grinder/ heavy sanding disk, and take it all off A lot of air bubbles around the bottom to transom overhang as well. I put a radius on but should have done twice as much. I got some of the glass to lay down, but not all. Air bubbles around cnrs with suitable radius is not so much a 'bubble' issue but bit a stiffness due to glass not fully wetted out and or the resin curing a little too fast .. high temps , on your own etc. If the radius was minimin , hot temps, on your own no roller, yes chances are that is what will happen.. Always radius more than what you think, inside and outside radius' Wet out areas before laying up, this helps adhesion and bubble issue... inside cnrs you may have to build up with filler, and if need a very tight inside cnr, wet cnr out, then lay full length chop stand rovings into the cnrs... then lay up. |
Posted By: OneWayTraffic
Date Posted: 09 Mar 2020 at 10:48am
|
I'm buying a belt sander this week. I can borrow a grinder but I think I'd prefer the belt sander as I'll have a bit more control, and the wife will be happier if I make less mess. Grinder is a backup. I don't think I need to take off all the glass, but by the time I'm down to a surface I'm happy with it may be pretty close to all. Certainly over 90% of the second layer is suspect, so the rest of it will probably go as well. Lesson learned. One of the kids in my class asked me why I didn't stop. I told him that I was hot and tired and made some poor decisions. AKA I was stupid. |
Posted By: OneWayTraffic
Date Posted: 03 Apr 2020 at 10:23am
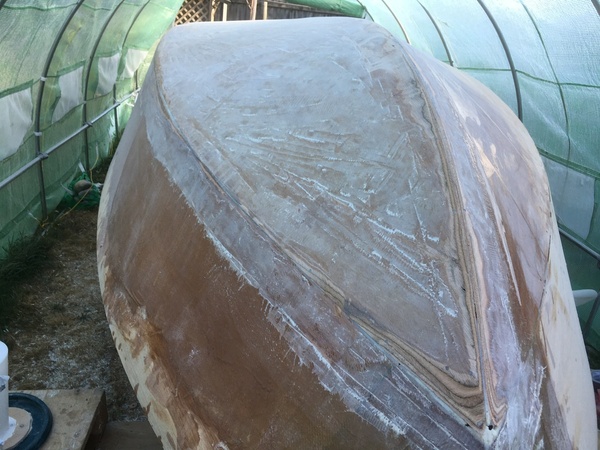  Brief update. Tried the grinder and a heavy sanding disc. I did not like it at all. The amount of dust kicked up was phenomanal. So switched tactics and bought a power planer from the Toolshed with Tungsten Carbide blades. This was a lot better. Pictured is my planer with my dust collection. The vacuum hooks into the top of the cyclone on the bucket and sucks the dust through the side. 99% of the dust can't follow the air and gets left in the bucket. I'm taking it down to wood along most of the chine and keel, and removed about 95% of the bubbles on the rest. I'll touch it up over the next couple of days aiming to get all the rest of it and then move to taping the seams. This probably wouldn't have happened if I had had a workshop to build in, or one of those shelter logic carports. What I get for being cheap but what's done is done. I'm a bit concerned about glassing over it. The surface is not as fair as it once was, so there's bit of sanding and filling before I can glass again.
|
Posted By: OuttaHere
Date Posted: 03 Apr 2020 at 10:53am
|
Looks like good progress?!
EDIT: If it went perfectly the first time I think it would be less satisfying when it was all said and done. I've had a few projects before (none as big as this) that have required significant re-work, and while its frustrating at the time, I think it adds to the end result in a strange way.
|
Posted By: Motorhead
Date Posted: 03 Apr 2020 at 1:06pm
|
OWT, How have you found the Trade Tested tunnel house as far as cost, suitability and ease of use? Would you use the same again or invest in something different? |
Posted By: OneWayTraffic
Date Posted: 03 Apr 2020 at 3:00pm
|
I actually got mine from Steelmates, bit cheaper at the time. Here’s what I think: Pros: cheap and went up in a day. Has sat through some pretty stiff wind and is still there. I have some rocks on it to hold it down. Fairly robust for what it is. Cons: The sides curve in, this helps the structural aspect of it but is a real pain if you are to close to the side. You will get a sore neck from bending over. It’s 3m wide but this is at the bottom. I’ll need to move it when working on the other side. Leaks a little when it rains through the seams. Drys up fast though when the sun comes out. Overall you get what you pay for. Better than the Supercheap carports but a distant second to a garage. I’d buy it again but only because I have no better options. |
Posted By: Bounty Hunter
Date Posted: 03 Apr 2020 at 4:01pm
|
ahh well - it's all part of the fun - and gaining valuable experience along the way
as long as youre consistently at it, youll have it done before you realise. i like to remember - 'never go to sea in a boat that was launched on time or on budget'
------------- No disintegrations! |
Posted By: Steps
Date Posted: 03 Apr 2020 at 4:03pm
|
You will find once u have sanded back , and with belt sander far better to 'block off' flat ..re laying will go fine. We all started in primitive condition once upon a time.. My 1st car resto was on a scoria floor shed...with power from a extension lead off the house... M8 you are doing fine, and most of all learning a skill.. no many skills that relate to a huge number of projects .. from plastering walls on a house reno, finishing body work on a car or boat or airplane.. |
Posted By: OneWayTraffic
Date Posted: 03 Apr 2020 at 8:30pm
|
Sadly I don't have a belt sander. I have a random orbital, grinder, power planer, multitool and a hand sanding board. I was planning toborrow one from school, but I am not allowed to go there with Covid19 going on. I'll do what I can with what I have. People are dying out there, so I won't complain about not having a belt sander. The main thing is that the glass goes down tight and strong and the planing surface is flat and smooth. There are a few places where not much glass was taken off, and others where I'm down into the first or even second ply of the core, so they will need smoothing. I spent over an hour today on the RO sander, and am happy with about 99% of the bottom. I'm sure I've missed a few bubbles, but not many and nothing bigger than 1mm.
|
Posted By: OneWayTraffic
Date Posted: 03 Apr 2020 at 8:31pm
| The sides another story, but the side glass is not really for strength so it can stay as is for now. |
Posted By: Steps
Date Posted: 04 Apr 2020 at 9:02am
|
I have a random orbital, grinder, power planer, multitool and a hand sanding board. Hit the majority but dont take quite all the way down with the grinder/ disc sander. So the scratch/ grooves nearly touch and do just touch the bottom intended level occasionally Then again with afiner sanding disc. Then finish with orbital.. There are a few places where not much glass was taken off, and others where I'm down into the first or even second ply of the core, I dont understand why get into the ply core? This is your guide level.. a no no to go into this You only need to take out resin dry and poorly rolled out areas.. then feather those edges and lay back up those patches. To get a good finish surface just block back the high spots, a little resin/talc filling for minor low spots. If not used to being able to run your hand over a surface and feel minor inconsistencies, lay a bit of newspaper on the surface, and move your hand along with the newspaper with your eyes closed.. Old new apprentice trick in panel shops. I'm sure I've missed a few bubbles, but not many and nothing bigger than 1mm. I know you dont intend this to be the most perfect possible in the world build... Attitude to a build , build anything , is the critical issue...taking care of the minor details, measurments, double and triple measure , check , assume nothing, dumby fit up .. Generally ppl think , "havnt the time .. blah blah." type of thing Taking that time has every panel perfect fit, every lay up go right (and if isnt, stopped and re thought very early This then results in far less triming, finishing work , or ripping apart start again stuff... which makes those who do work like this seem to work quick and finish nice.. far more cleave with their hands than what seems. Its the attitude to everything on a build from clean tools , having good electric cable lead to get to the other side stuff... the little stuff. This is not my take.. it is the take the best advice every given me consistently by craftsmen that I have met and worked with over the decades. I remember as a kid my grandfather saying to be when he was building a small garden shed (no kitsets in those days) "Make sure (building anything) the foundations are perfectly square level to the smallest mark on your rule. (used to be 1/32) If not when get to the top of the wall you will be 1 inch out , lok wrong out of square and nothing will fit right.." 99% of a build quality and how well/ smooth it goes is attitude |